
Learn how to make fun and festive pie crust designs that will take your homemade pies to the next level with this easy-to-follow tutorial and video. Get your pie dough ready!
I love making pie. You know this. But I didn’t just wake up one day and know how to make one. My first attempts at homemade pie weren’t exactly cookbook cover-worthy. You want to know the hardest part of making a homemade pie? The hardest part is finding the courage to start. And once you do, you’ll wonder why you didn’t begin sooner. Nothing is more satisfying than making a pie completely from scratch. Until, of course, you eat a slice.
But Sally… you might be saying… my pies will never turn out pretty! To which I say, nonsense! 😉
The pie crust designs on this page look pretty and professional because I’ve practiced so much over the years. We all have to start somewhere, and work our way up to artistic pie masterpieces. All you need is the willingness to practice, and a really good tutorial. If you’re willing to provide the former, I’ve got you on the latter. You CAN do this. Read the step-by-step instructions and watch the video tutorial below, then power up your confidence and flour up your hands.
Here’s What You’ll Find on This Page
- The Best Pie Crust to Use
- 5 Success Tips for Pie-fection
- Tools You’ll Need
- My 4 Favorite Pie Crust Designs
- Recipe Card Video Tutorial
- 3 More Designs Below the Recipe
The Best Pie Crust to Use
This is my favorite, tried-and-true pie crust. It’s buttery, flaky, and holds its shape in the oven. But if you prefer an all butter pie crust or want to use store-bought dough, that’s fine too.
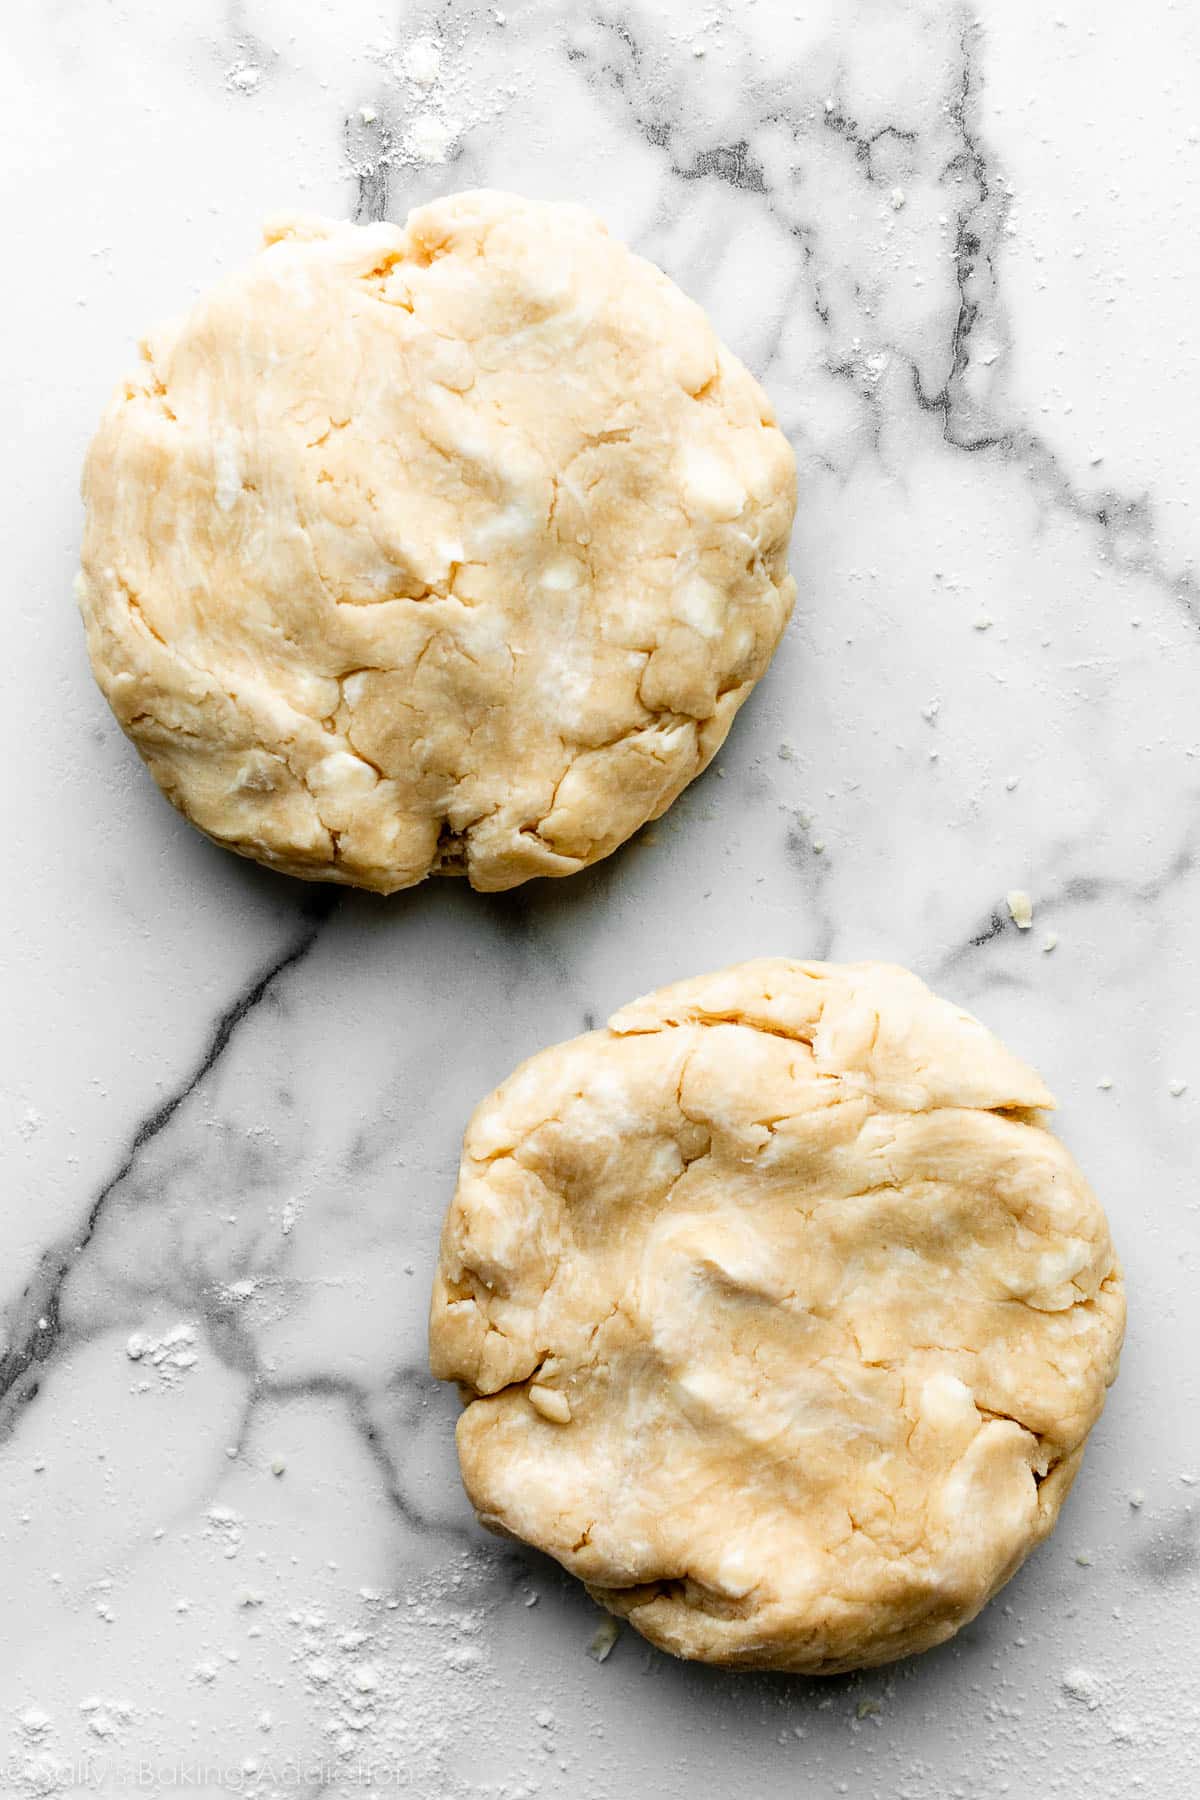
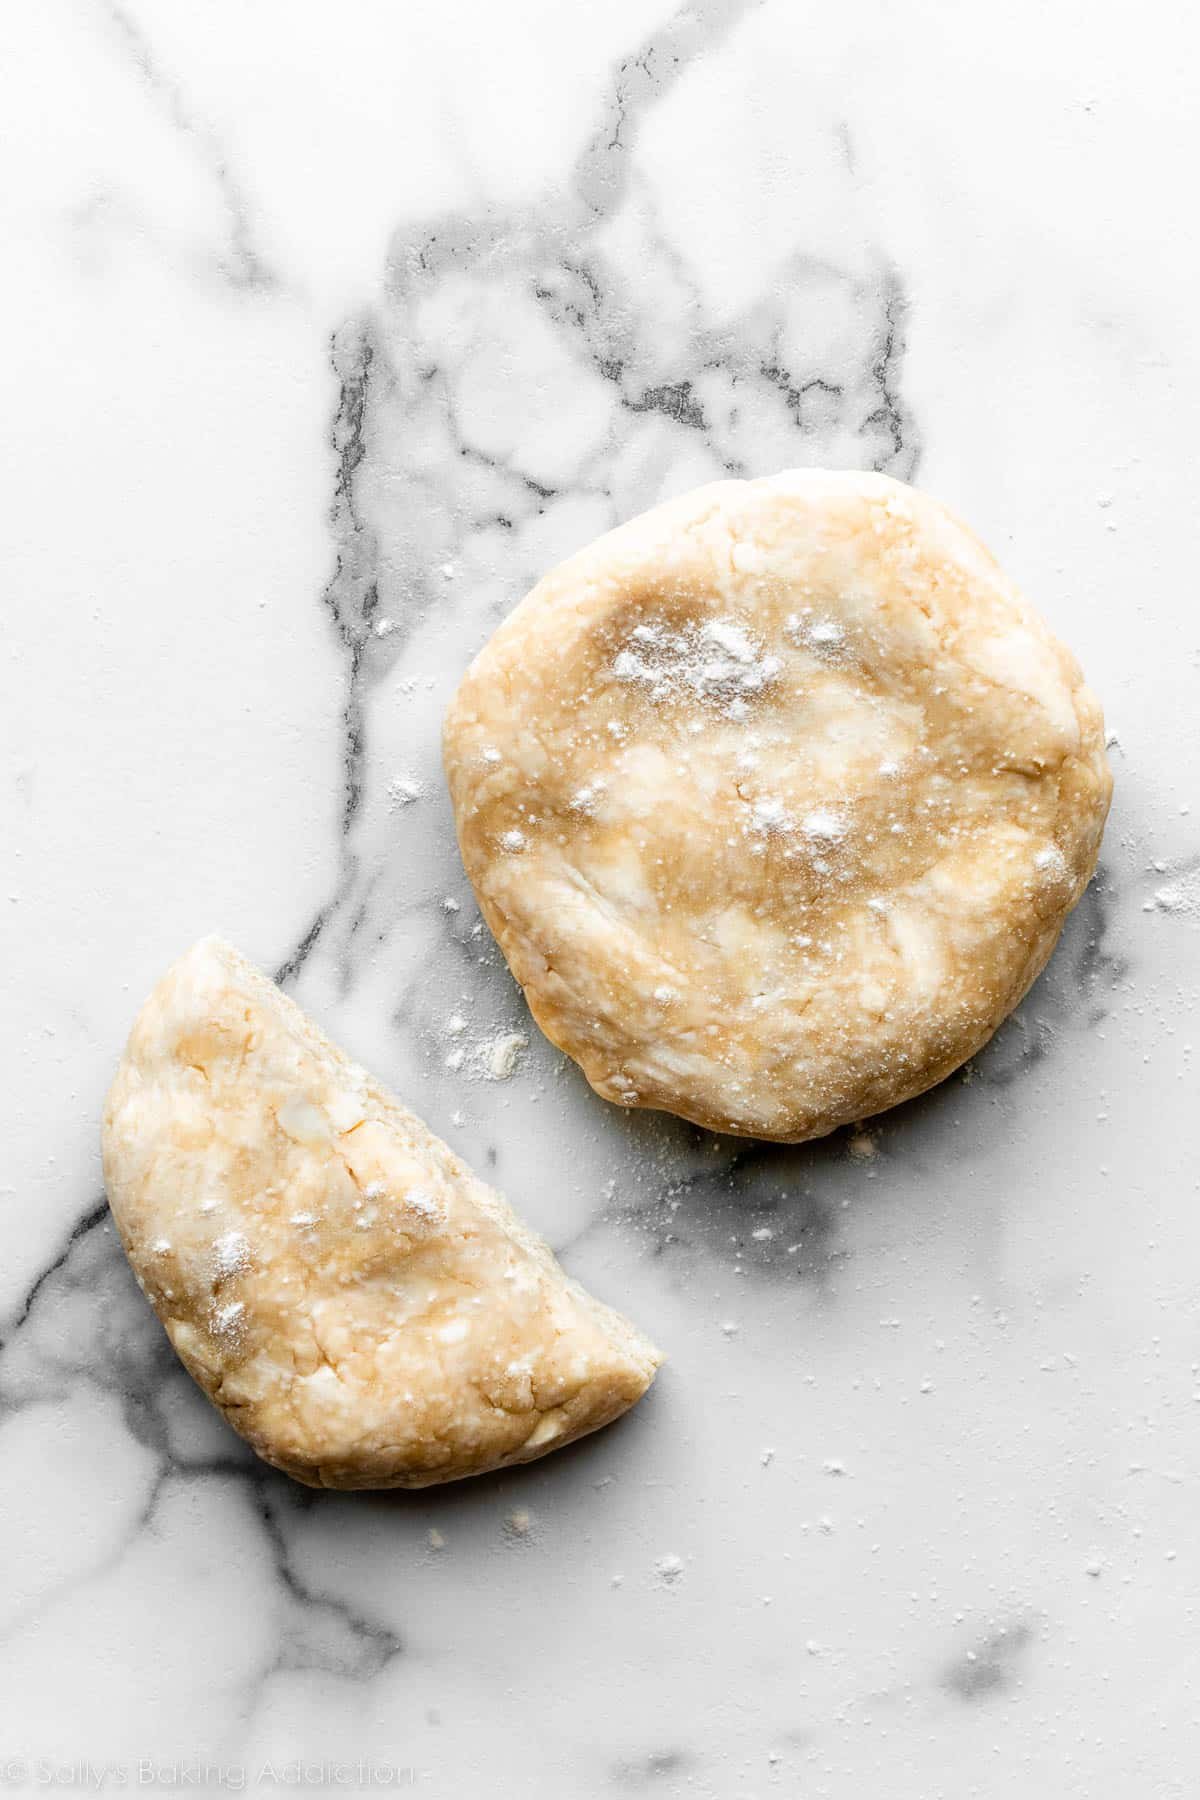
Both of the above linked pie crust recipes make 2 pie dough discs, which is enough dough for 2 pie crusts—either for a double-crust pie or for 2 separate bottom crusts (like if you were making 2 pumpkin pies). The pie dough discs need to chill for a couple hours, so I always make them a day ahead.
Before I show you 4 unique pie crust designs and walk you through the techniques, here are 5 tips that will help you pick up that rolling pin.
5 Success Tips for Pie-fection
1. The hardest part is finding the courage to start.
It’s time for another pie pep talk! Like I mentioned before, the hardest part about working with homemade pie dough is actually mustering up the courage to work with homemade pie dough. It’s easy to resist something if it intimidates you, but something (anything!) has to start somewhere, right? Such is the case with nearly any goal or dream we have. You’ll practice, it will feel daunting, you’ll practice some more, you’ll improve, you’ll succeed. YOU CAN DO THIS!
2. Use a quality pie crust.
You’re ready to begin making pies from scratch, so don’t sabotage your efforts with a lackluster crust. Pie crust is essentially 3 things: flour, fat, liquid. It’s the types of each and the ratios that make a real difference. My beloved pie crust recipe hits the mark. I mix butter and shortening together for the best flavor and texture.
3. Keep everything COLD.
Keeping your pie dough as cold as possible helps prevent the fat from melting. If the butter melts inside the dough before baking, your pie crust will lose shape in the oven. The sides will shrink down and, even worse, the crust will taste greasy instead of tender and flaky. Basically any design you arranged on top of the pie will shrivel up. Remember this: the colder the pie is before going into the oven, the better your pie will taste and the more your pie crust will hold its shape. Keep your filled pie in the refrigerator while you’re rolling out and cutting the dough for the top. You can also place the completed unbaked pie back in the refrigerator before putting it in the oven—a good idea if you’ve taken your time to make an intricate design and the dough has warmed up in the process.
4. Add some sparkle and shine!
An egg wash—a simple mix of milk (or water) and egg—creates that golden sheen we see on bakery pies AND it even gives the crust a little extra-crisp texture. Without the egg wash, the pie crust will brown but will look extremely dull. For a little sparkle, I always sprinkle pies with coarse sugar prior to baking. Gives the top a lovely sweet crunch and looks pretty, too.
5. Take your time and have fun.
Always take your time when working with pie dough. It’s not a race! Treat the dough with a little TLC. You are not angry at the pie dough (but maybe you are LOL). Don’t roll it out too forcefully or rush through a decorative topping. Set aside enough time to really concentrate on it. Put on some music or invite some friends or family to join you, and enjoy the process. I promise it’s worth it!
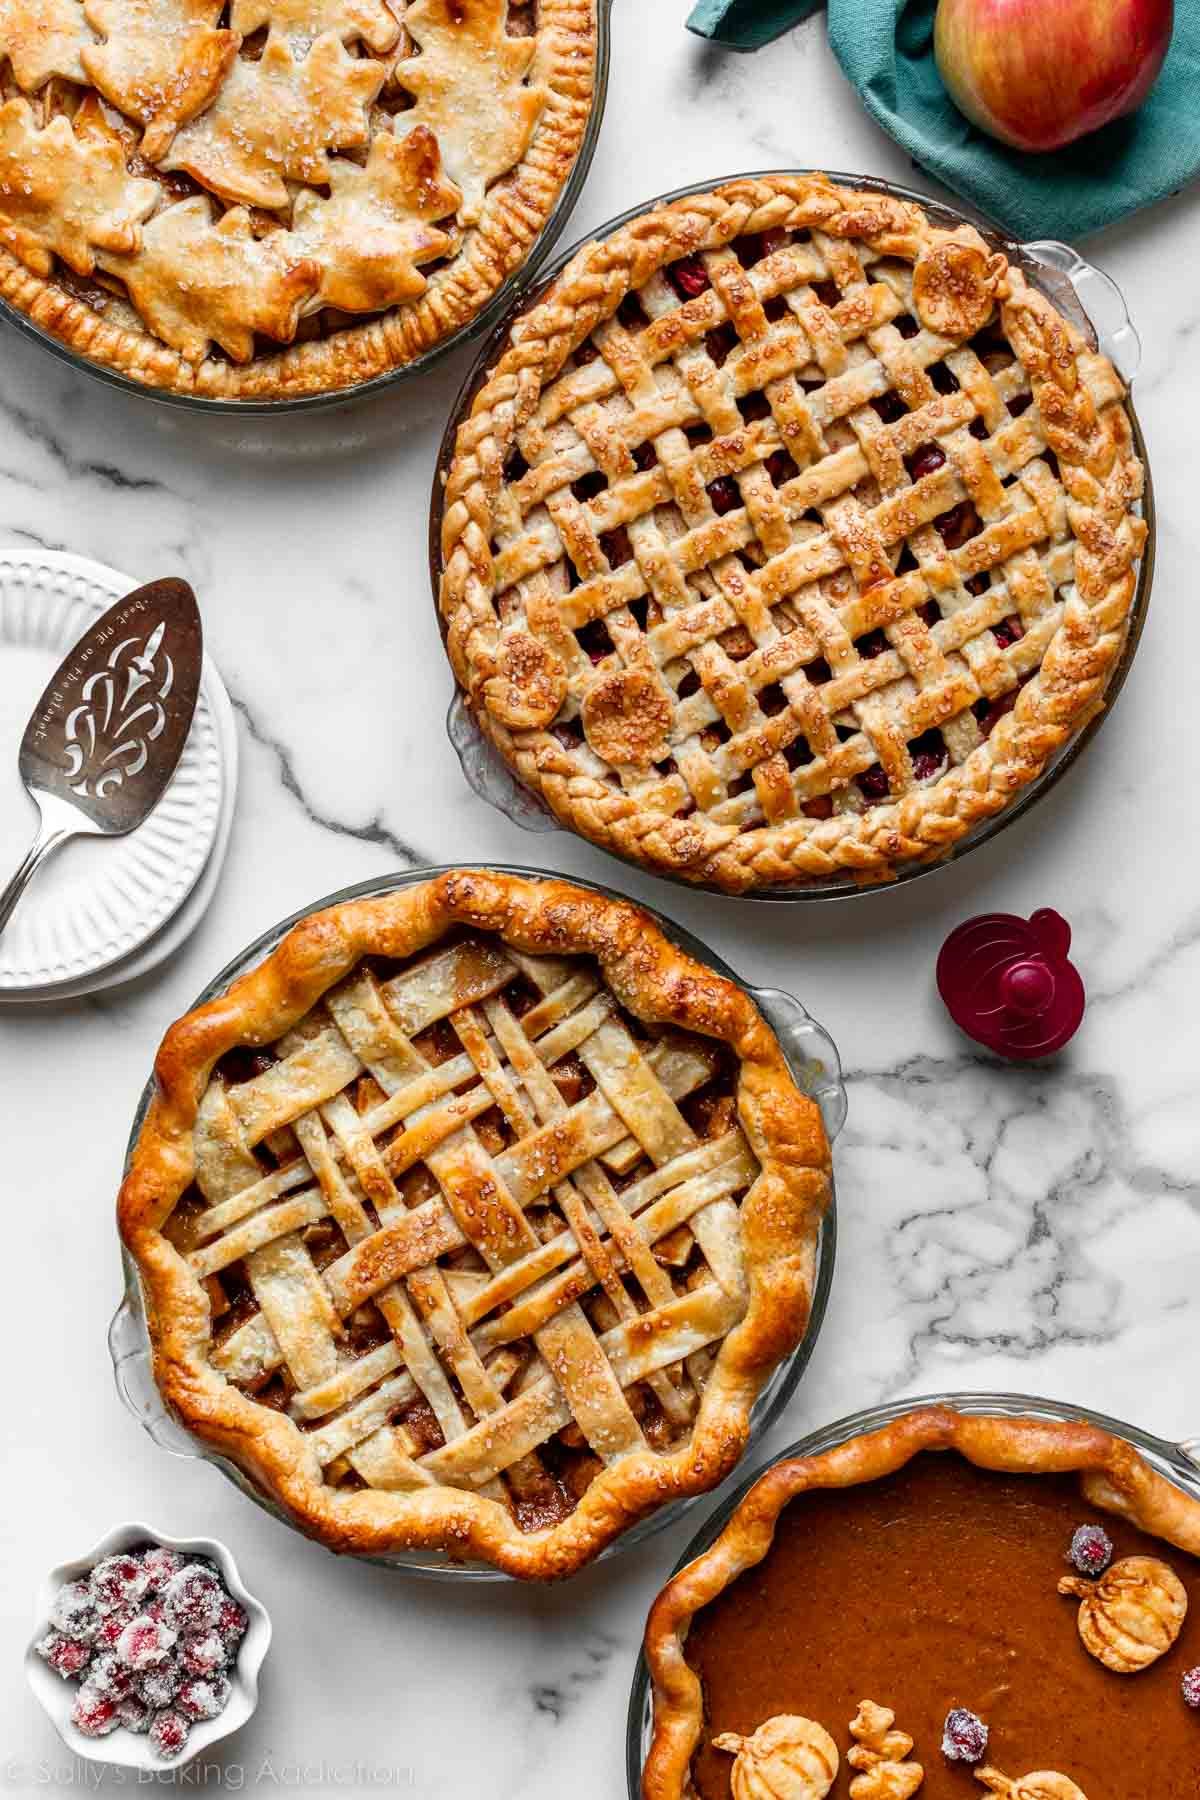
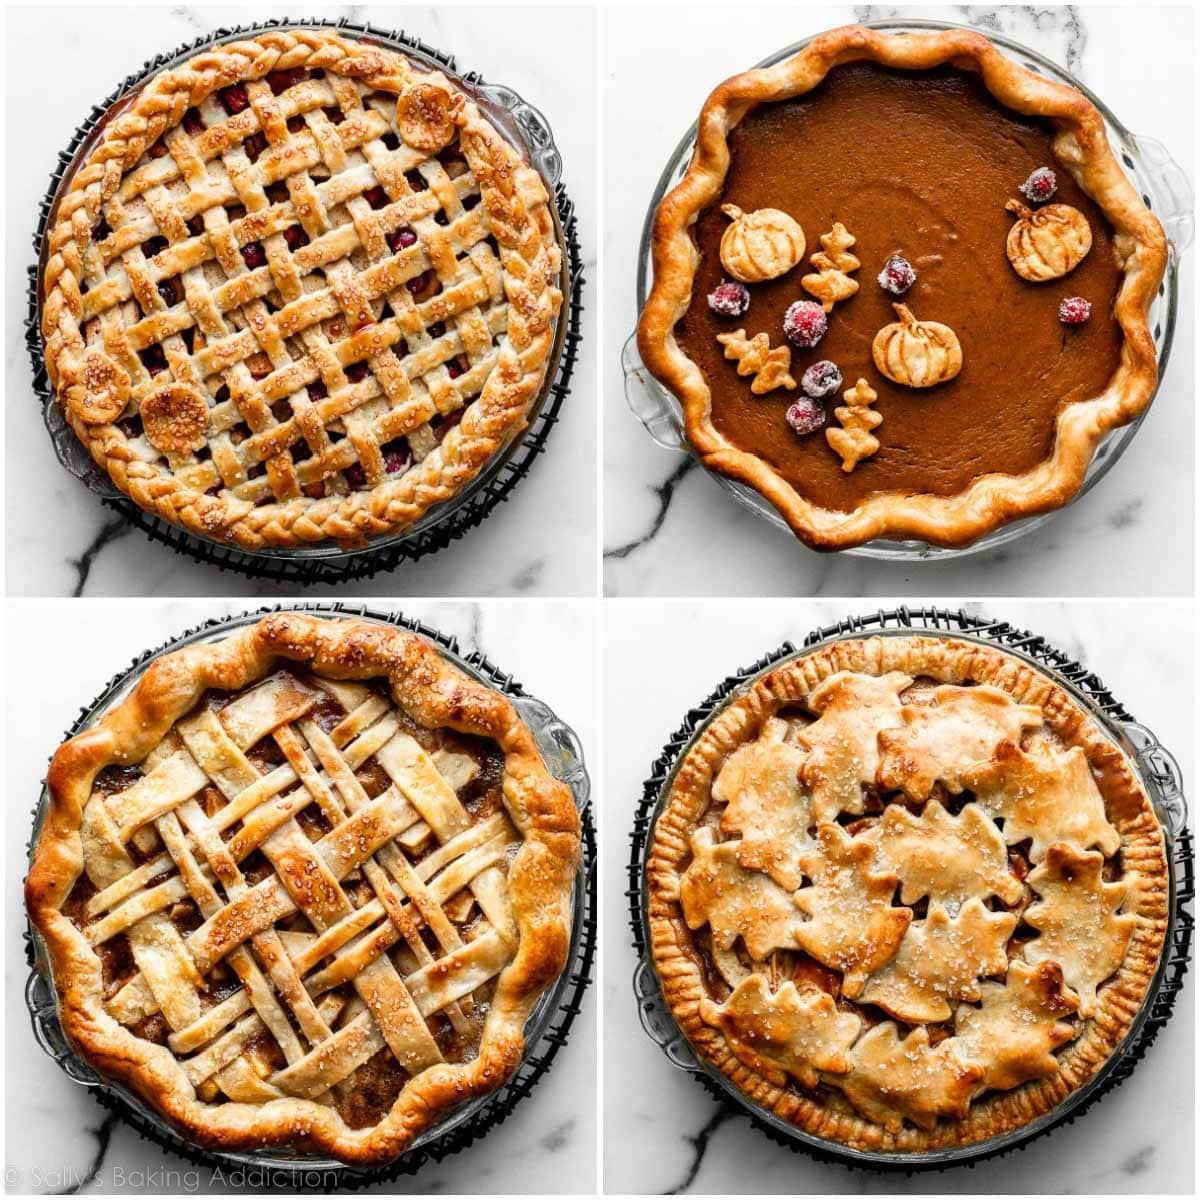
Here are the 4 pie crust designs I am teaching you today:
Tools You’ll Need
Each of these 4 different pie crust designs require a:
Once you have your tools and your bottom crust filled and ready for a top crust, it’s time for the fun part! These are my 4 favorite pie crust designs, and how I make them. Note: The video shows only the first 3 designs. I just added the 4th design because it’s really easy, yet makes for a show-stopping presentation, especially during the autumn months.
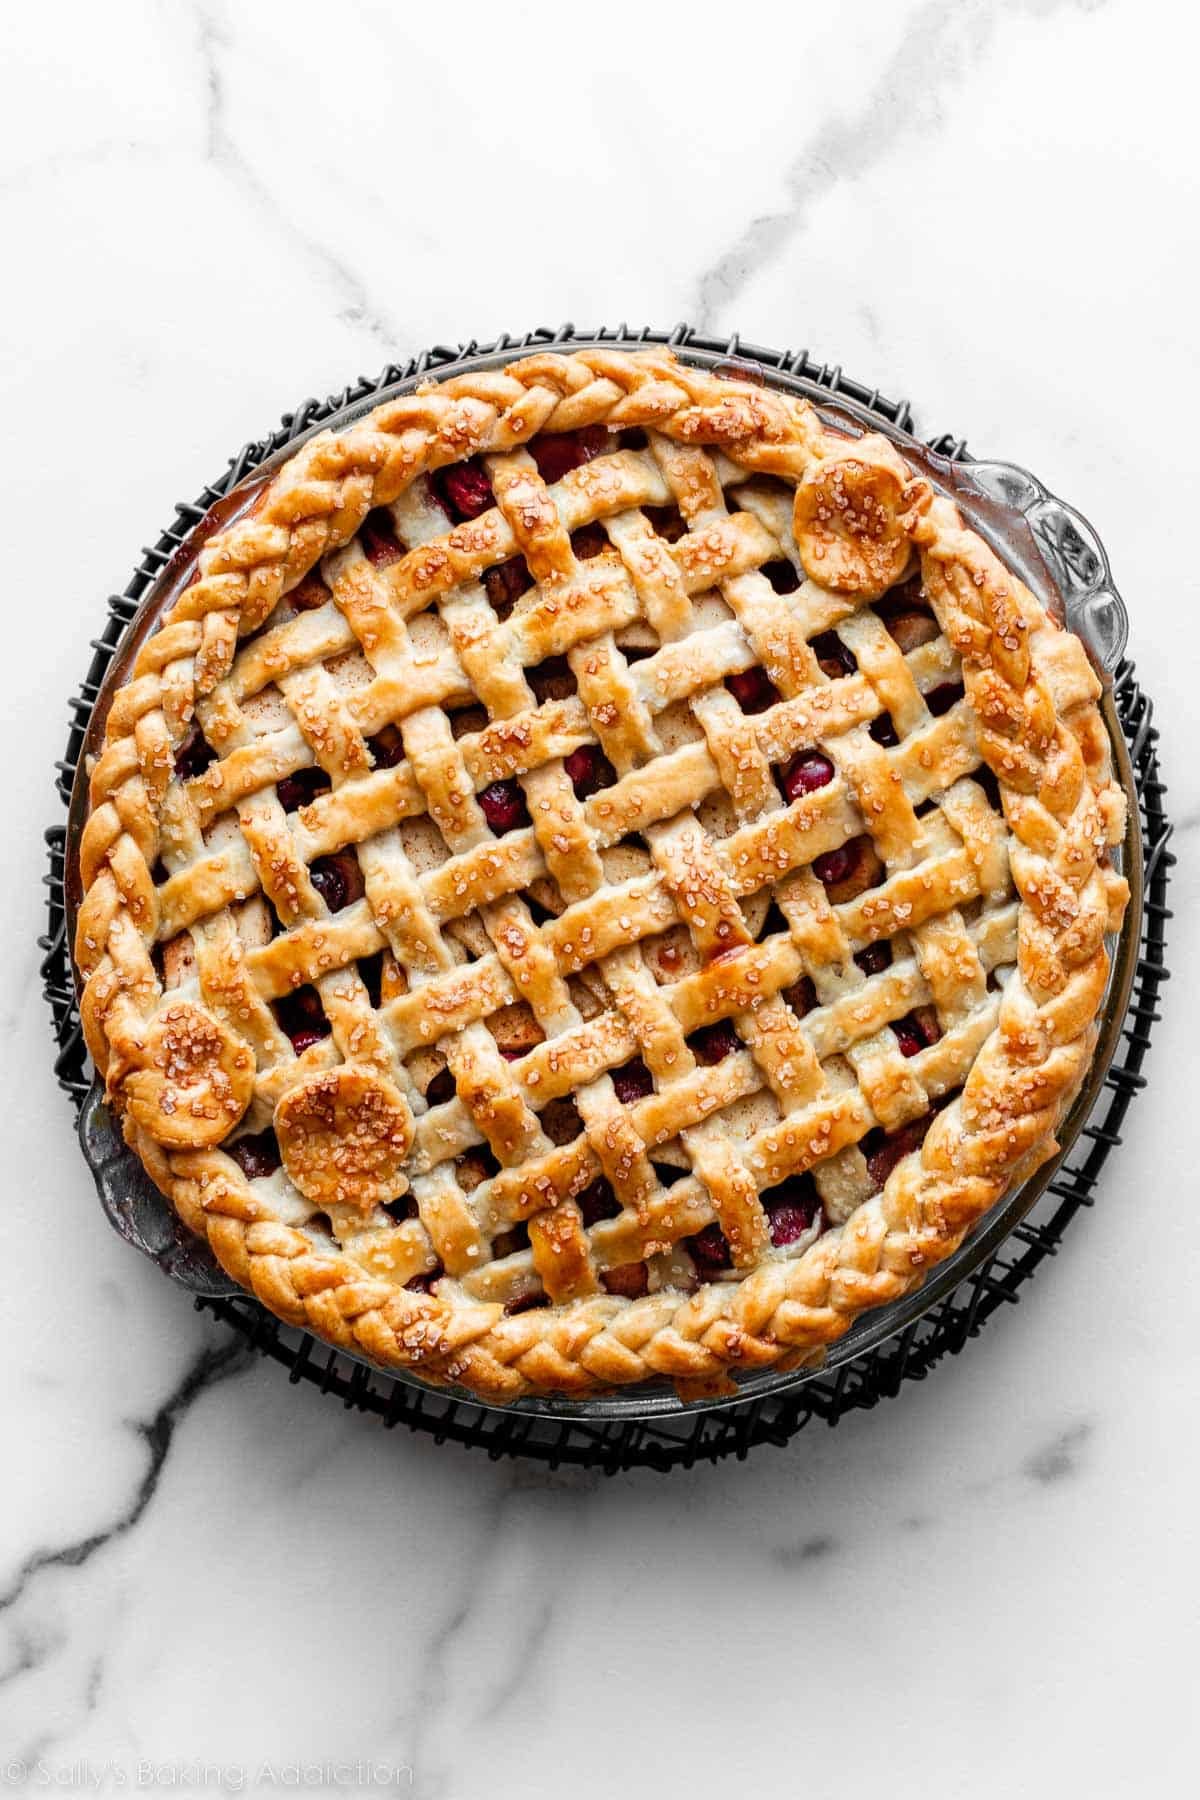
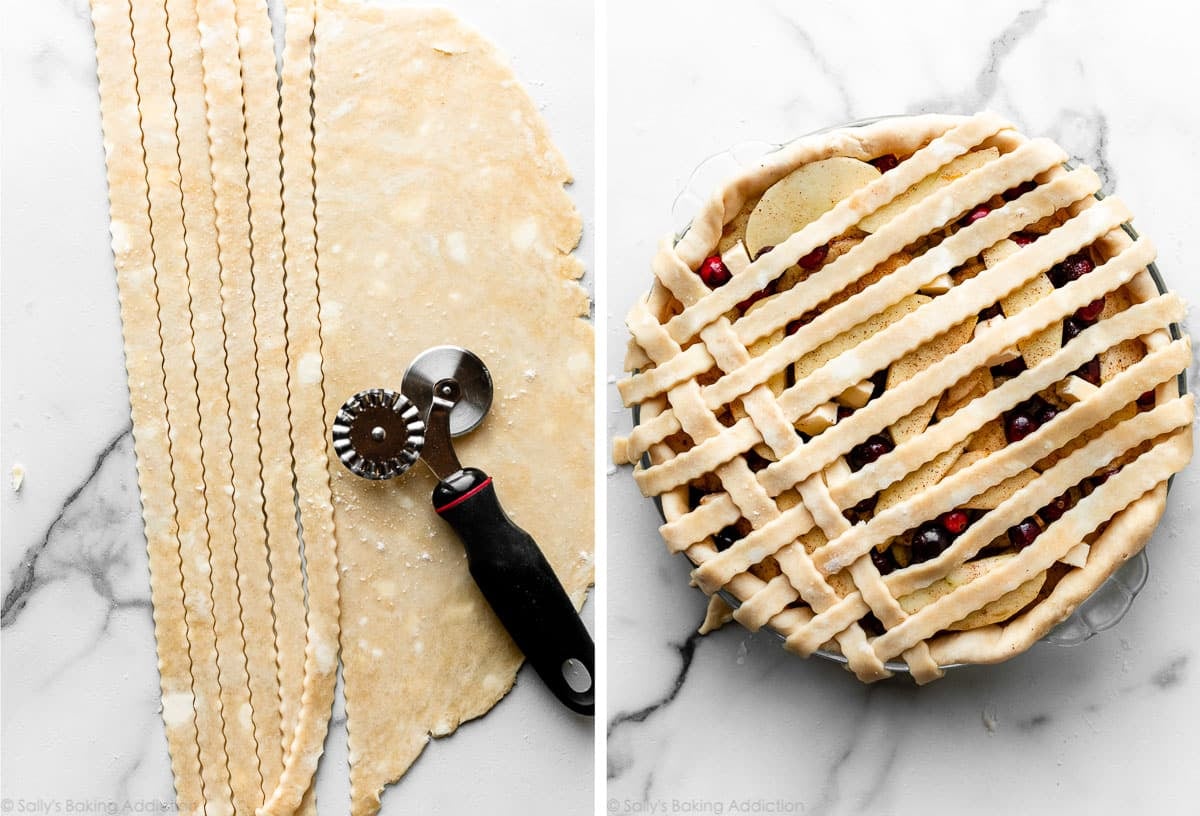
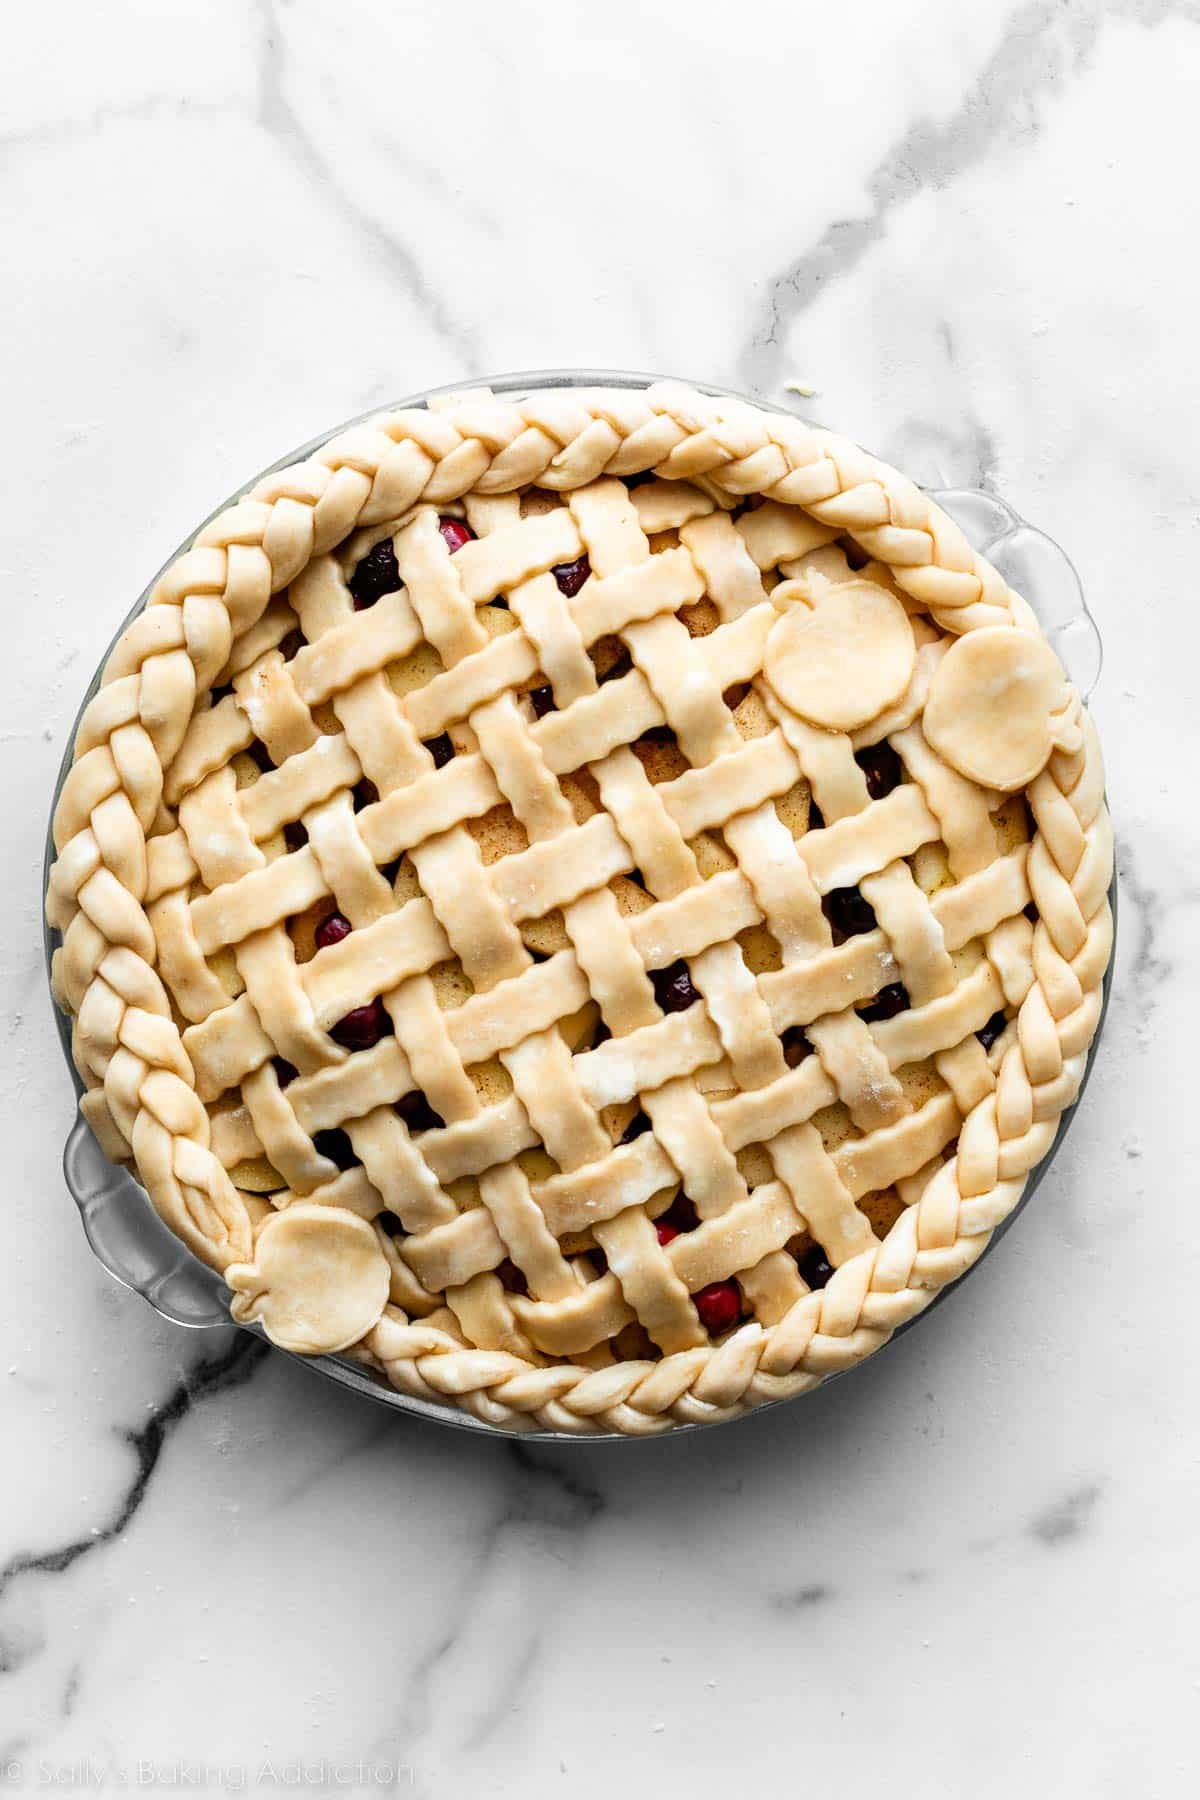
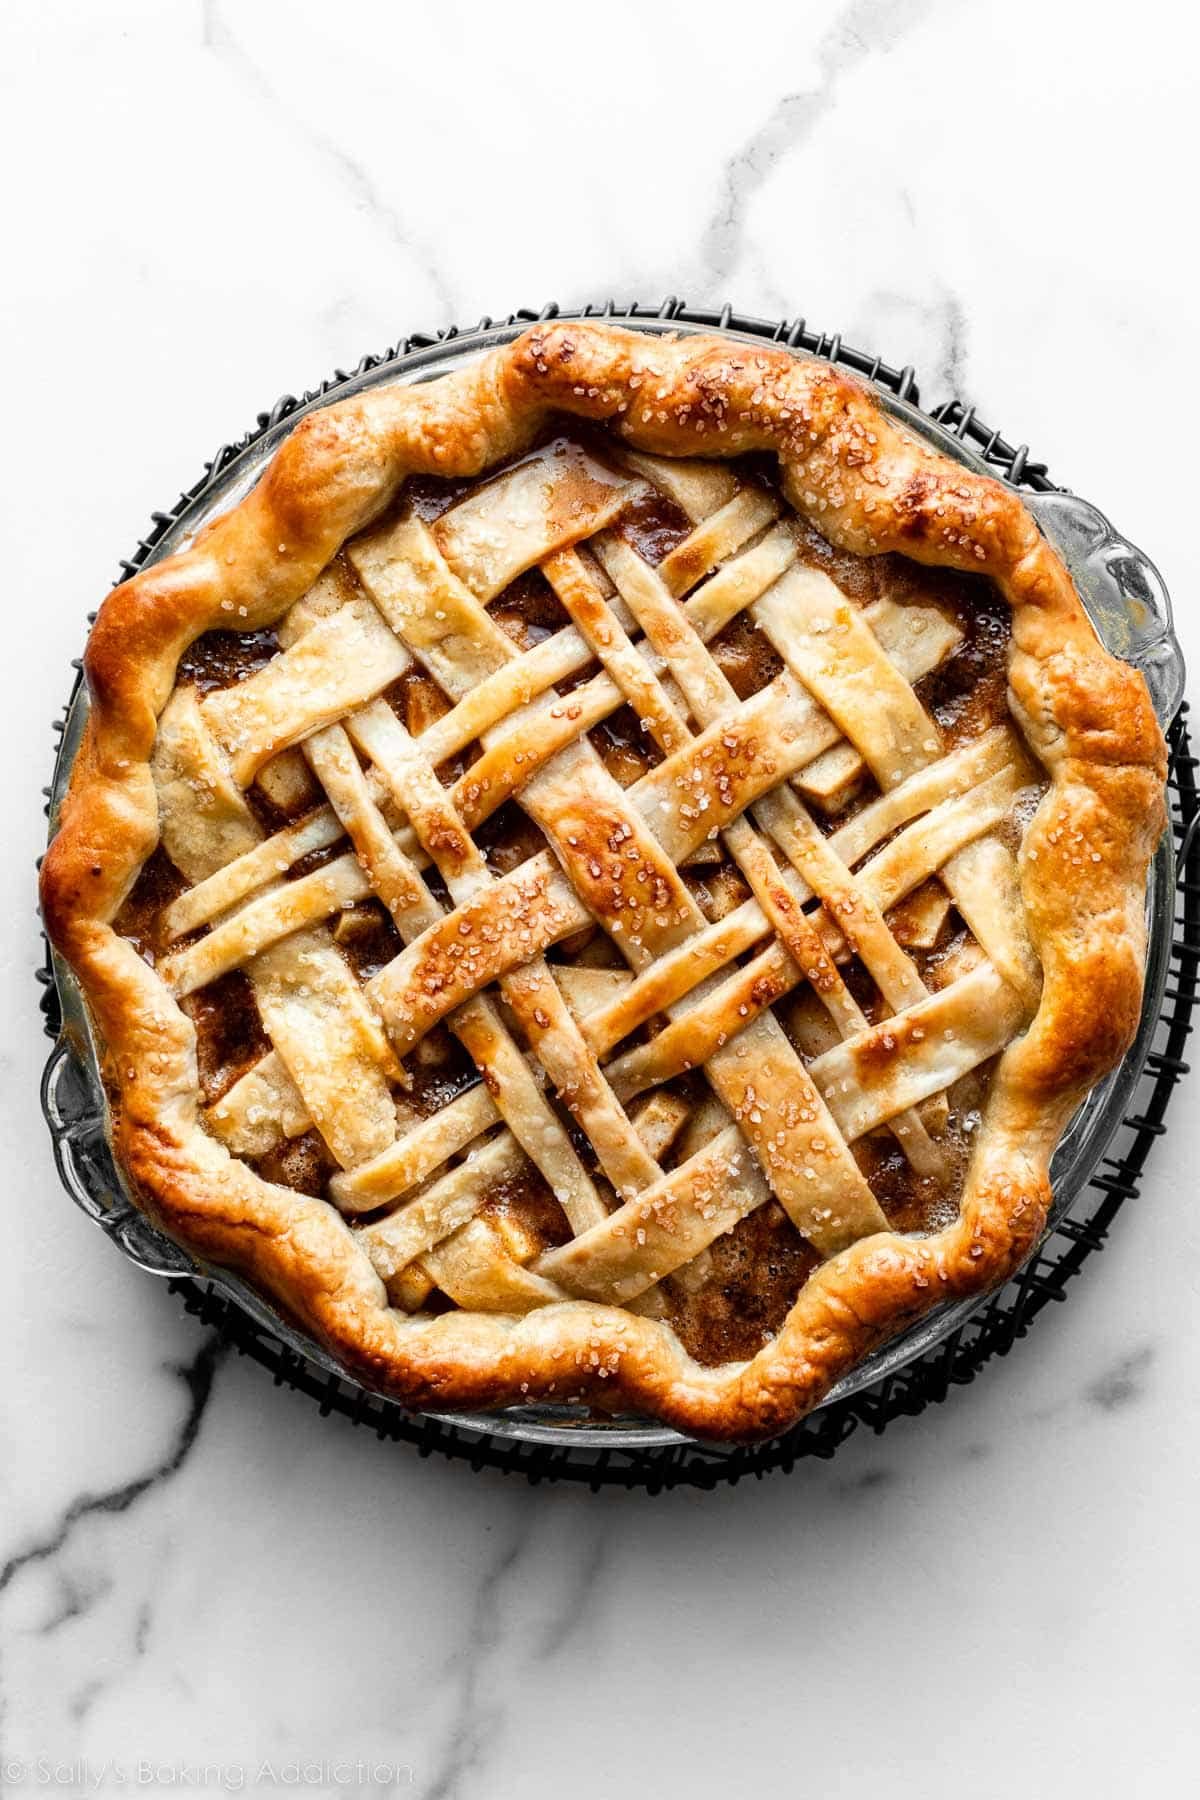
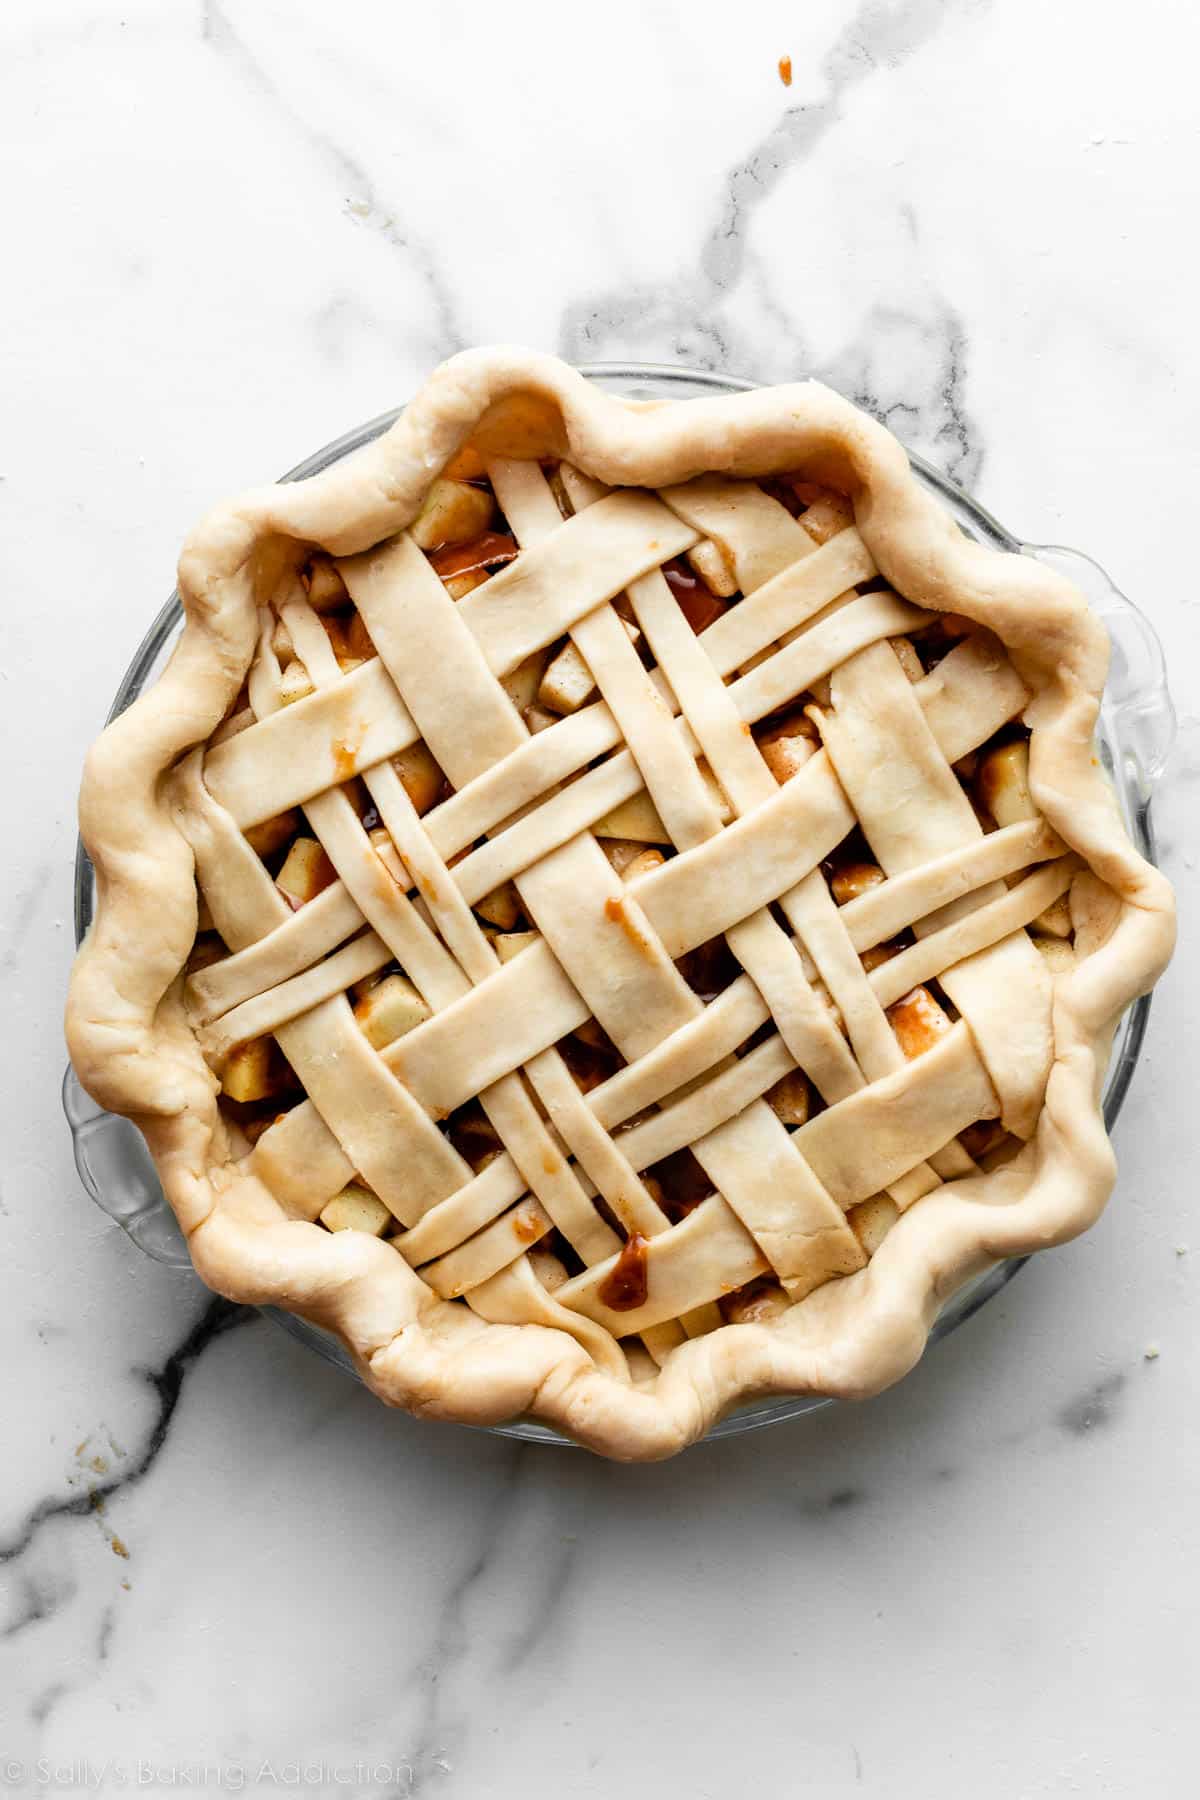
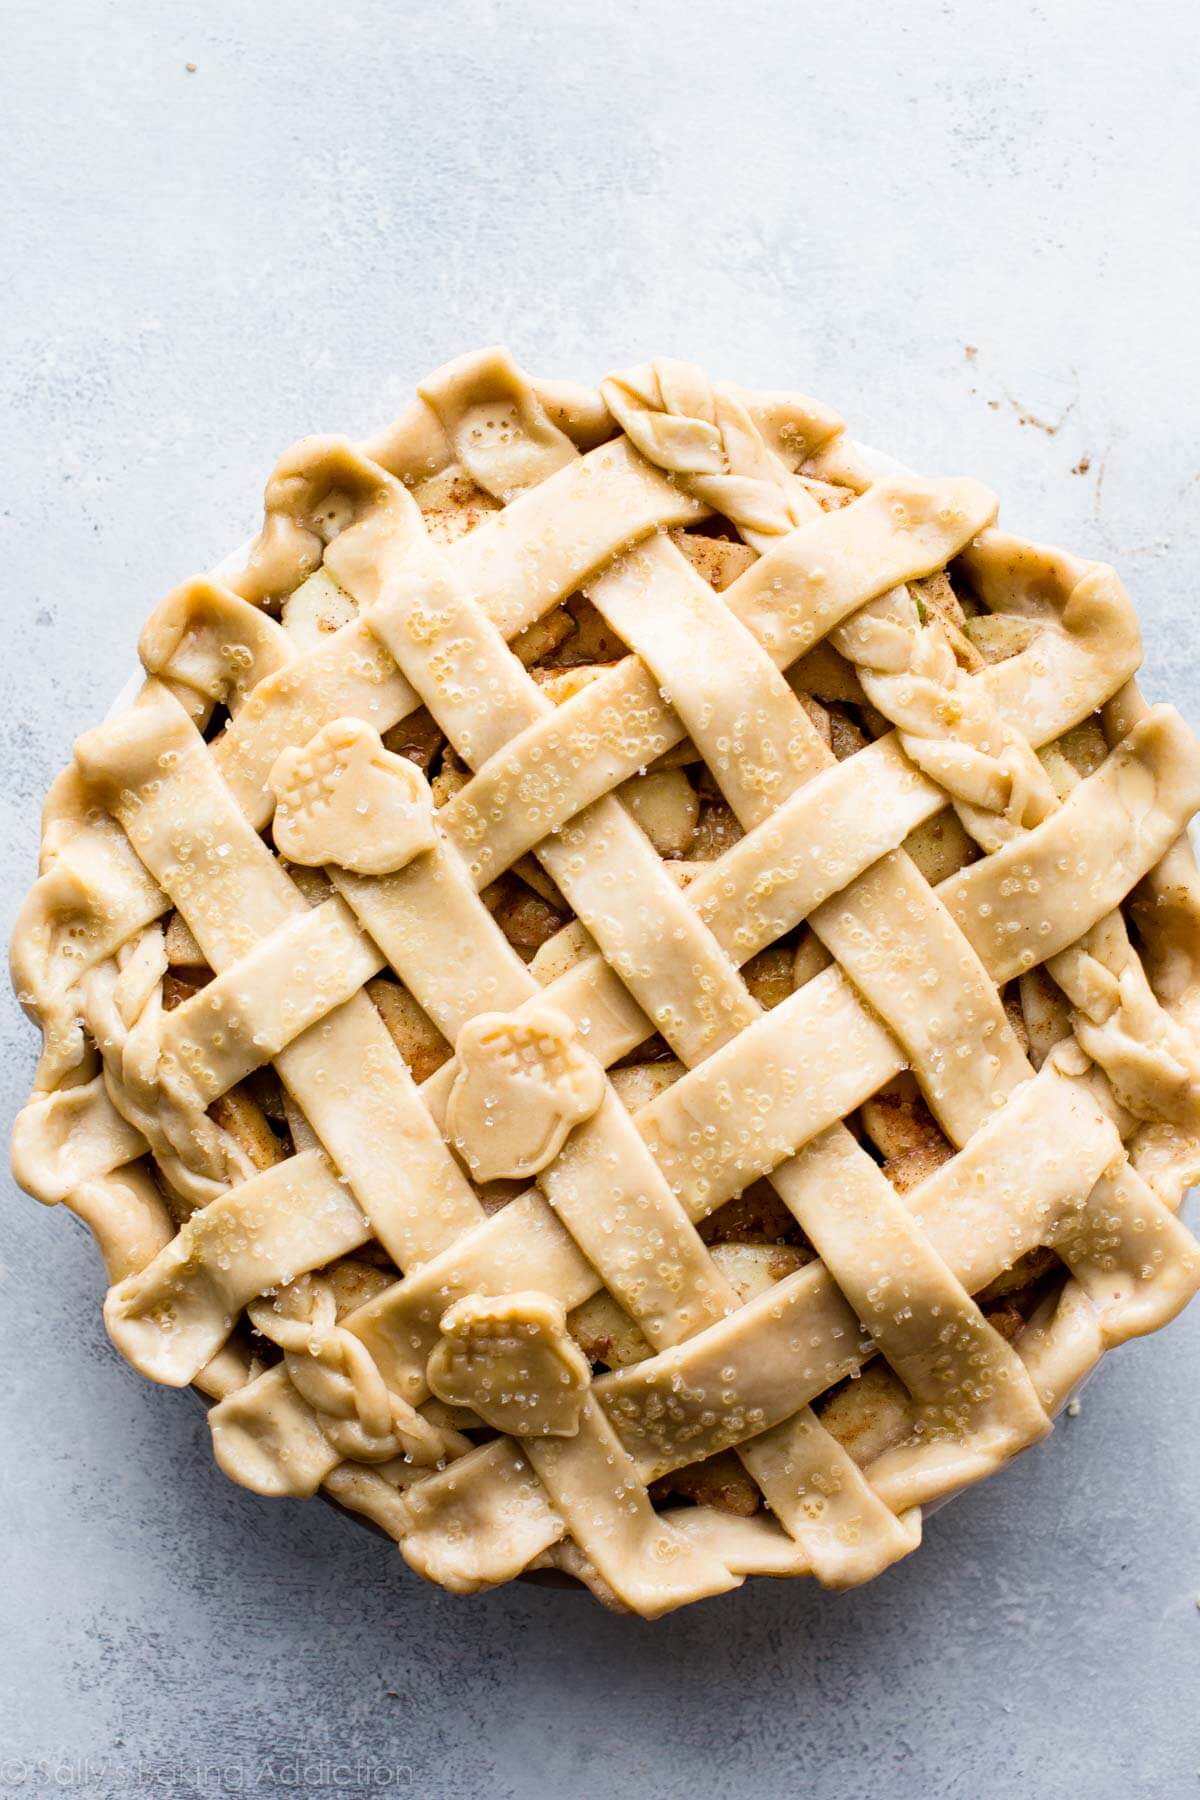
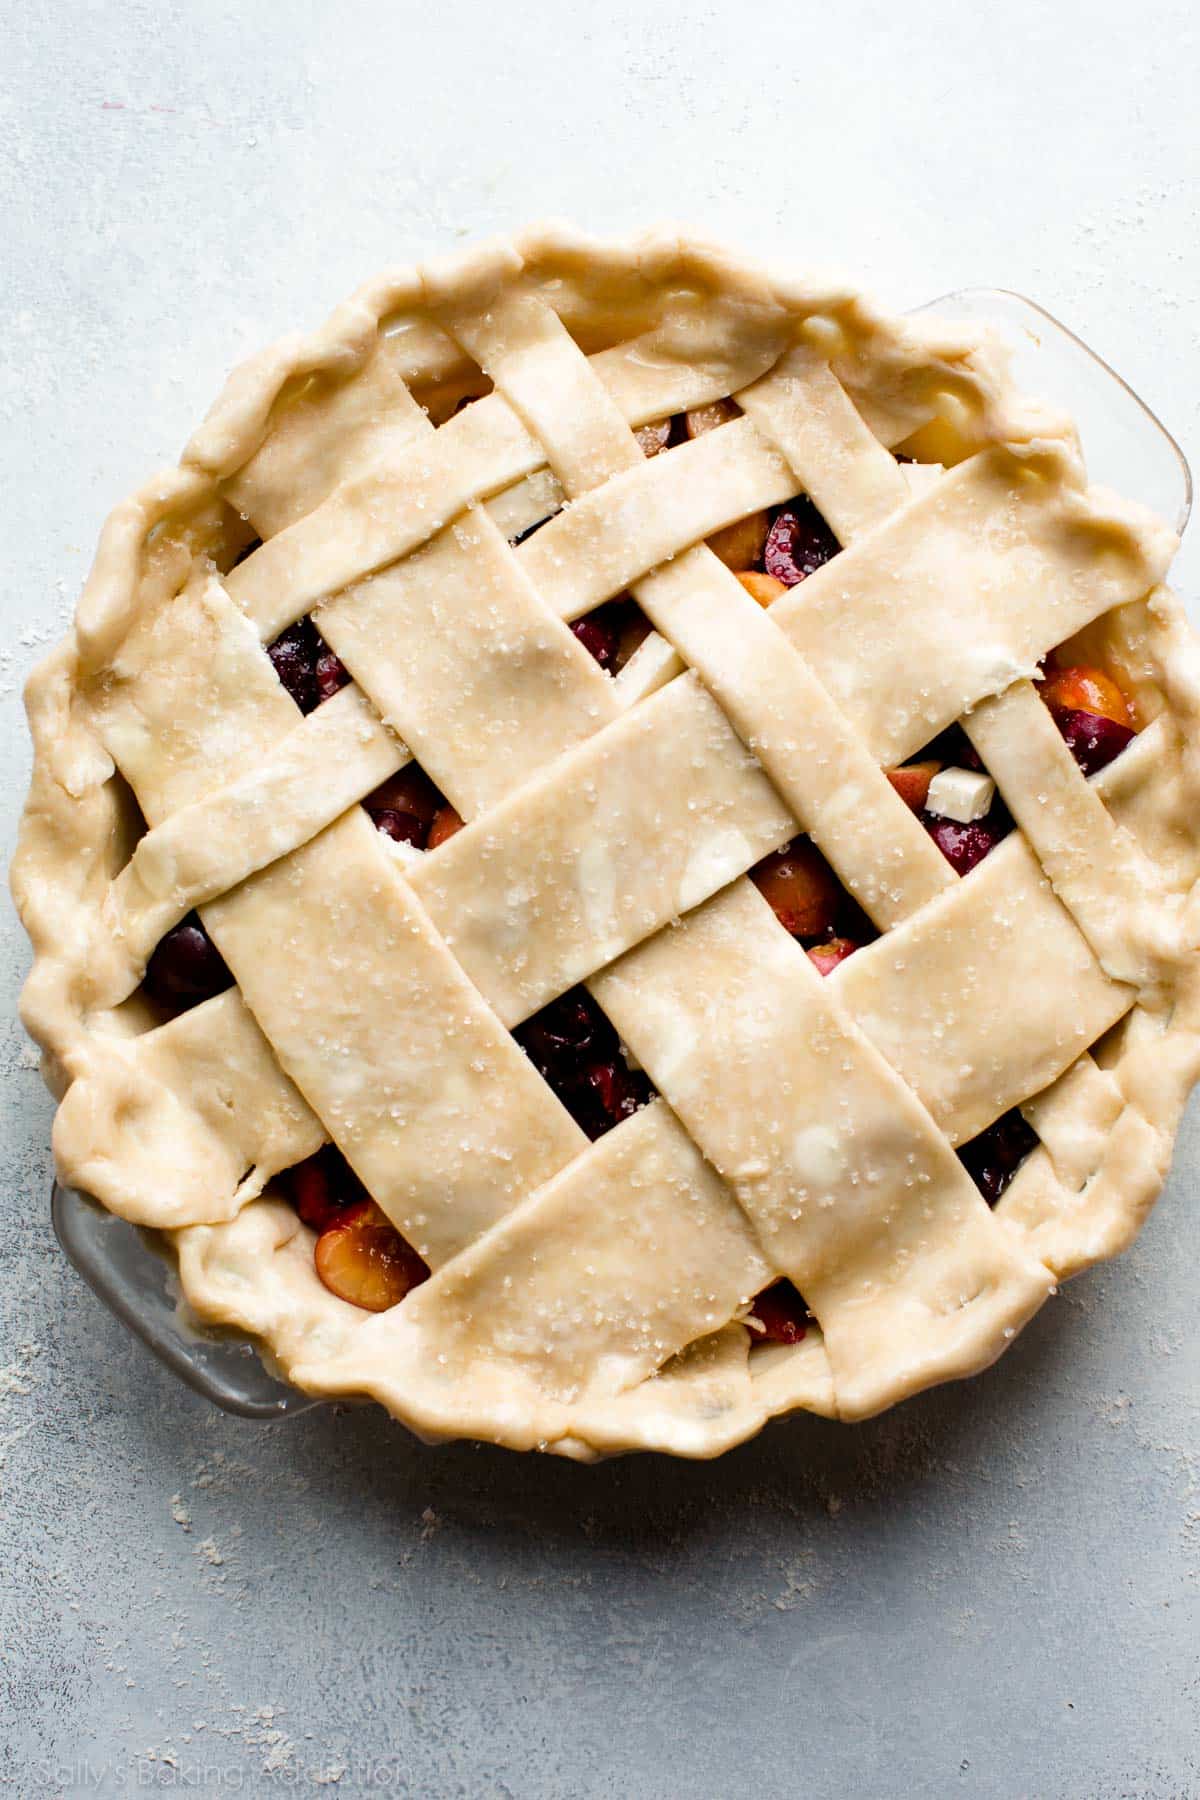
Wavy Lattice With Braided Edge
The pictured pie is my apple cranberry pie.
Here’s what you need to make this pie crust design:
The fondant cutter is what you see me use in the video below, but the wavy side of a pastry wheel can do the same thing. A pastry wheel is very handy because you can use the scalloped edge to make a pretty wavy design, or you can use the flat edge for a traditional lattice pie crust. We need both a wavy cutter (for the lattice) and a flat cutter (for the braid strips) for this particular pie design. I also used a pie punch to add apple shapes, but you can use any cookie cutter or pie punch shape.
This topping actually requires 1.5 discs of dough, plus another disc of dough for the bottom crust. I recommend making the full pie crust recipe twice, so you’ll have plenty of dough to work with. If you don’t use it all, the discs of pie dough freeze beautifully, for up to 3 months, so you can save them for a future pie.
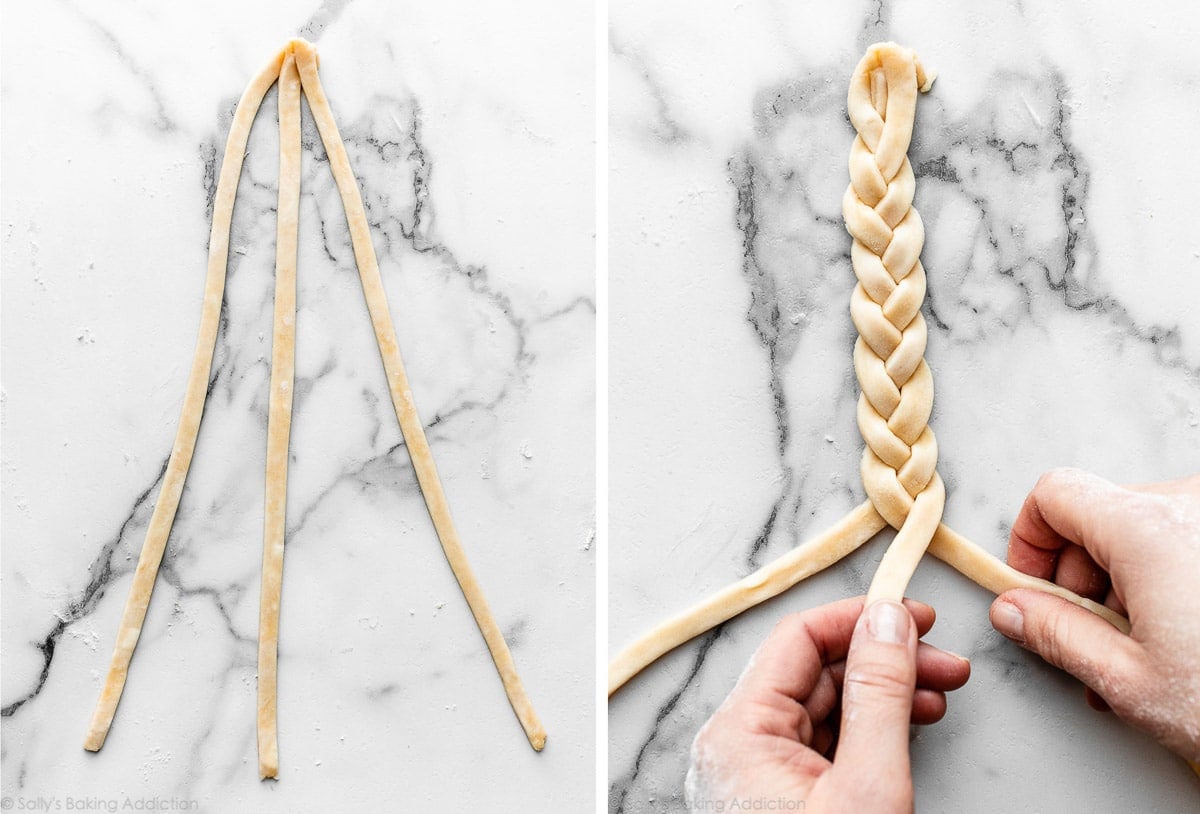
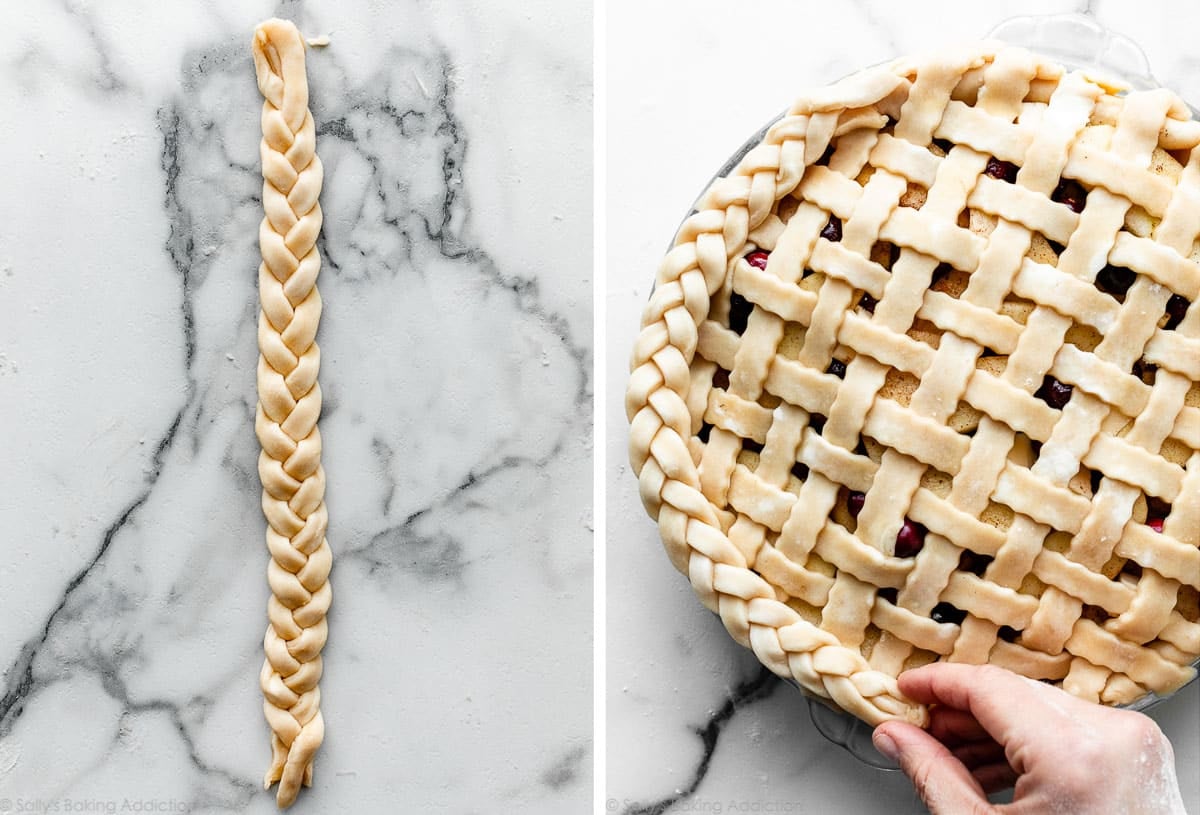
See the recipe card below for detailed written instructions. We’re making a lattice pie crust topping and braided pie crust edge detail. Design the lattice, and then trim excess dough around the edges. Make 2 braids, then press each one around the edge of the pie, pressing them gently into each other to secure. To hide the places where the braids connect, place a dough cut-out shape over them. (Sneaky!) Finish by brushing with egg wash and sprinkling with coarse sugar.
Here are my in-depth tutorials for how to braid pie crust and how to lattice pie crust.
Baked Cookie Cutter Shapes
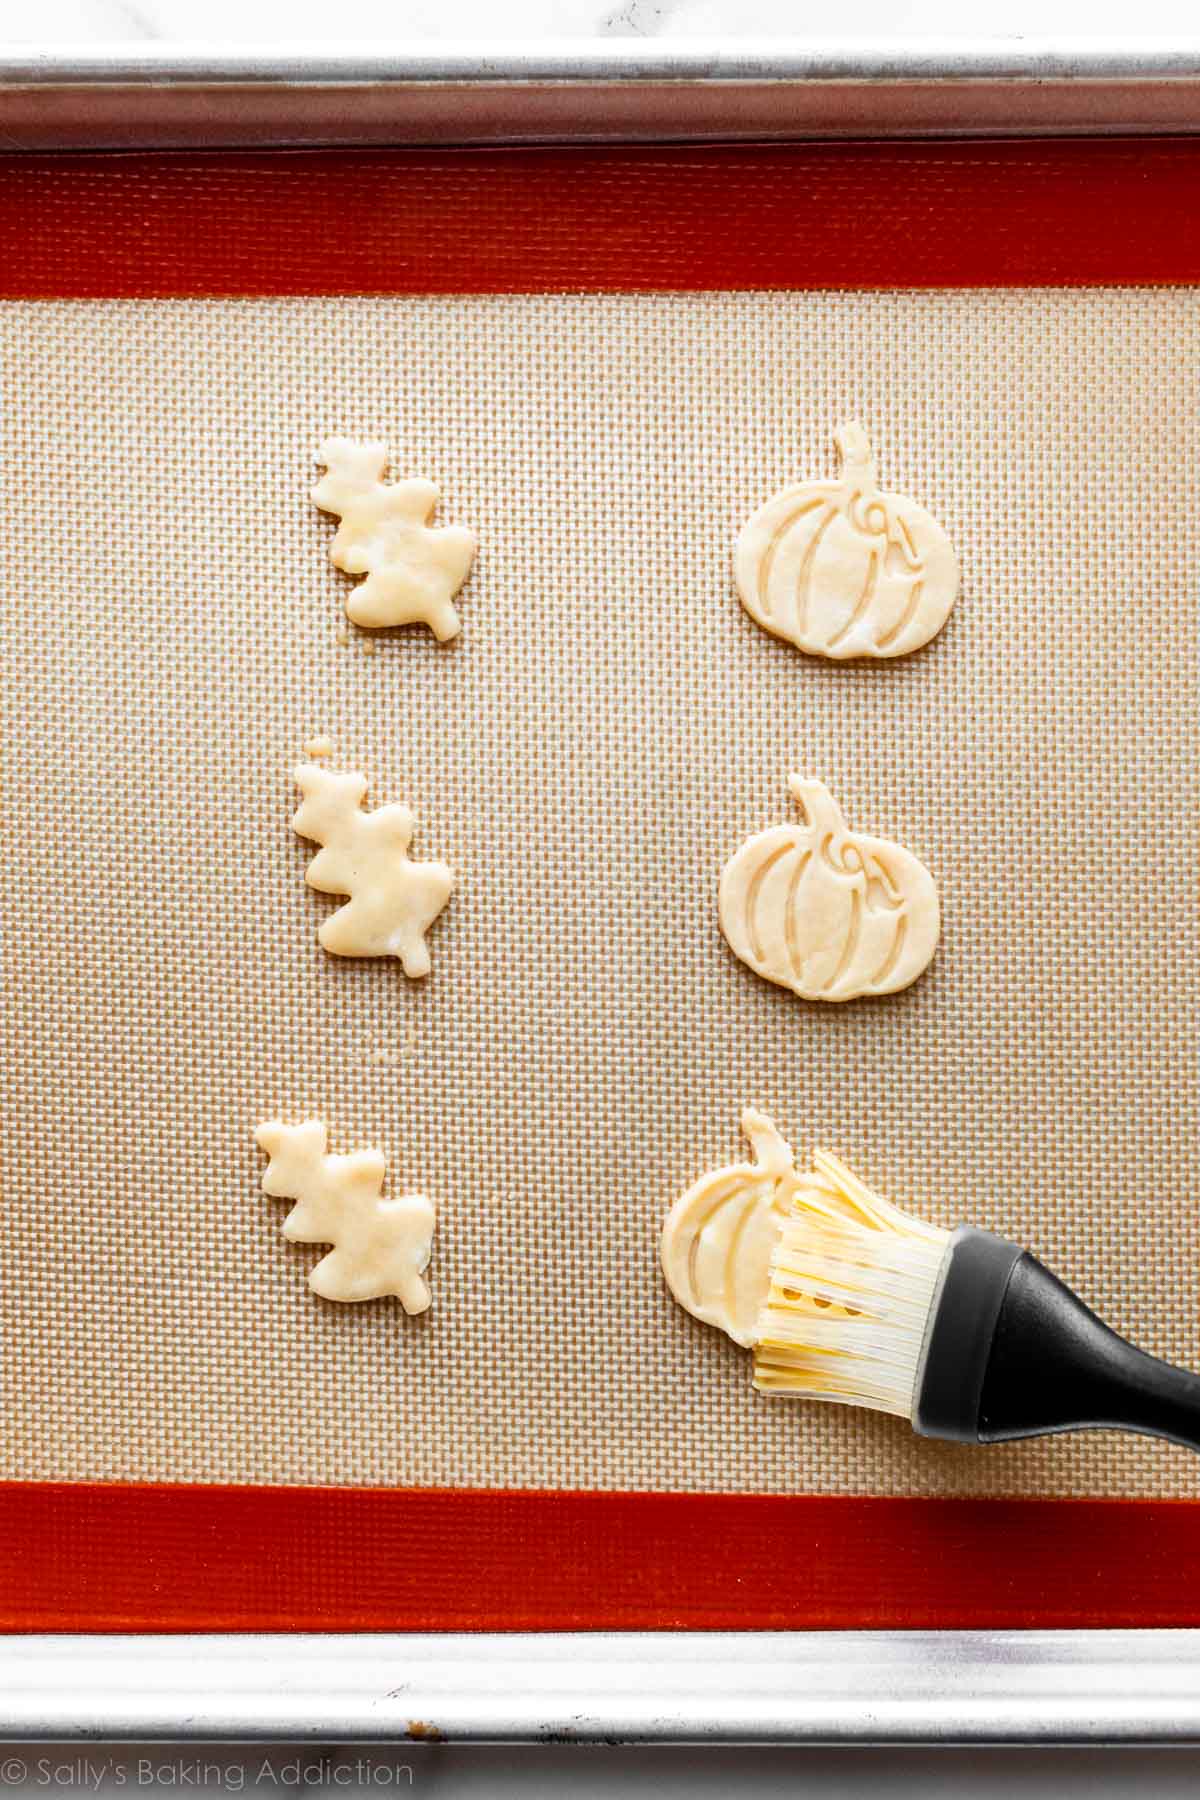
This pie-decorating method is different from the others because you’re going to add the decorative pie crust topping to a fully baked and cooled pie, such as brownie pie or chocolate chess pie, rather than an unbaked pie. The pictured pie is my favorite pumpkin pie. Here’s what you need to make this pie crust design:
For the baked cookie cutter shapes design, you can really use any small cookie cutters. You can also look for impression pie punches, sometimes called “plunger cookie cutters,” which make such beautiful designs in the dough. I love using autumn-themed impression cutters to decorate pumpkin pie and sweet potato pie. The exact set I own is no longer available, but there are lots of similar ones, like these fall pie punches. These harvest impression cutters would also make gorgeous pie toppers, and sugar cookies, too!
Unless you want to decorate your baked pie with MANY pie crust shapes, you really don’t need a ton of dough for this. I usually only use 1/2 of a pie dough disc.
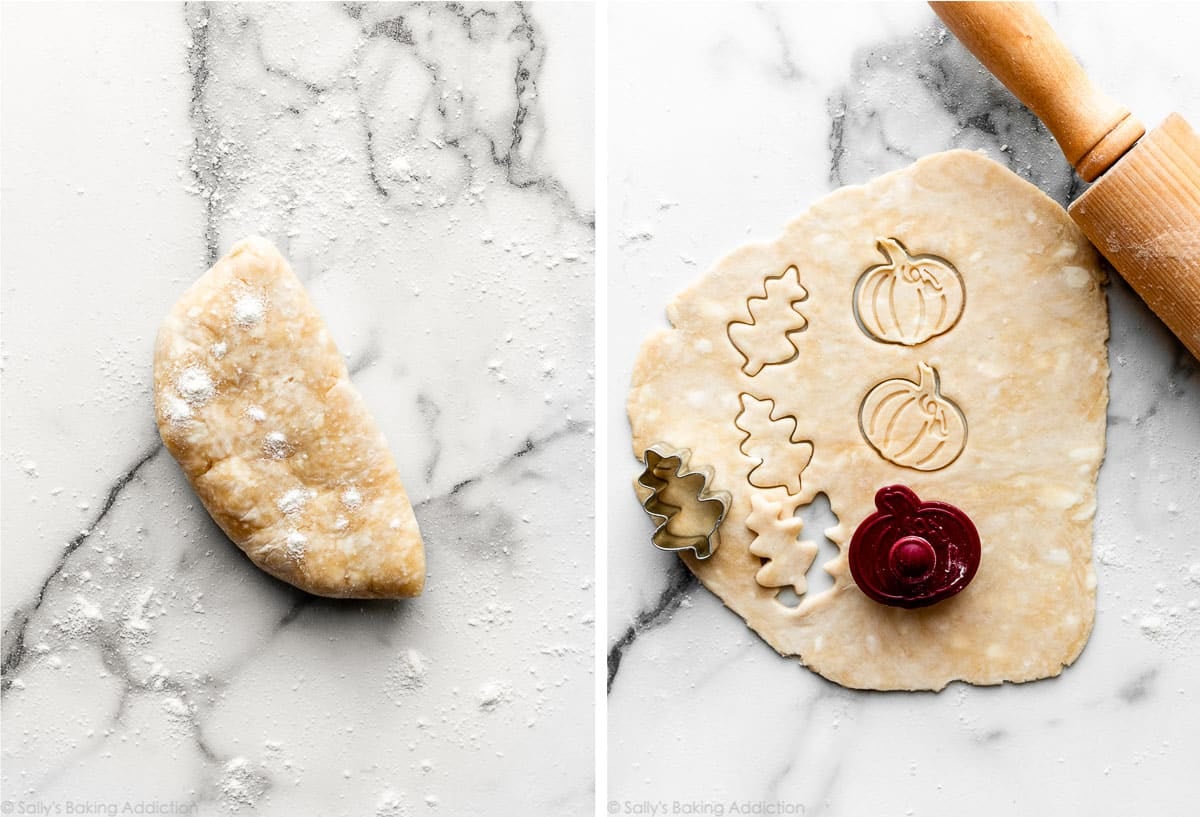
See the recipe card below for detailed written instructions. You’ll roll out your pie dough and cut shapes just like you do for gingerbread cookies. Place onto a lined baking sheet, brush with egg wash, and bake at 350°F (177°C) for 10 minutes or until lightly browned. Remove and set aside to cool before decorating pie.
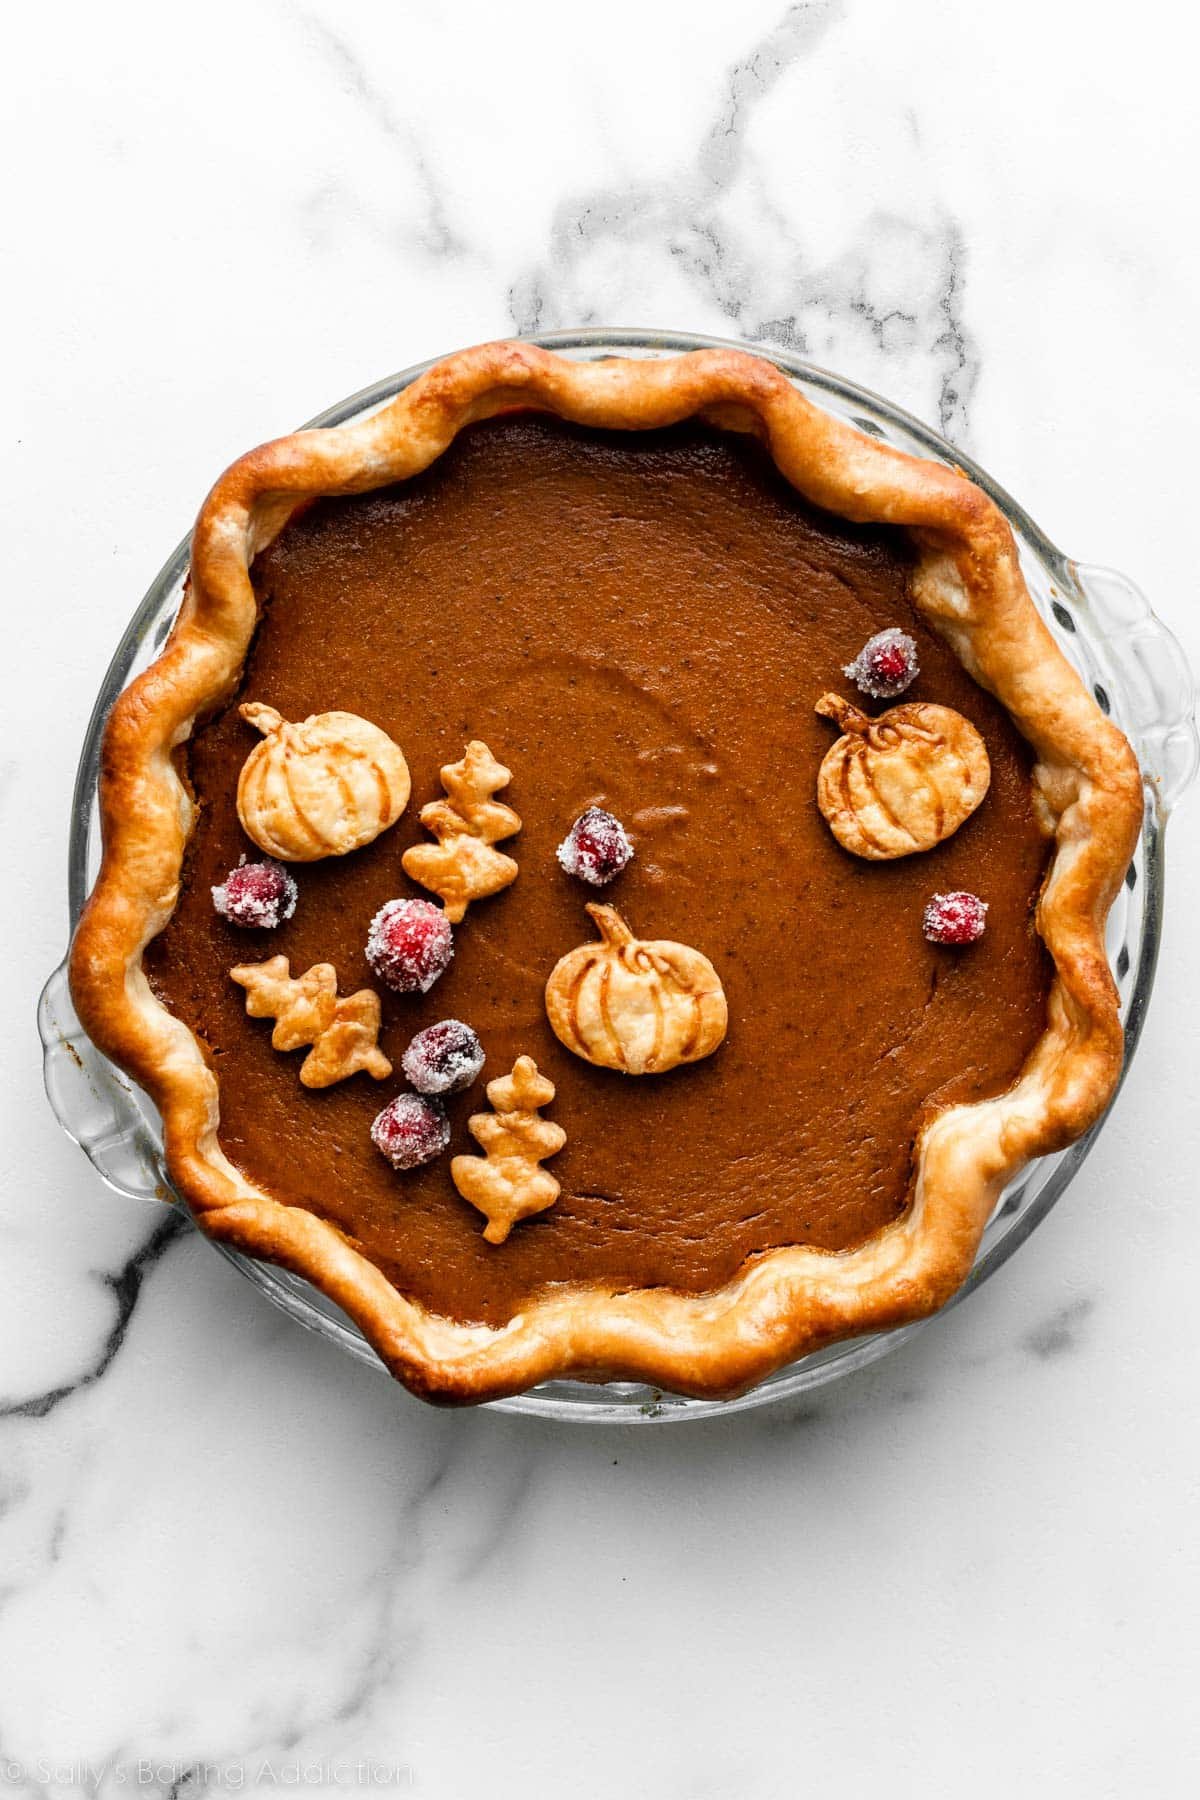
If you’d like to make the pictured sugared cranberries, you can find instructions in the pumpkin pie recipe.
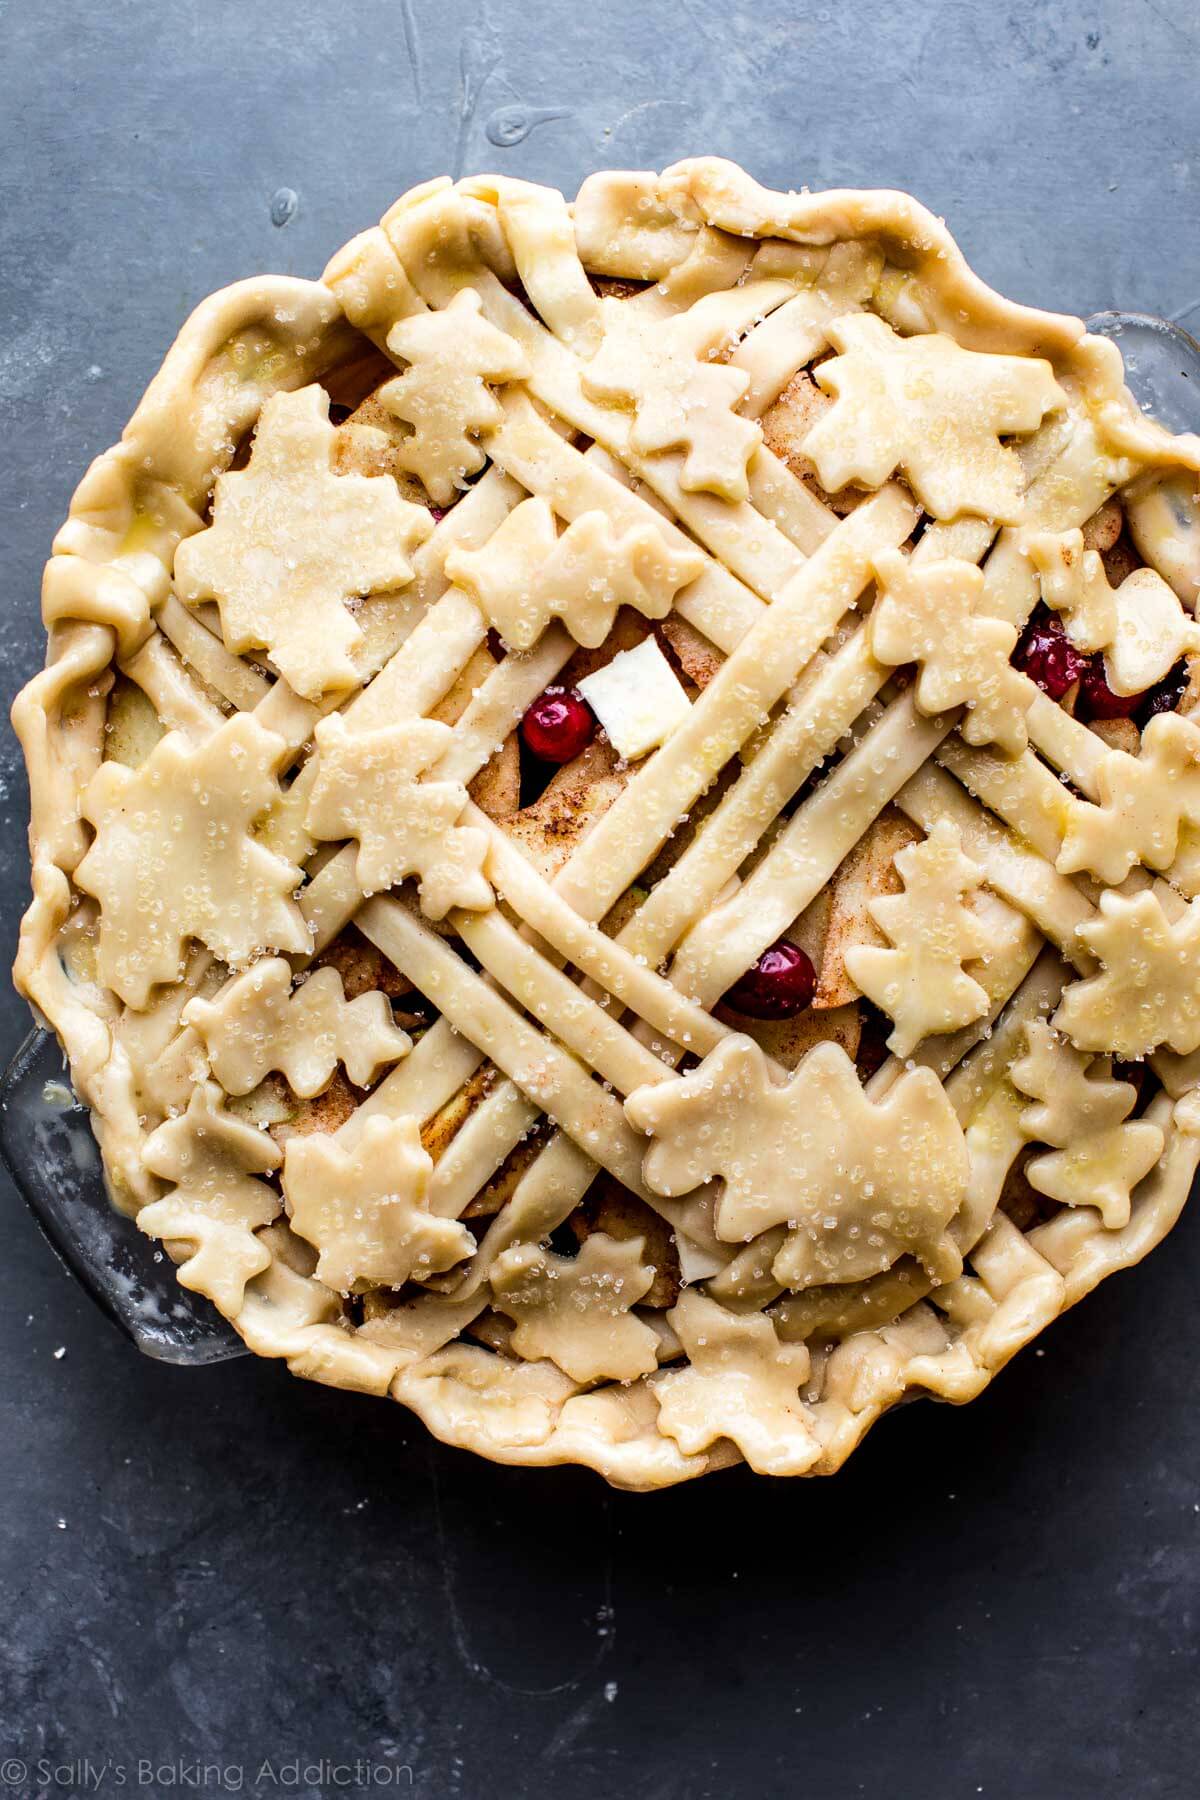
Thick & Thin Lattice
The pictured pie is my caramel pear pie.
Here’s what you need to make this pie crust design:
For the thick & thin lattice, you need a pastry wheel or a pizza cutter. 2 pie dough discs is enough for this entire pie (again, my pie crust recipe yields 2 discs). You need 1 disc for the bottom of your pie and 1 for the designed top.
See the recipe card below for detailed written instructions. You’ll cut the rolled-out dough into 10 strips, about 1-inch wide. Then cut every other strip in half, lengthwise, so you have 8 skinny strips and 6 wide strips for your lattice pie crust. Finish by brushing with egg wash and sprinkling with coarse sugar.

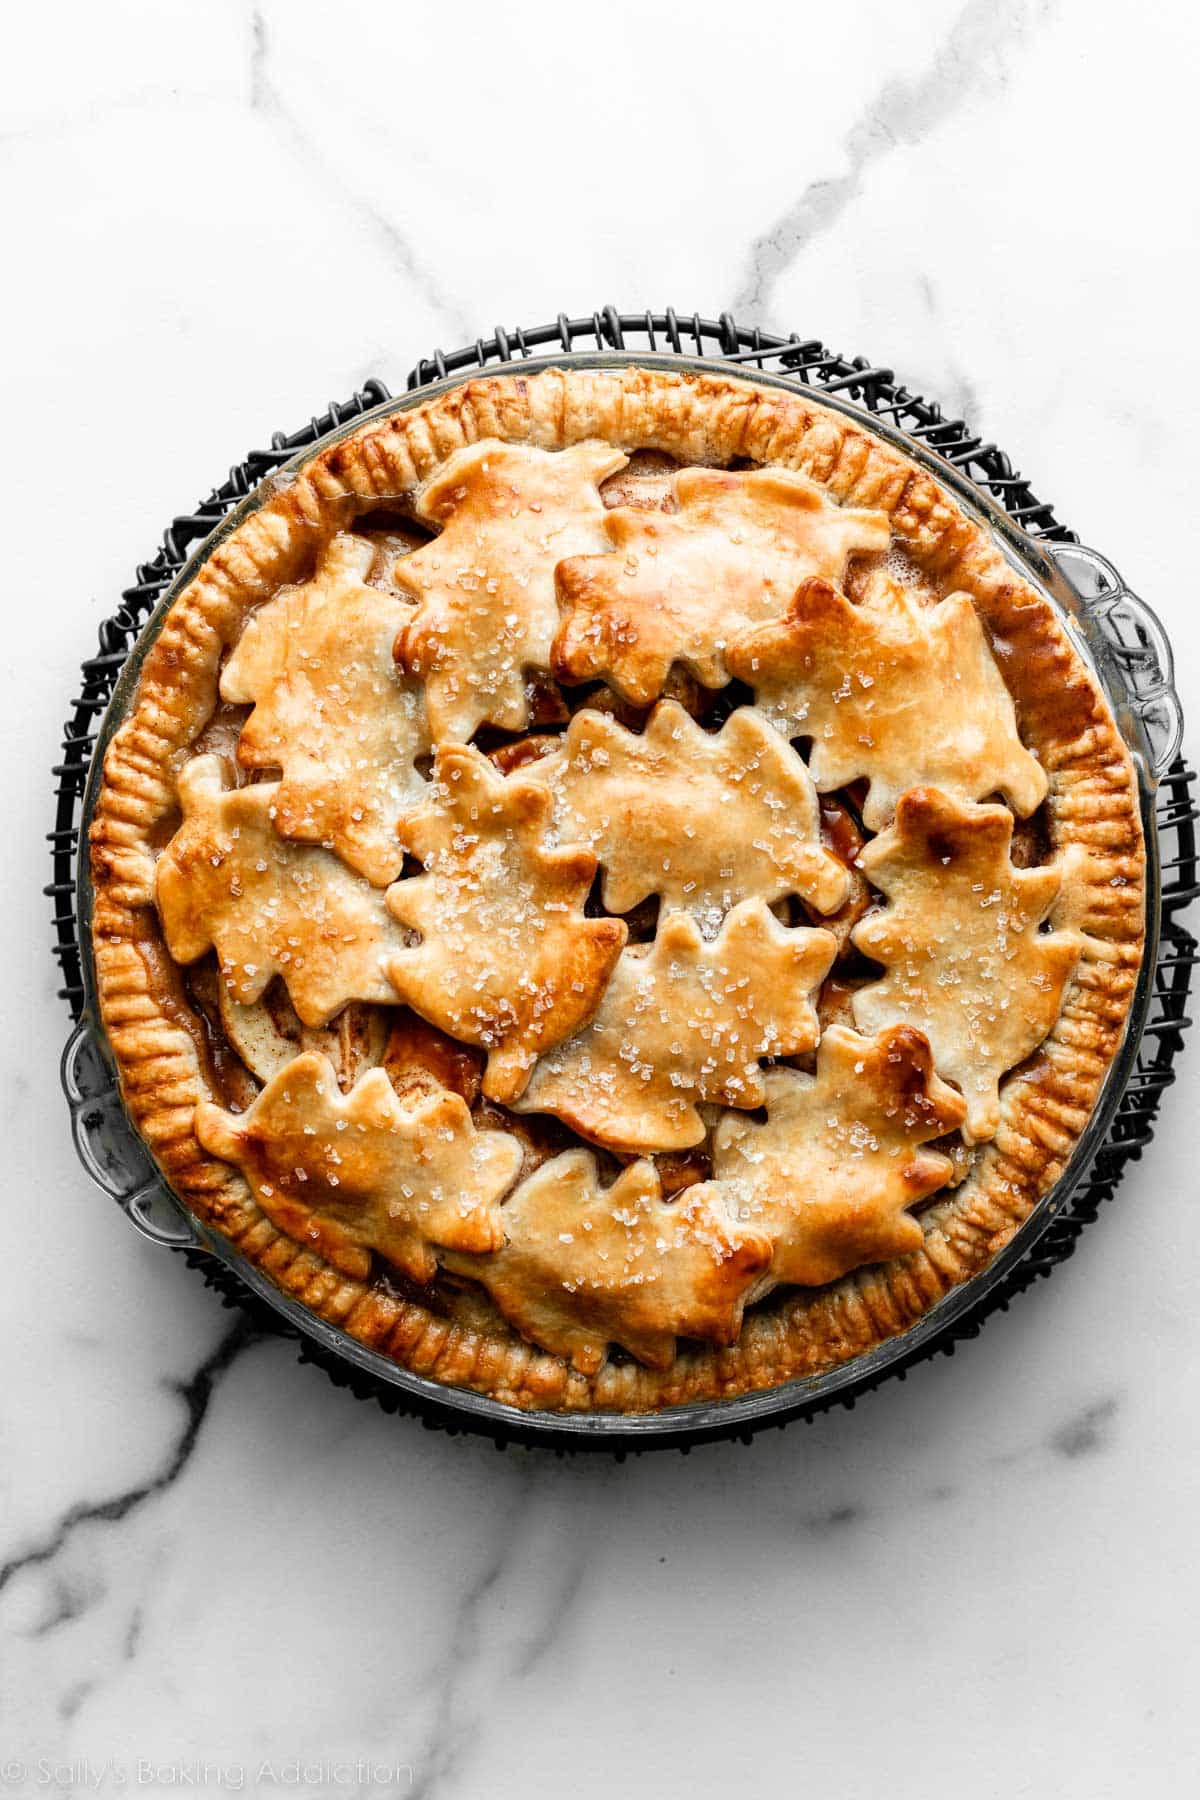
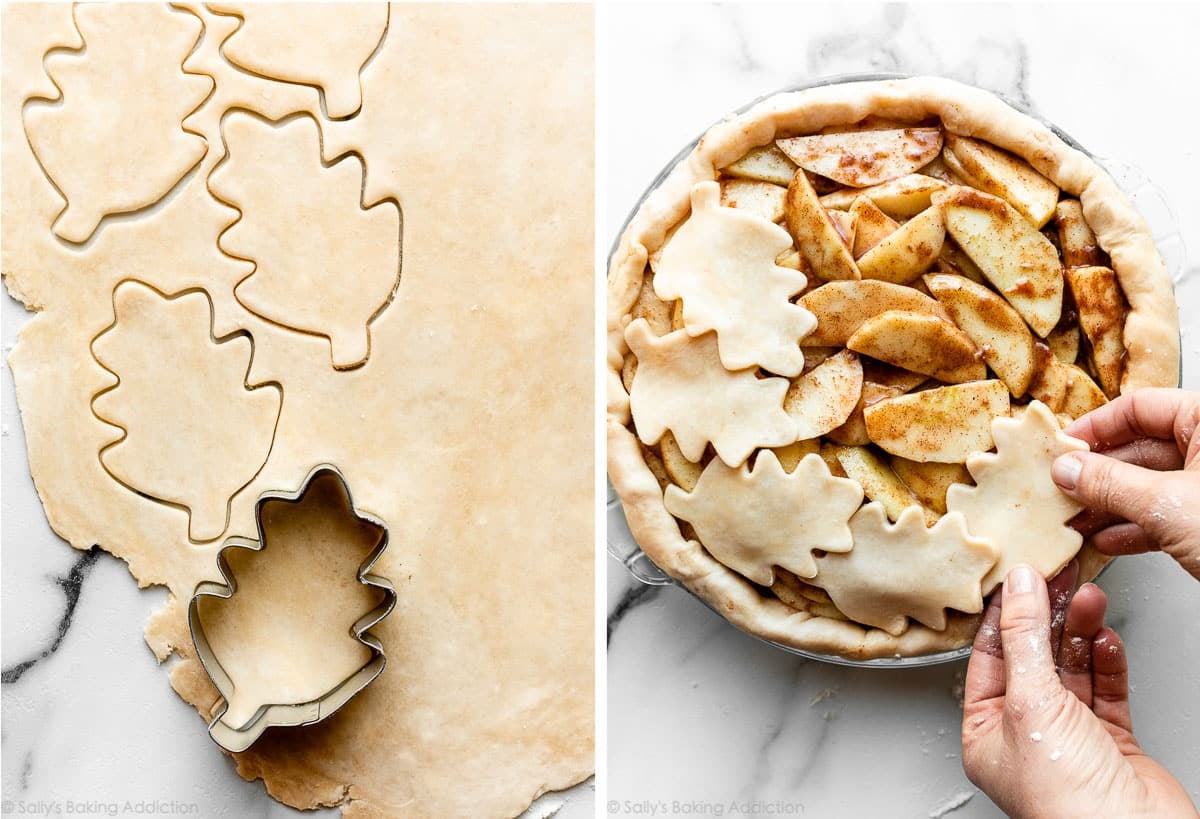
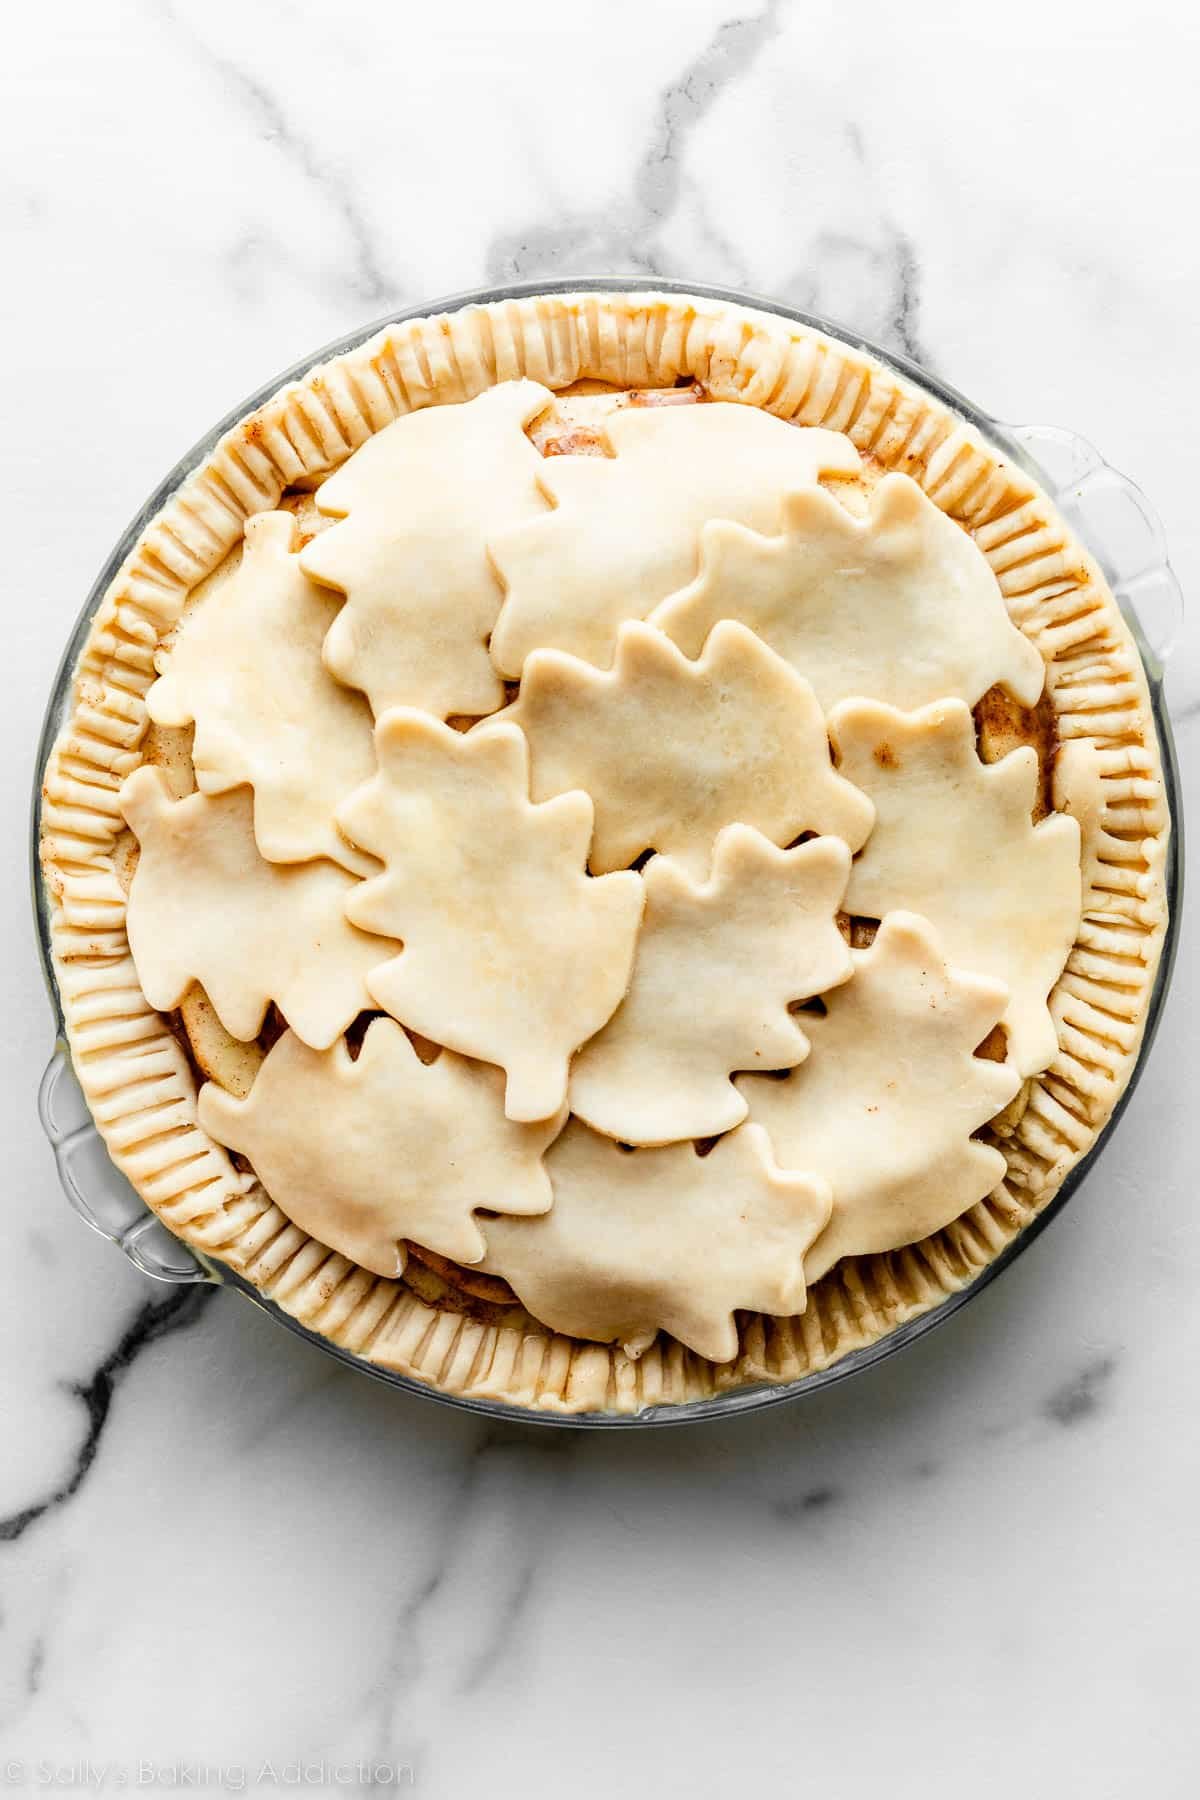
Autumn Leaves Crust
The pictured pie is my beloved apple pie.
Here’s what you need to make this pie crust design:
For the autumn leaves crust, you need a medium-size leaf cookie cutter.
See the recipe card below for detailed written instructions. Roll out your pie dough about 1/8-inch thick. Cut out leaves—the number you’ll get will depend on the size of your cookie cutter. Carefully arrange the leaves, overlapping, on top of the pie. Finish by brushing with egg wash and sprinkling with coarse sugar.
You can arrange these designs on many different types of pies including blueberry pie, cherry pie, apple pie, strawberry rhubarb pie… pick your favorite!
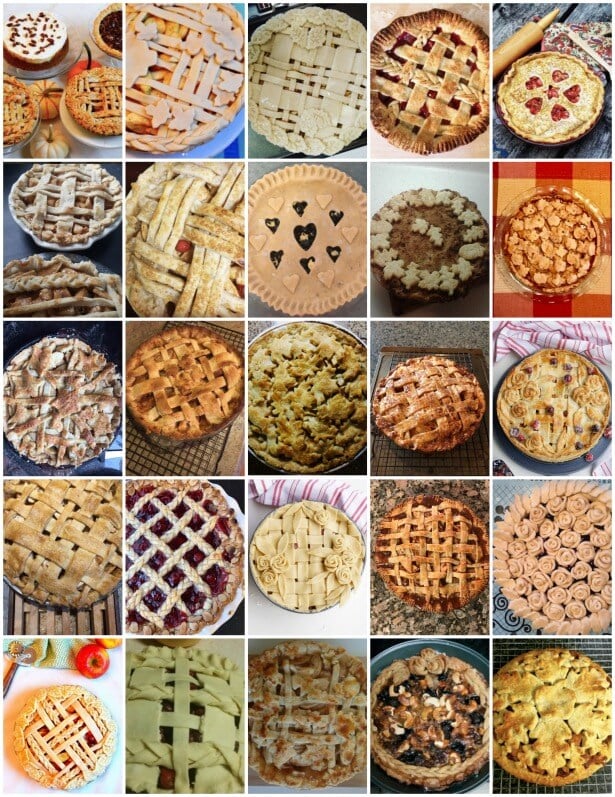
See Your Pie Crust Designs
A few years ago, readers made different pie crust designs as part of a monthly baking challenge. Look at their beautiful work!
Description
Get inspired with these 4 fun, festive, and beautiful pie crust designs! Homemade pie has never looked so stunning on the dessert table.
- Note Before You Begin: These designs, with the exception of the baked cookie cutter shapes design (step 3 below), all go on top of an unbaked pie. So start with your pie already filled and ready for a pie dough topping. After topping with your designed top crust, bake according to the pie recipe you’re using, such as this apple pie, apple cranberry pie, caramel pear pie, or other pie recipe.
- Wavy Lattice With Braided Edge: Watch the video tutorial below before you start. You need 1.5 discs of pie dough for this top crust design, in addition to the bottom crust (another disc). Start with 1 disc of pie dough (keep the remaining dough, and the filled pie, in the refrigerator until you’re ready for them). On a lightly floured surface with a lightly floured rolling pin, roll the disc of dough into a circle that is about 12 inches (30cm) in diameter. Using a scalloped pastry wheel or fondant ribbon cutter, cut 18 wavy strips. Remove the second disc of dough from the refrigerator and cut it in half. (Save the other half for another use.) Roll it out into a tall oblong shape, close to 14 inches long. With a sharp knife, pizza cutter, or the flat edge of a pastry wheel, cut 6 1/4-inch wide, 14-inch long strips of dough. With gentle force because the dough is delicate, tightly braid 3 strips together. Repeat with remaining 3 strips, so you have 2 braids. Cut 2-3 cookie cutter shapes out of any extra rolled-out dough. Remove the filled pie from the refrigerator and carefully thread the 18 wavy pie dough strips over and under one another, pulling back strips as necessary to weave. Press the edges of the strips into the bottom pie crust edges to seal. Use kitchen shears to trim off any excess dough. Carefully place one braid around half of the pie and press lightly to secure. Repeat with 2nd braid, then attach the 2 braids by pressing one into the other. Lightly press the cookie cutter shapes on top of where the braids connect. Brush it all with egg wash and sprinkle with coarse sugar. Follow your pie recipe’s baking instructions.
- Baked Cookie Cutter Shapes: Watch the video tutorial below before you start. Start with a fully baked pie. You need 1/2 disc of pie dough for these cut-outs. On a lightly floured surface with a lightly floured rolling pin, roll out the dough to about 1/8-inch thickness. Using cookie cutters, cut out shapes. Place the shapes onto a parchment paper- or silicone baking mat-lined baking sheet. Brush with egg wash. Bake at 350°F (177°C) for 10 minutes or until lightly browned. Allow to cool before decorating cooled pie.
- Thick & Thin Lattice: Watch the video tutorial below before you start. You need 1 disc of pie dough for this top crust design. On a lightly floured surface with a lightly floured rolling pin, roll the disc of dough into a circle that is about 12 inches (30cm) in diameter. With a pizza cutter or pastry wheel, cut 10 strips of dough, about 1 inch wide. Cut every other dough strip in half, lengthwise, so you have 6 thick strips and 8 thin strips. Weave the lattice, alternating 1 wide strip and 2 skinny strips, as shown in the video. You should have 3 thick strips and 4 thin strips in each direction. Trim excess dough around the edges, if needed, then tuck in and flute or crimp the edges. Brush with egg wash and sprinkle with coarse sugar. Follow your pie recipe’s baking instructions.
- Autumn Leaves Crust: This look is not shown in the video (but it’s very easy!). You need 1 disc of pie dough for this top crust design. On a lightly floured surface with a lightly floured rolling pin, roll the disc of dough into a circle that is about 12 inches (30cm) in diameter, about 1/8-inch thickness. Use a leaf cookie cutter or pie impression cutter to cut out leaves. Arrange the pie dough leaves on top of the filled pie, slightly overlapping. Brush with egg wash and sprinkle with coarse sugar. Follow your pie recipe’s baking instructions.
Keywords: pie crust designs
Put your personalized touch on pie crust and make it stand out on the Thanksgiving table. Let your imagination run wild and create some edible art. Here’s even more pie inspiration for you!
Above: I created a simple lattice pie crust with 1-inch strips of dough and added two strips of braids on the edges. Braids are three 1/4-inch wide strips of dough. Here’s how to braid pie crust. I also added some acorns on top using a cookie cutter. Braiding requires a lot of pie dough, and to ensure you have plenty, I recommend 1.5 discs of dough for this look.
Above: This is my cranberry almond apple pie. I created a lattice pie crust with 1/2-inch strips grouped into three’s. I also added leaf cut-outs all over the top. 1 disc of pie dough is usually enough for this pie crust topping, but again, it’s handy to have extra dough. I always suggest having a couple extra discs of pie dough in the freezer when you’re making artistic pie designs.
Above: This is my homemade cherry pie. Another lattice using four strips 2-inches wide and four strips 1-inch wide. 1 disc of pie dough is enough for this topping.
You can do this! I’m cheering for you.
Subscribe
Baking Made Easy
Are you new to this website? This email series is a great place to start. I’ll walk you through a few of my most popular recipes and show you exactly why they work.