
Learn how to make decorated Halloween cupcakes in 4 designs with these simple tutorials that are perfect for decorating beginners. Start with your favorite flavor of cupcakes, make the vanilla buttercream frosting, and then follow the directions and video to dress up your cupcakes as monsters, jack-o’-lanterns, and spiders. These fun treats are EYE-deal for serving at your next monster mash bash!
4 Simple Halloween Cupcakes Designs
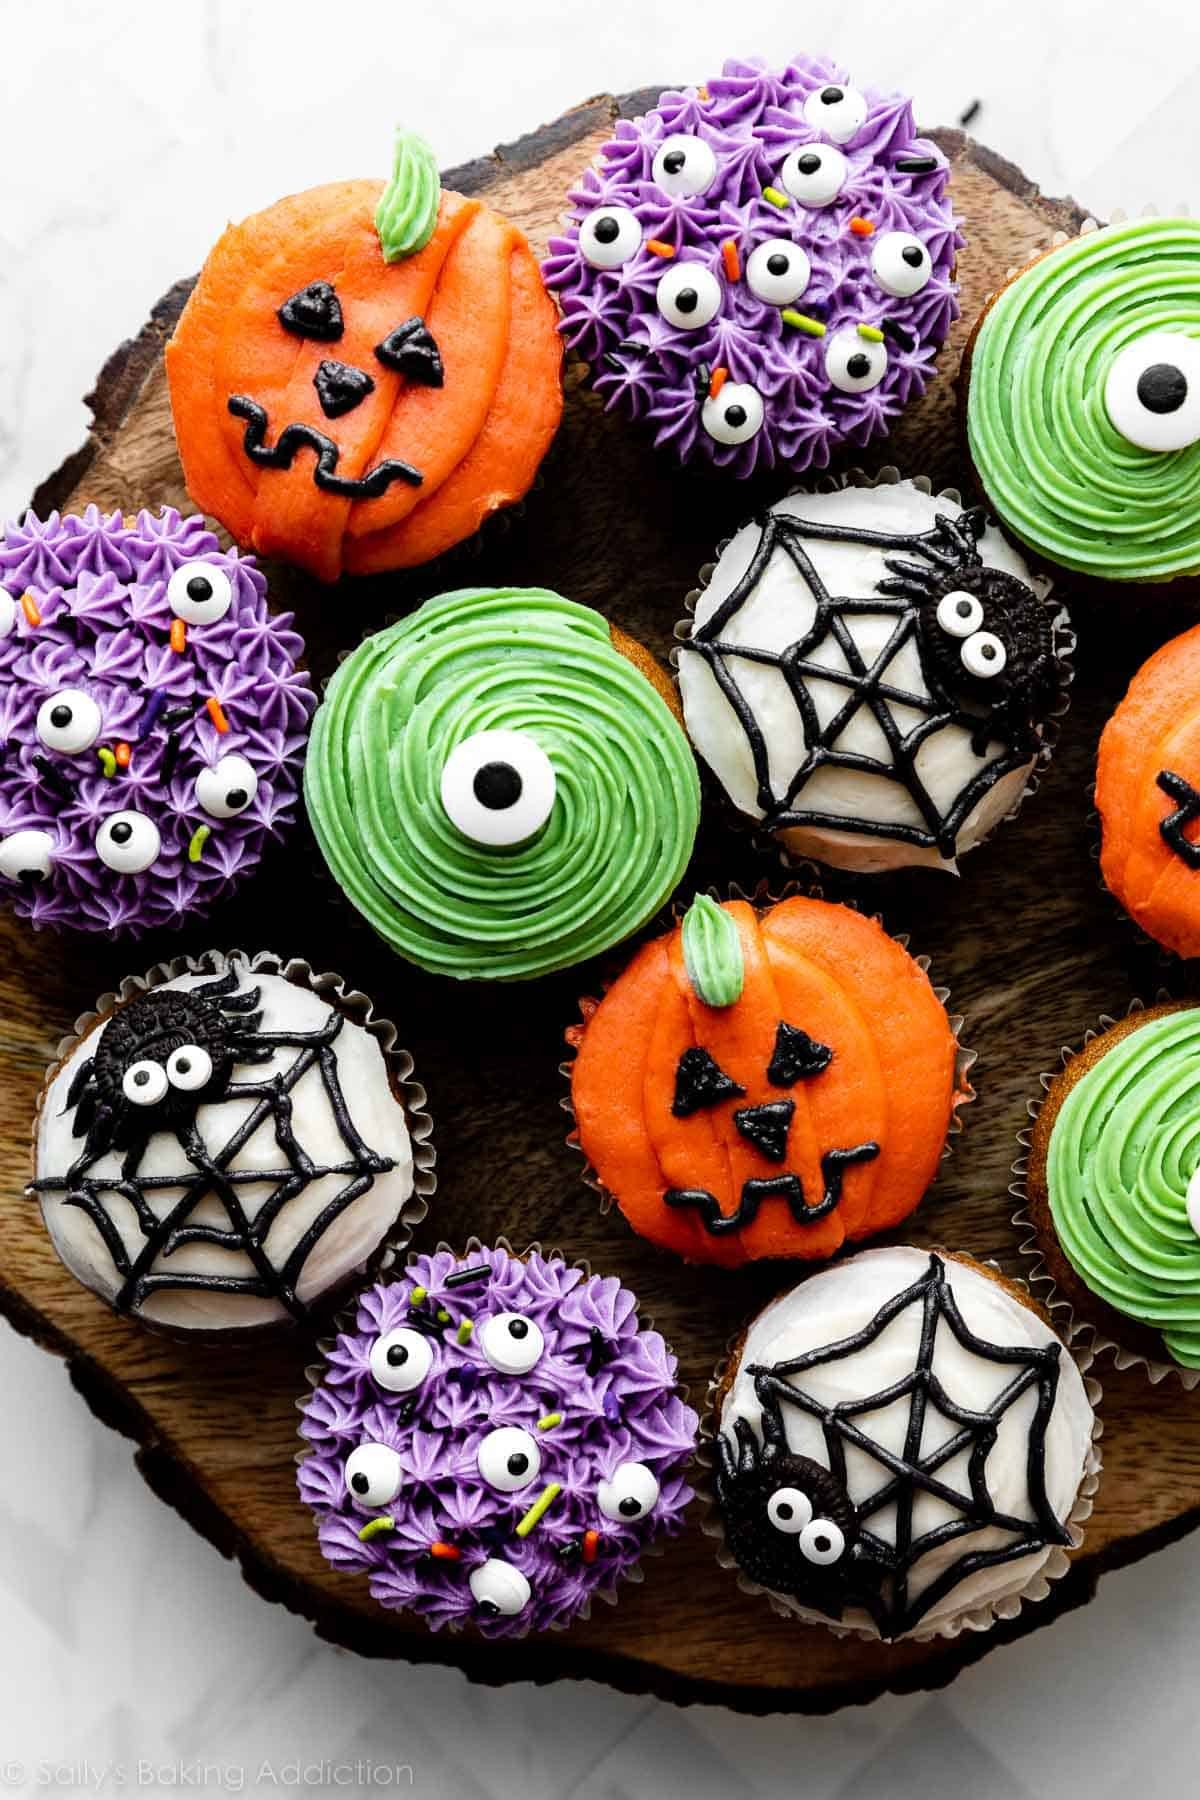
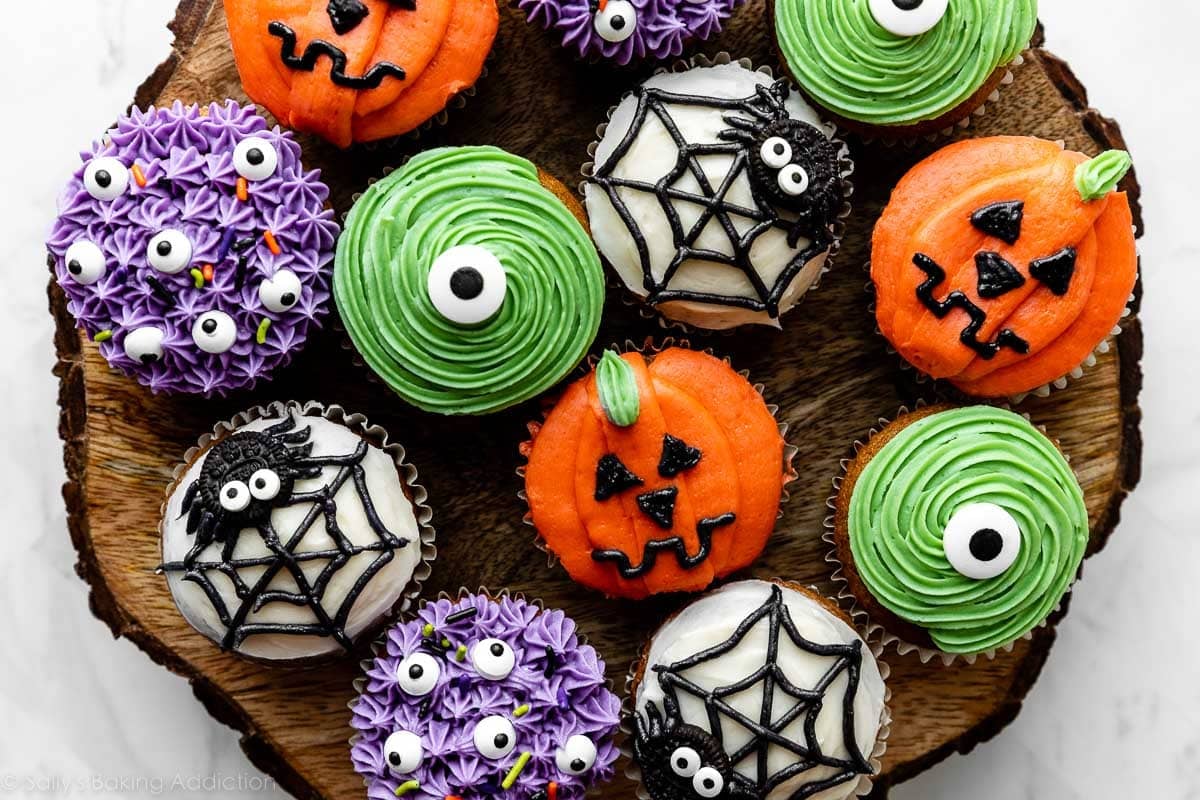
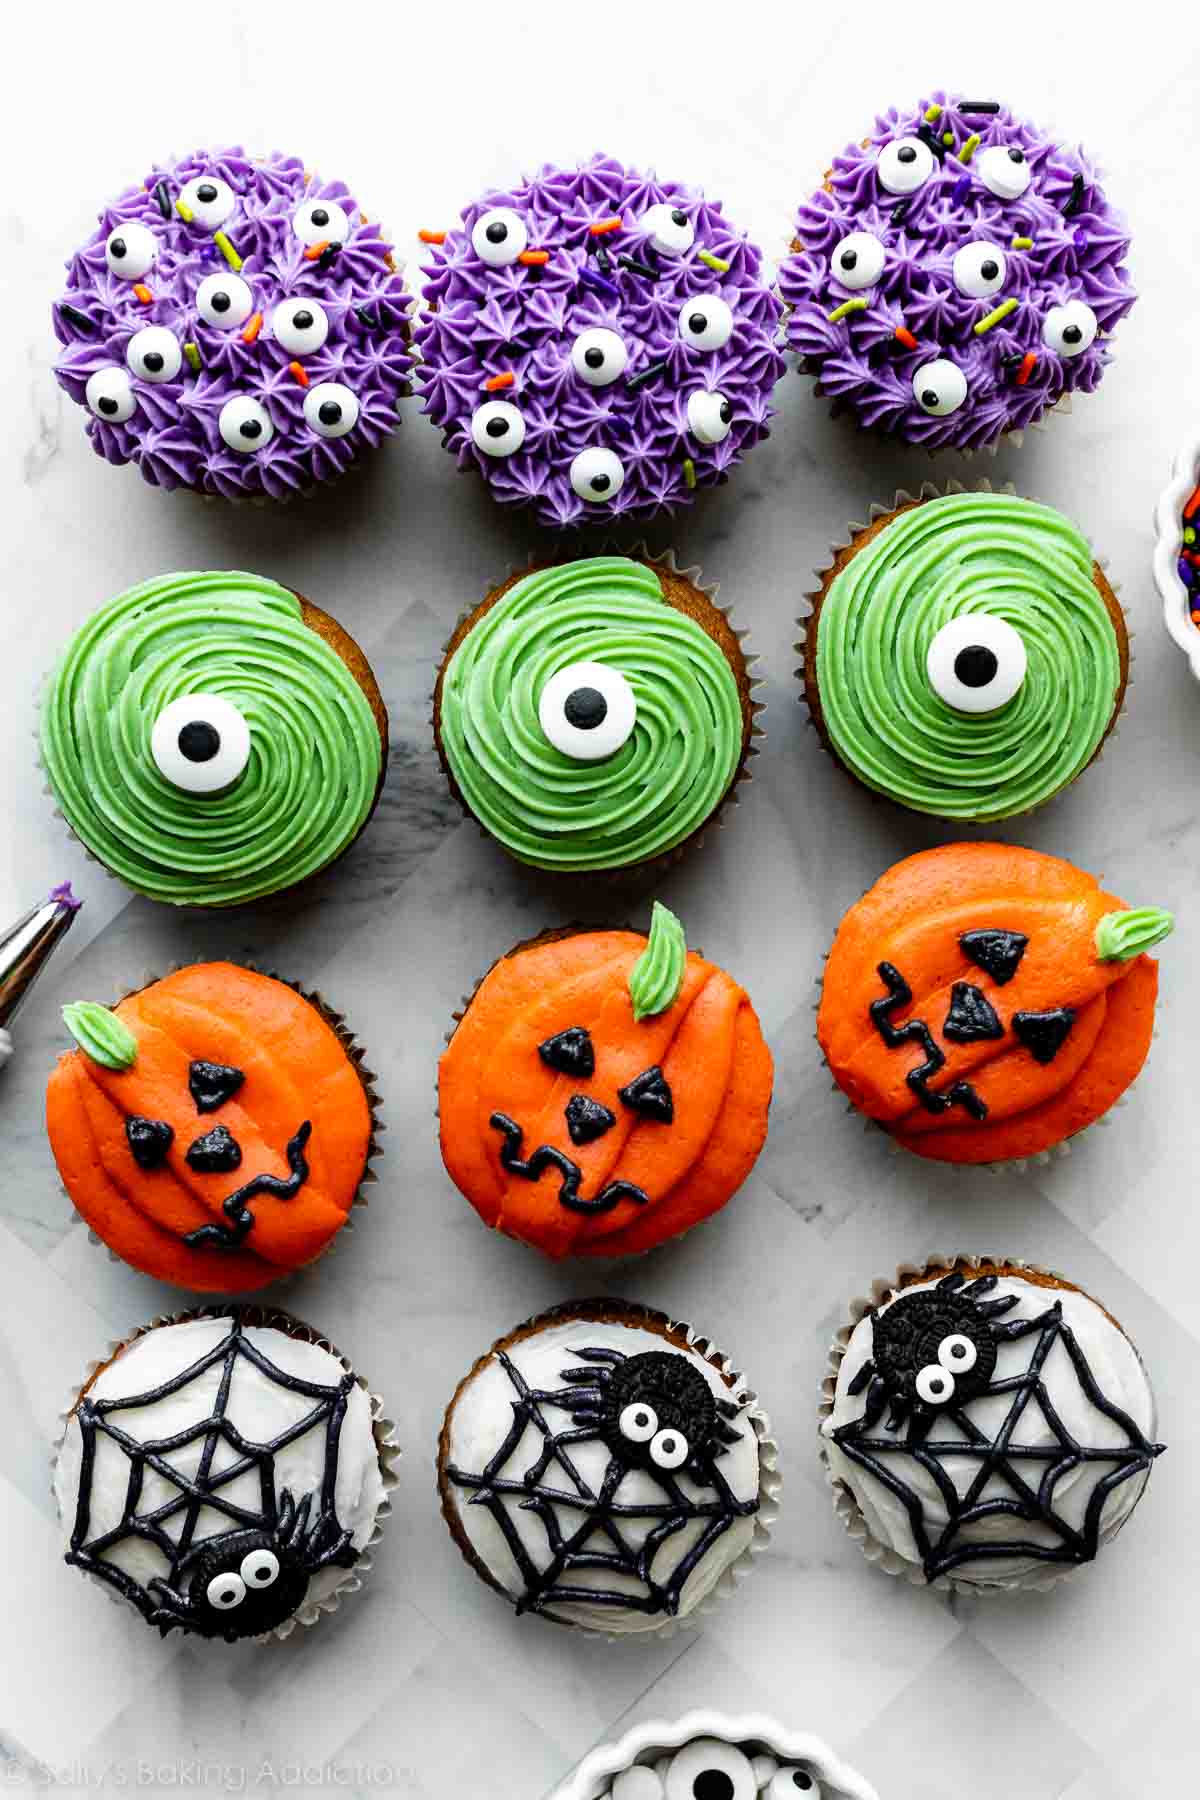
Using piping tips doesn’t have to be frightful! These cute Halloween cupcake designs are simple enough for decorating beginners. Using a small handful of piping tips, a batch of cupcakes, frosting, gel food coloring, and some candy eyeballs, I created 4 different designs:
- Purple Monsters
- Green Monsters (channeling Mike Wazowski here)
- Jack-O’-Lanterns
- Spiders
Save your fear face for the haunted house and let’s get started!
Start With Your Favorite Cupcakes
The Halloween cupcakes pictured in this post are pumpkin cupcakes. However, you can use any flavor such as: vanilla cupcakes, chocolate cupcakes, red velvet cupcakes, confetti cupcakes, or try these delicious cream-filled chocolate cupcakes—you could tint the cream filling orange, or even blood-red for a spooky treat vampires would love to sink their fangs into!
No matter which cupcakes you choose, make sure they are completely cooled before you begin decorating.
Use a Sturdy Buttercream Frosting
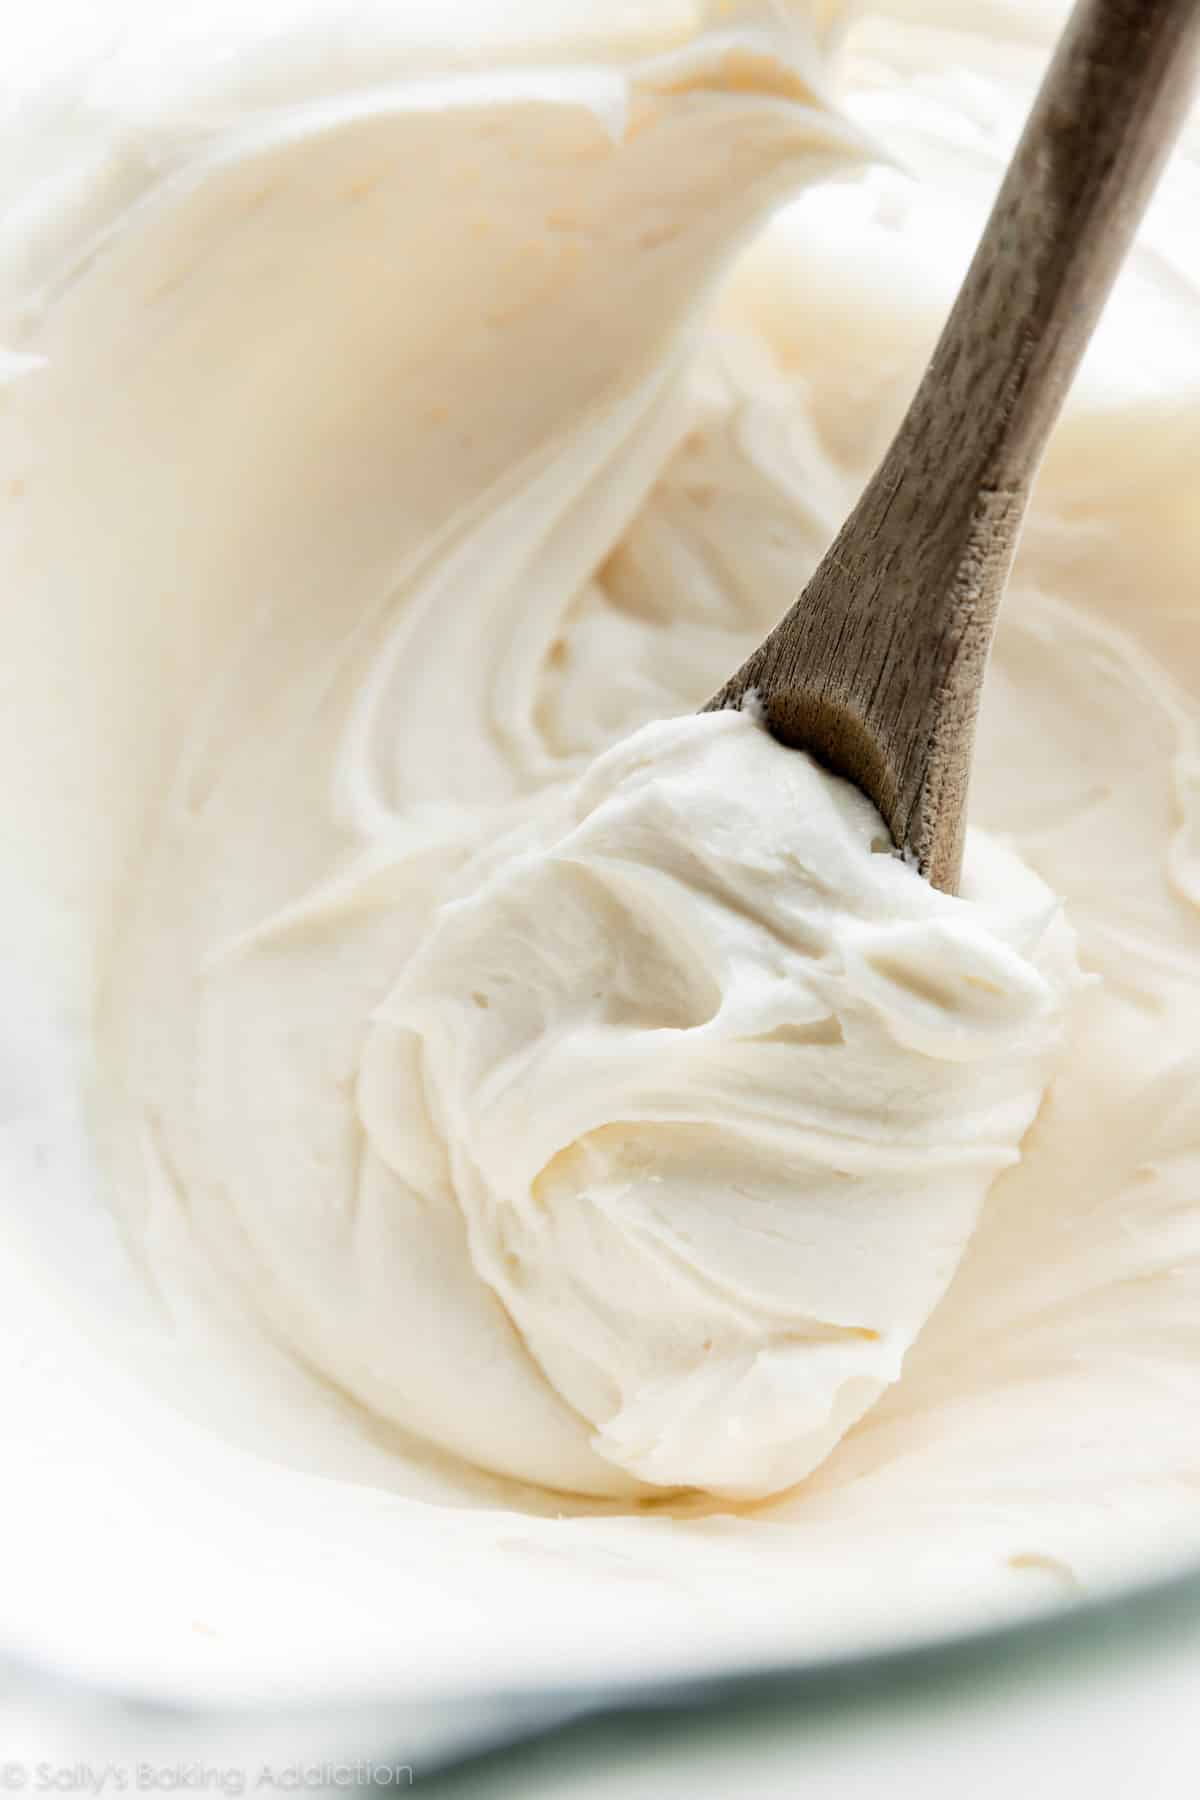
The best frosting option for decorating these Halloween cupcakes is definitely vanilla buttercream. I slightly scaled up the recipe so there’s enough for these fun decorations. You want a very sturdy white frosting that will pipe on easily and hold the detailed designs. If you prefer a less-sweet frosting, you could also use this Swiss meringue buttercream. You could use cream cheese frosting, but the piping won’t be as defined.
I strongly recommend using the vanilla buttercream recipe in the recipe card below. I love it because while it’s sturdy, pipe-able, and tint-able to any color, it’s also sweet, creamy, and tastes great on pretty much any flavor cupcake. Functional as well as tasty—this frosting delivers both tricks AND treats!
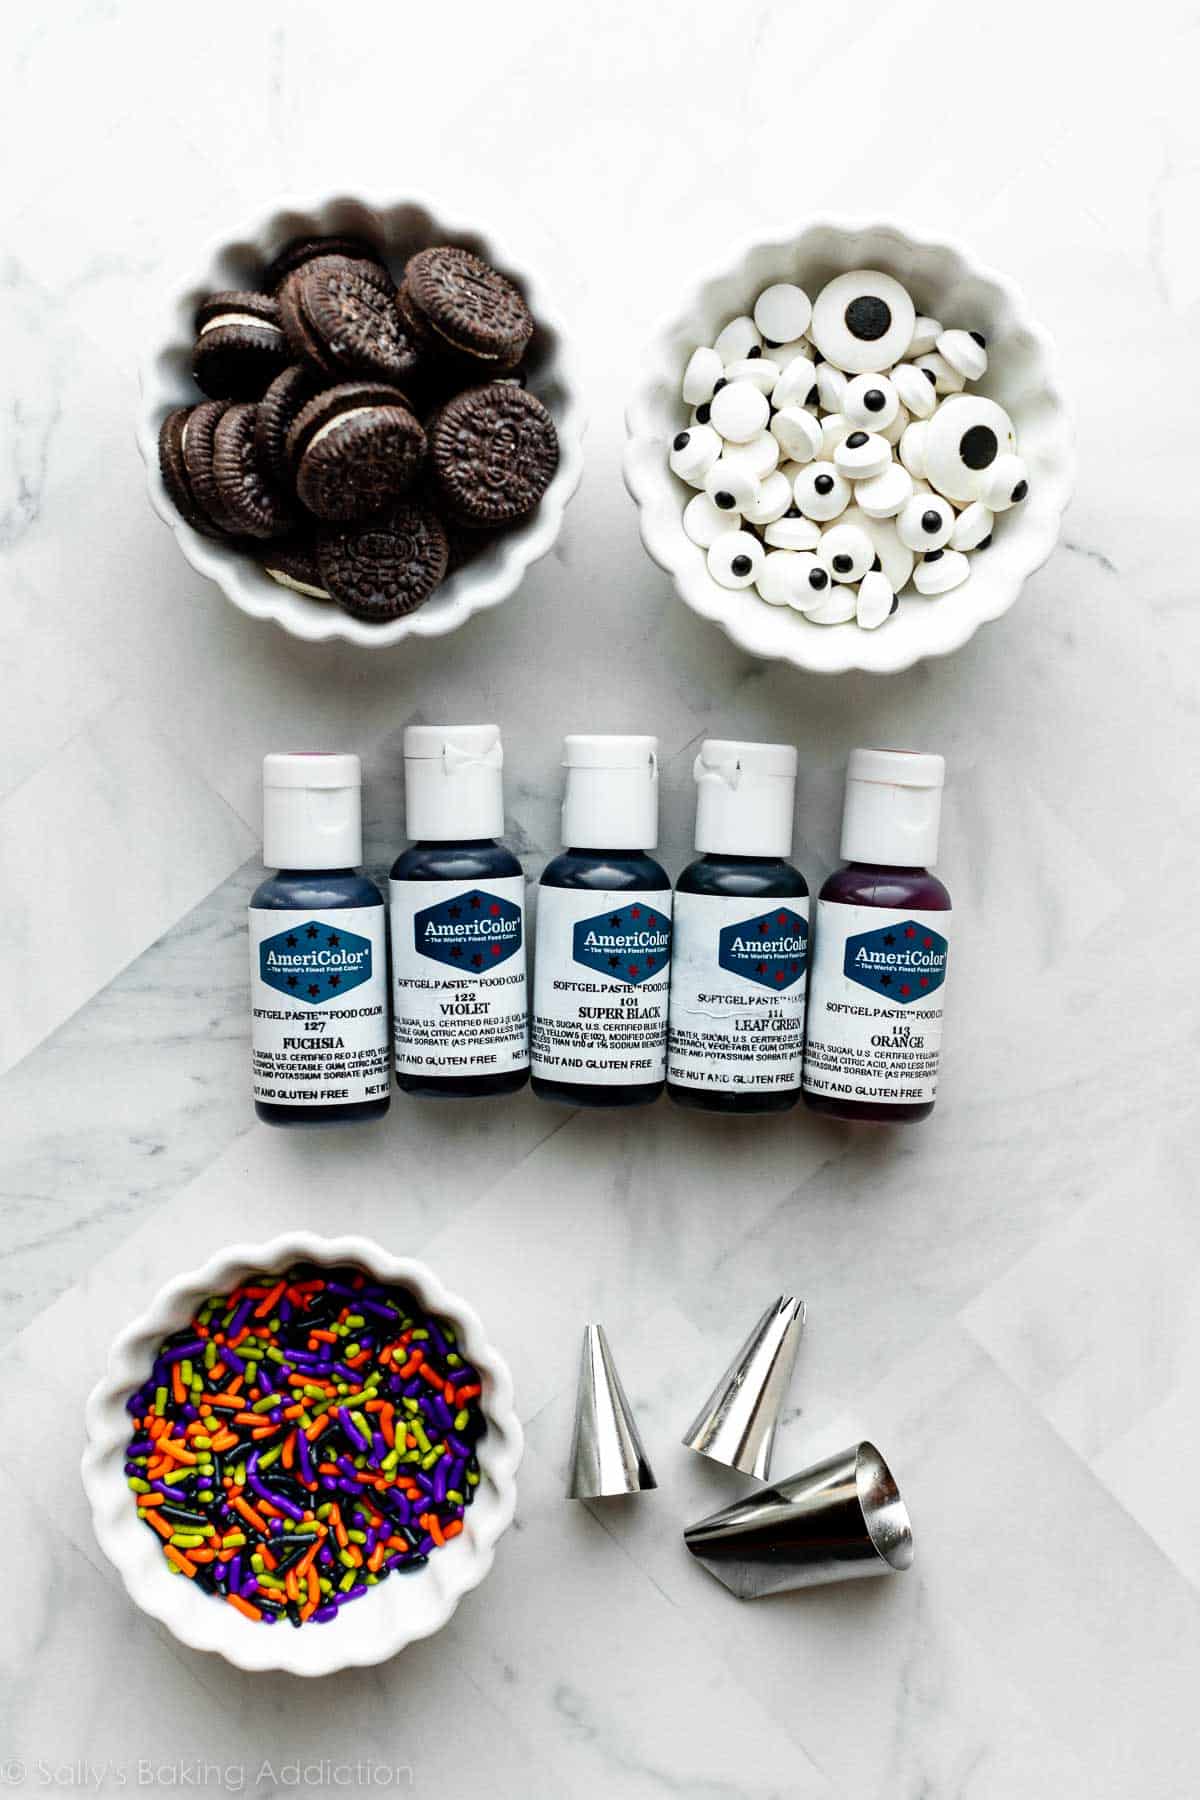
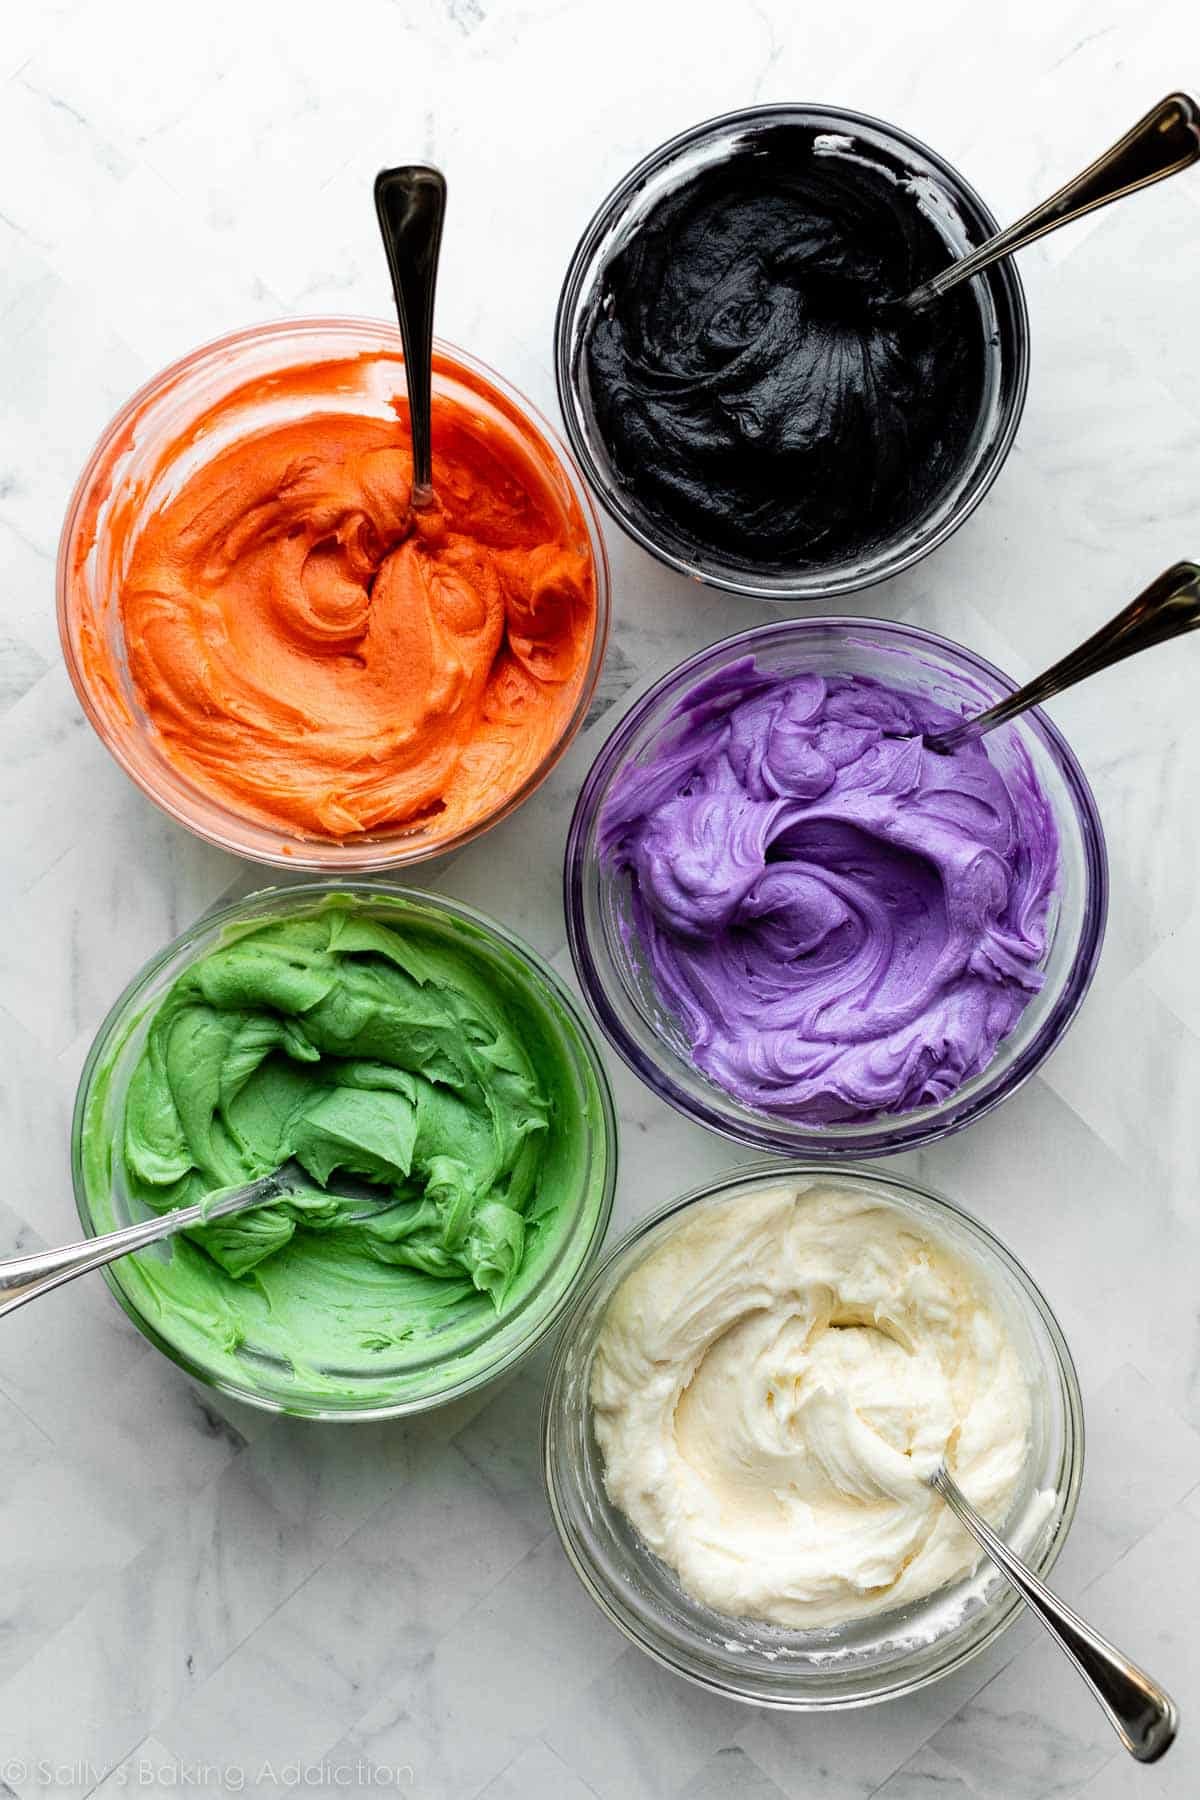
Gel food coloring is ideal and I used Americolor Orange, Leaf Green, Super Black, and Fuchsia + Violet (I used a little of each to make a pinkish purple).
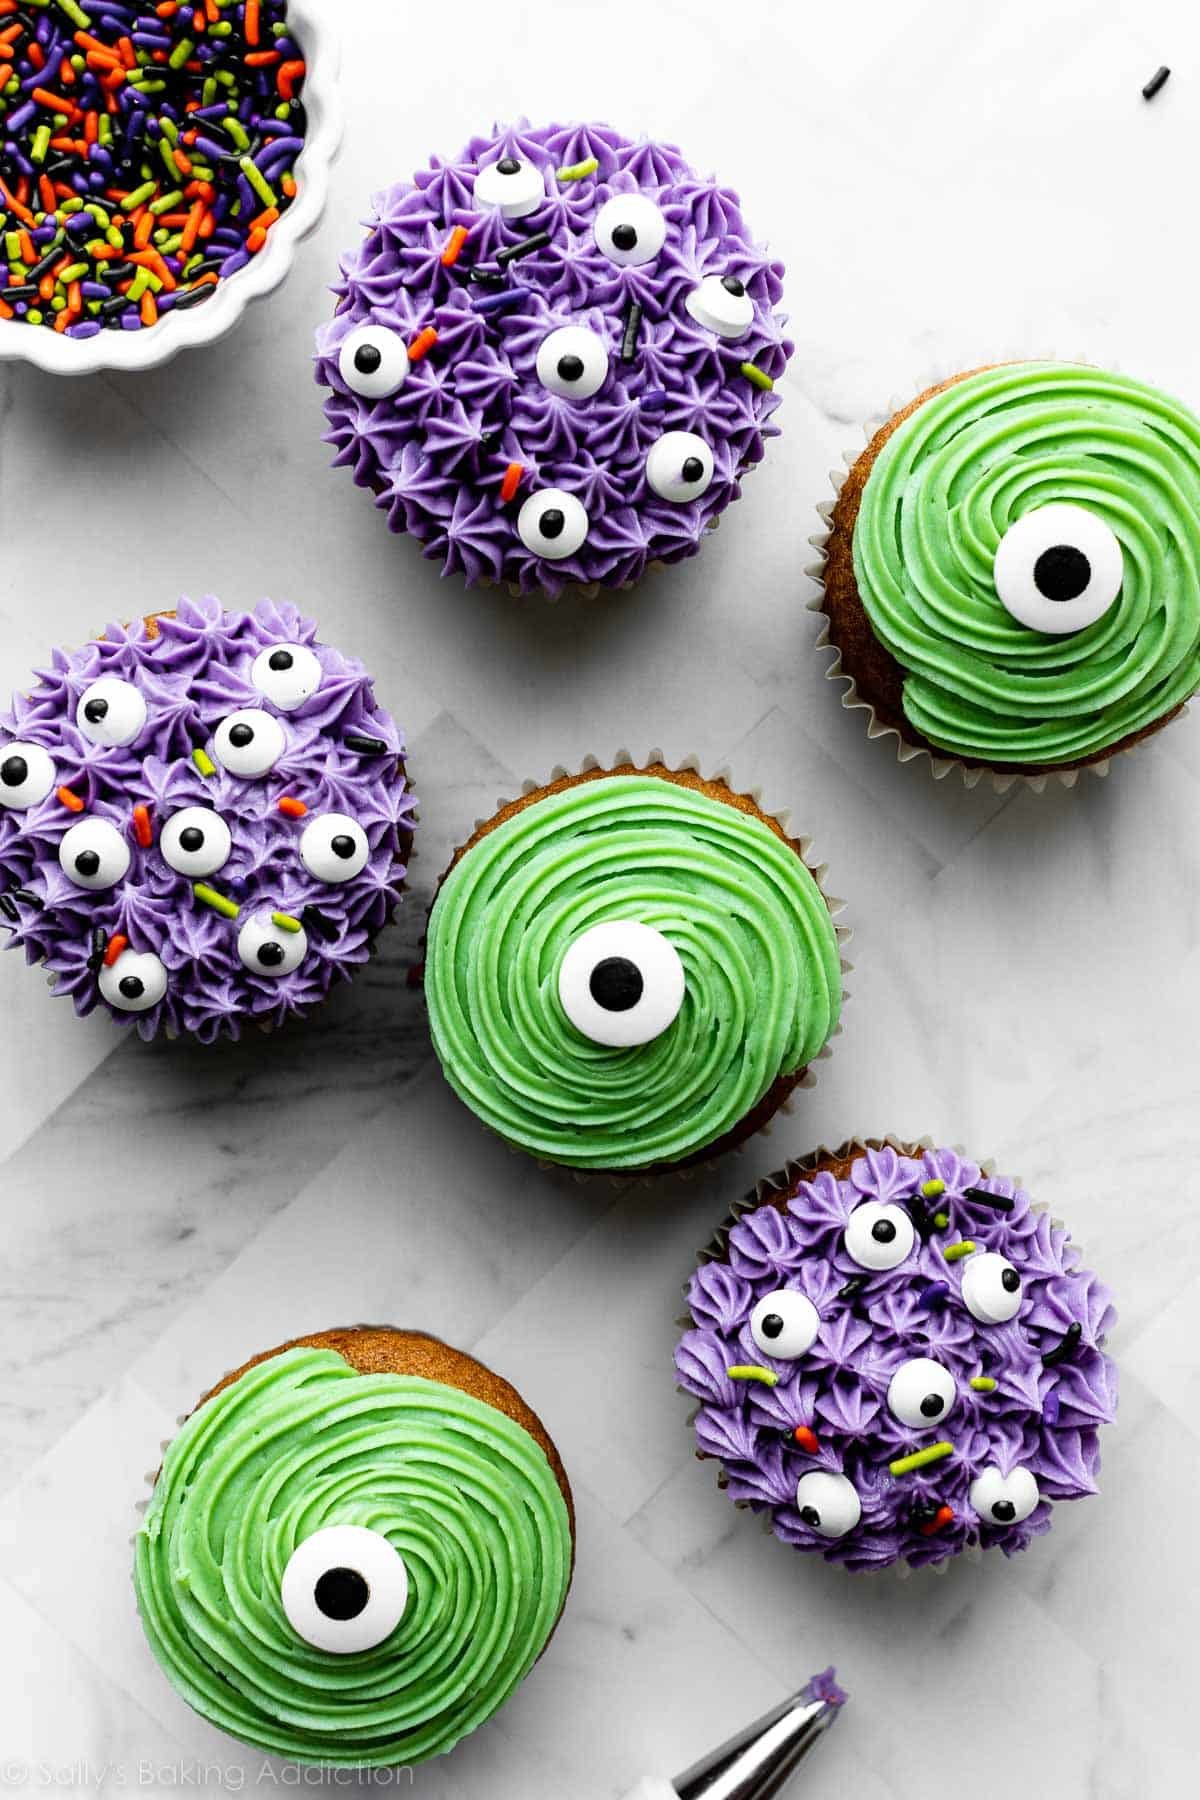
Monster Cupcakes
Aren’t the monster cupcakes so silly? You can make both designs with the same open star piping tip. If you’re also making the jack-o’-lantern cupcakes, you’ll use the same tip for the pumpkin stem. As an alternative look for monster fur, you could use a grass tip like Wilton 233, which is what I use for Cookie Monster cake and Elmo cake.
Here’s everything you need to make both monsters:
- Gel Food Coloring: I use Leaf Green for the green monster. I also use the smallest dot of Super Black to mute the color, since leaf green can be a little neon. For the pictured purple monster, I use Fuchsia + Violet to make a bright pinkish purple shade.
- Disposable Piping Bags or Reusable Piping Bags
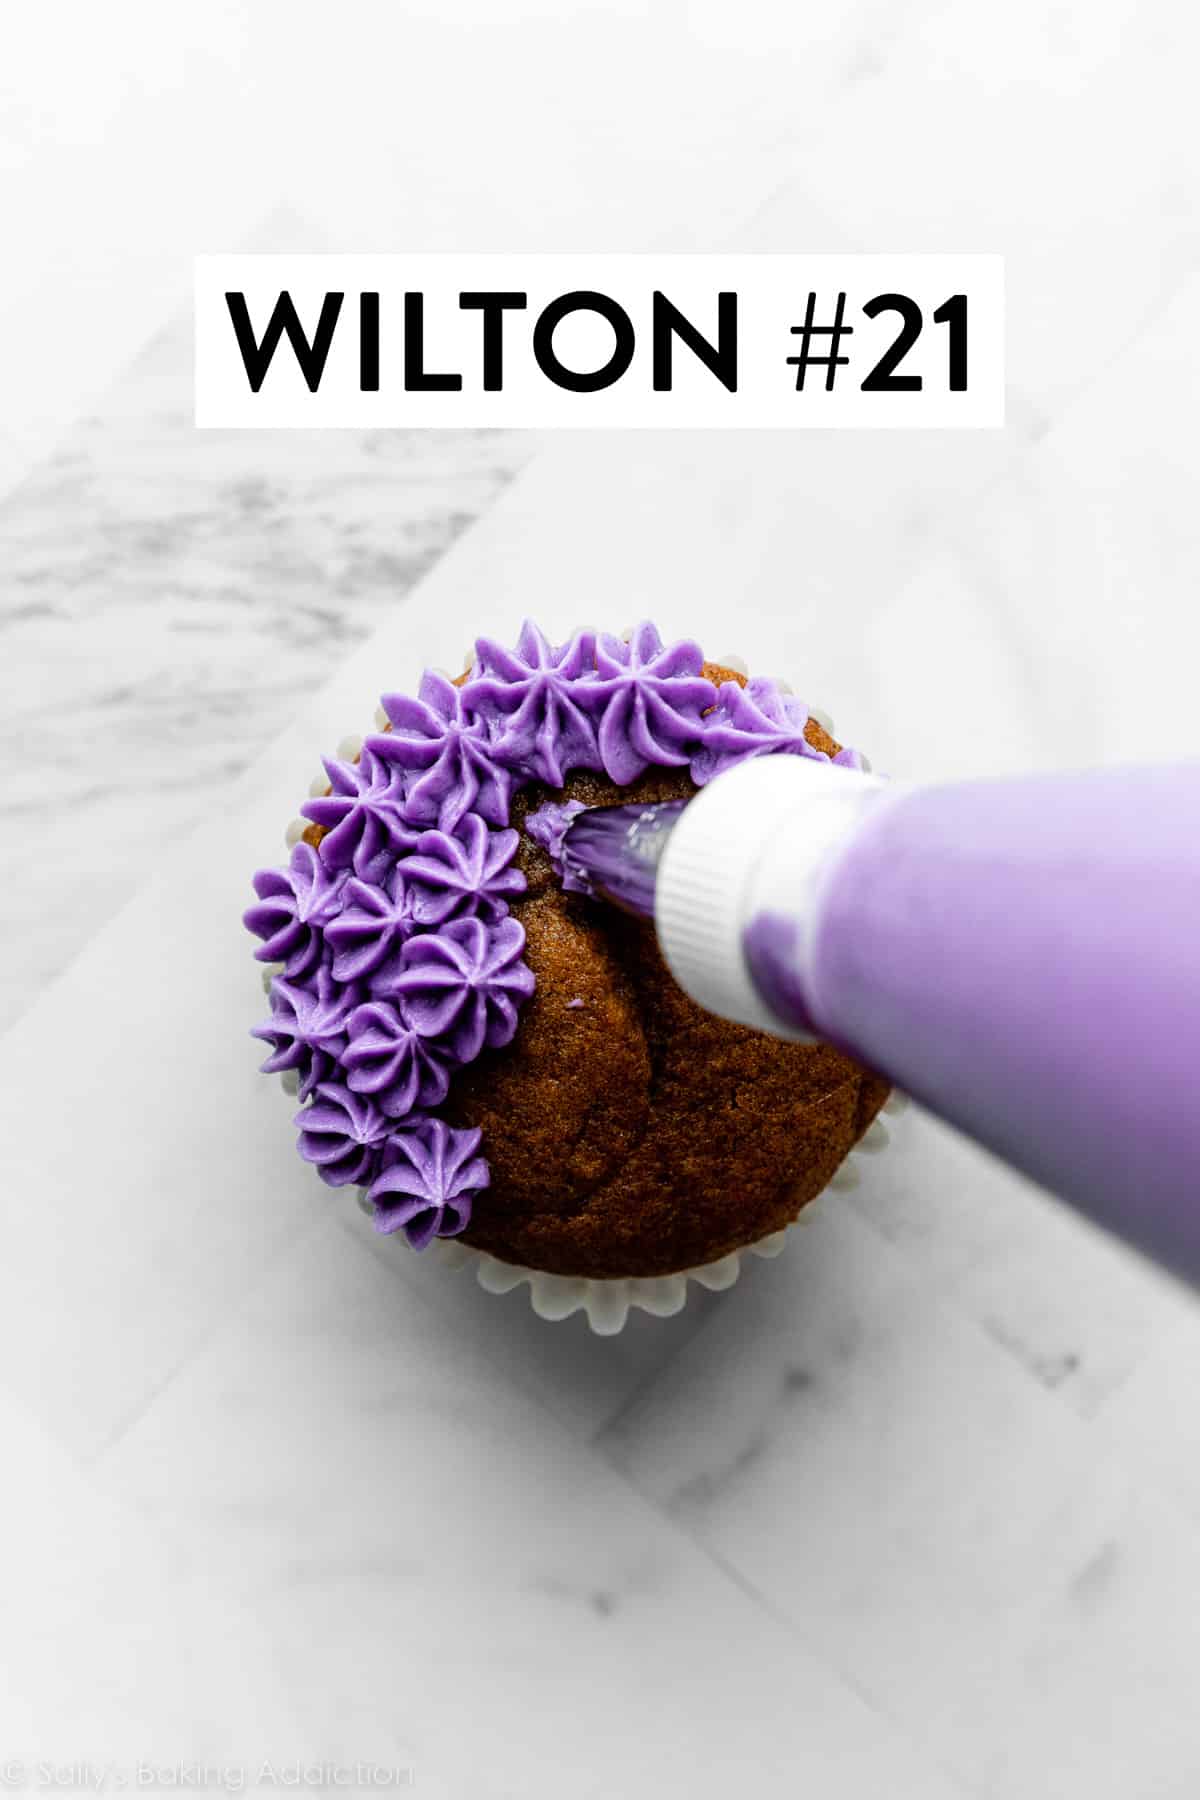
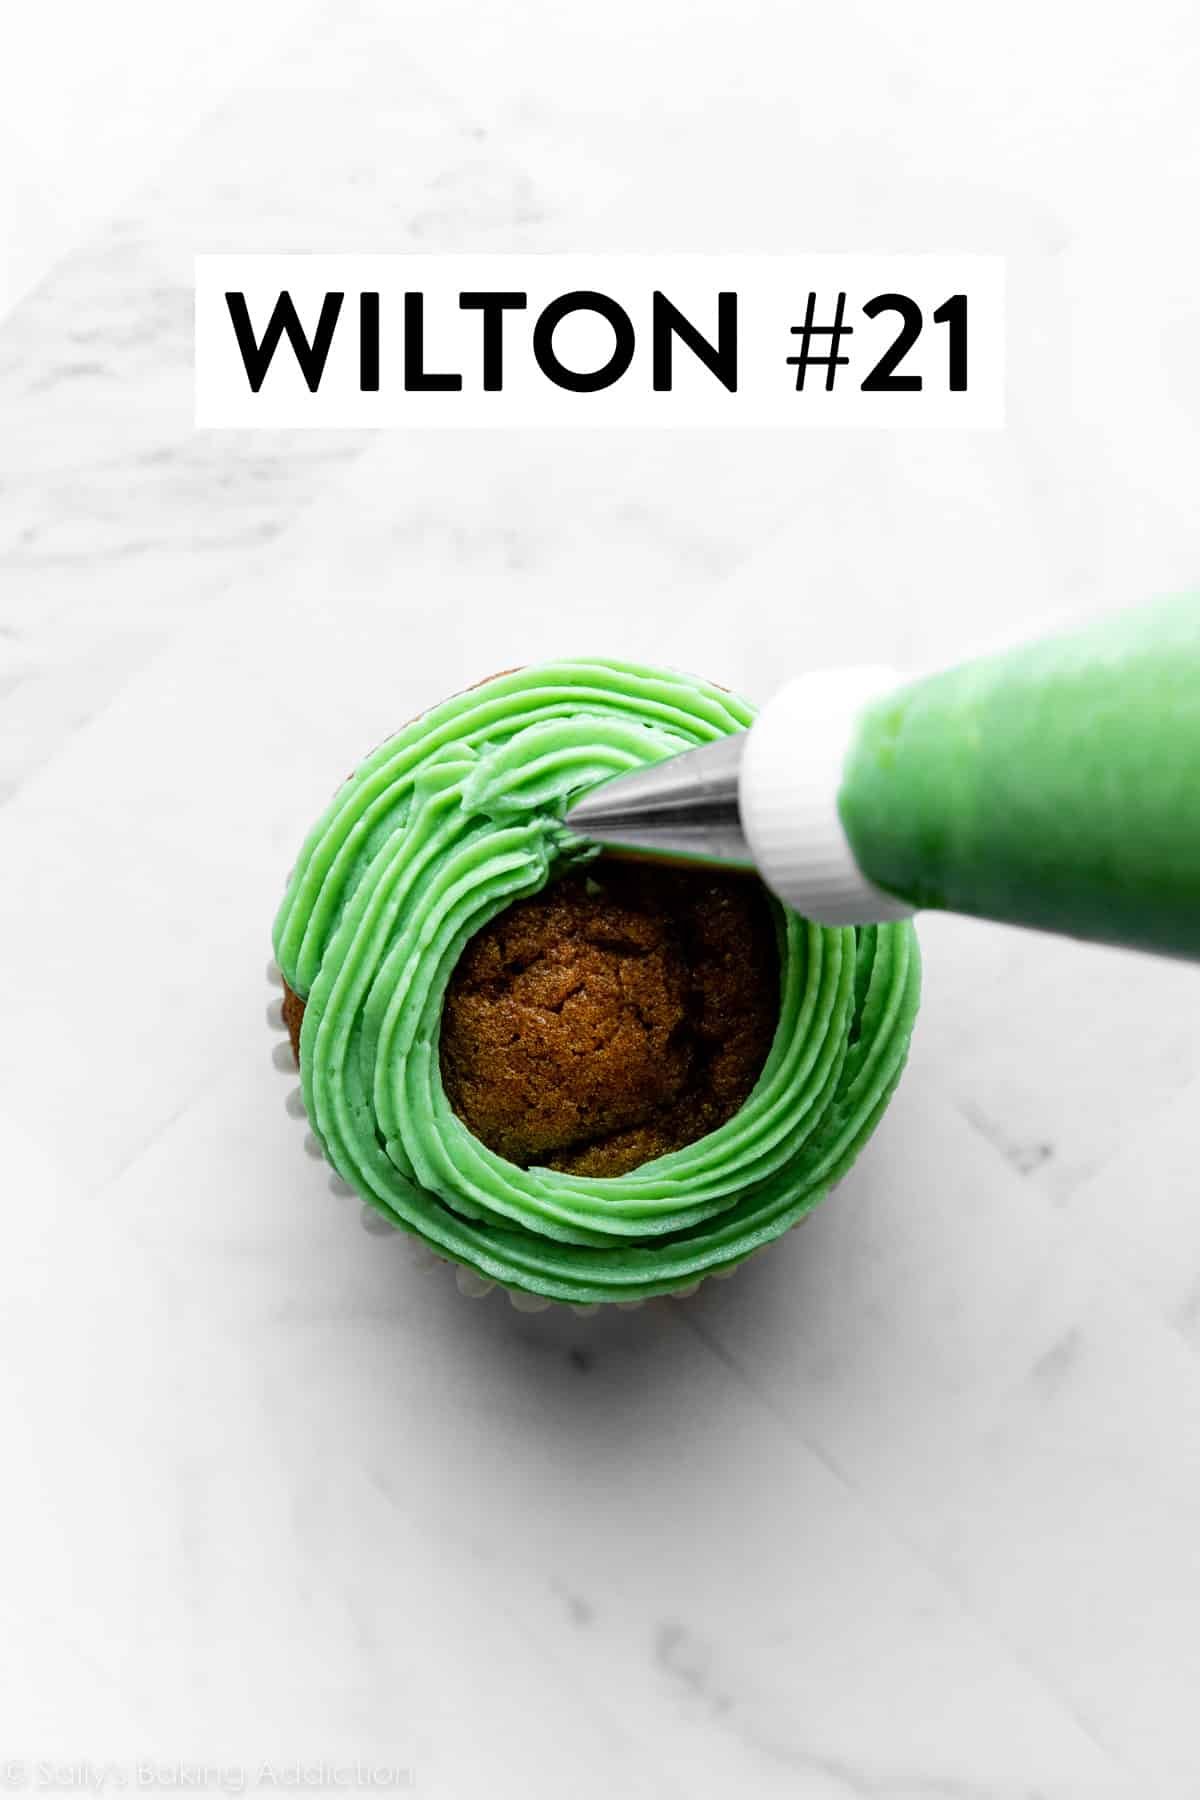
- Open Star Piping Tip: Use Wilton #21 for both monster designs
- Couplers are needed if you’re switching around your piping tips and frosting colors. Because you use the same tip for both the green and purple frosting, a coupler makes it easy to switch the tip between bags of frosting.
- Candy Eyeballs: You need large candy eyeballs for the green monster, and small candy eyeballs for the purple monster. If you can find an assorted size pack of candy eyeballs, that’s the best thing to buy to make these monster cupcakes as well as the spider cupcakes.
- Halloween Sprinkles: Optional, but a fun addition!
For the green monster, you’ll pipe a simple spiral of green-tinted frosting onto the cupcake, then place a large candy eyeball in the center. For the purple monster, you’ll pipe little stars across the surface of the cupcake, the same way you make hydrangea cupcakes for this cupcake bouquet. Add on some small candy eyeballs and sprinkles, and your monsters are ready to party!
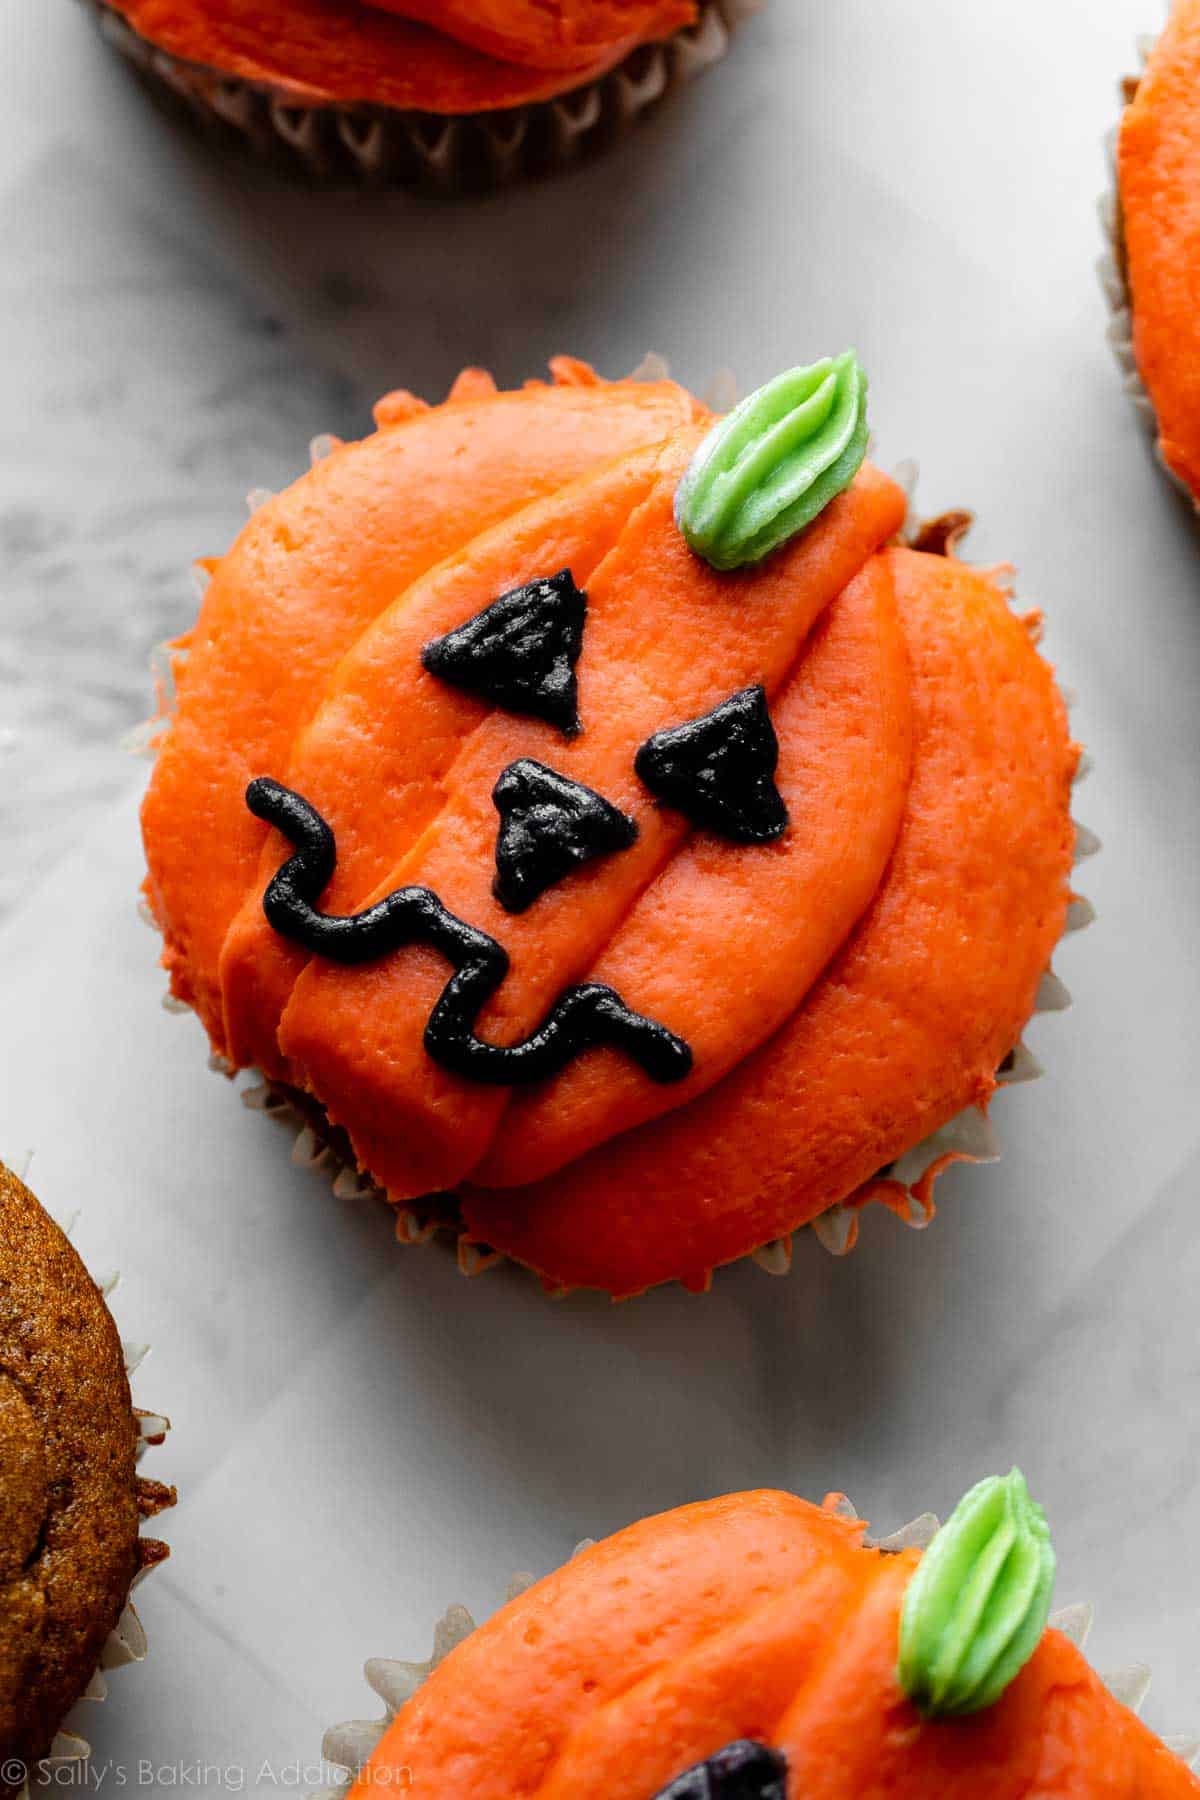
Jack-o’-Lantern Halloween Cupcakes
To make these jack-o’-lantern Halloween cupcakes, you need 3 frosting colors (black, orange, + green) and 3 different piping tips. The great news is that you use 2 of the frosting colors and tips for the other decorated cupcakes. The green monster cupcakes use the same piping bag/tip as the pumpkin stem and the spider cupcakes use the same piping bag/tip as the jack-o’-lantern’s eyes, nose, and mouth.
Here’s everything you need for these jack-o’-lantern cupcakes:
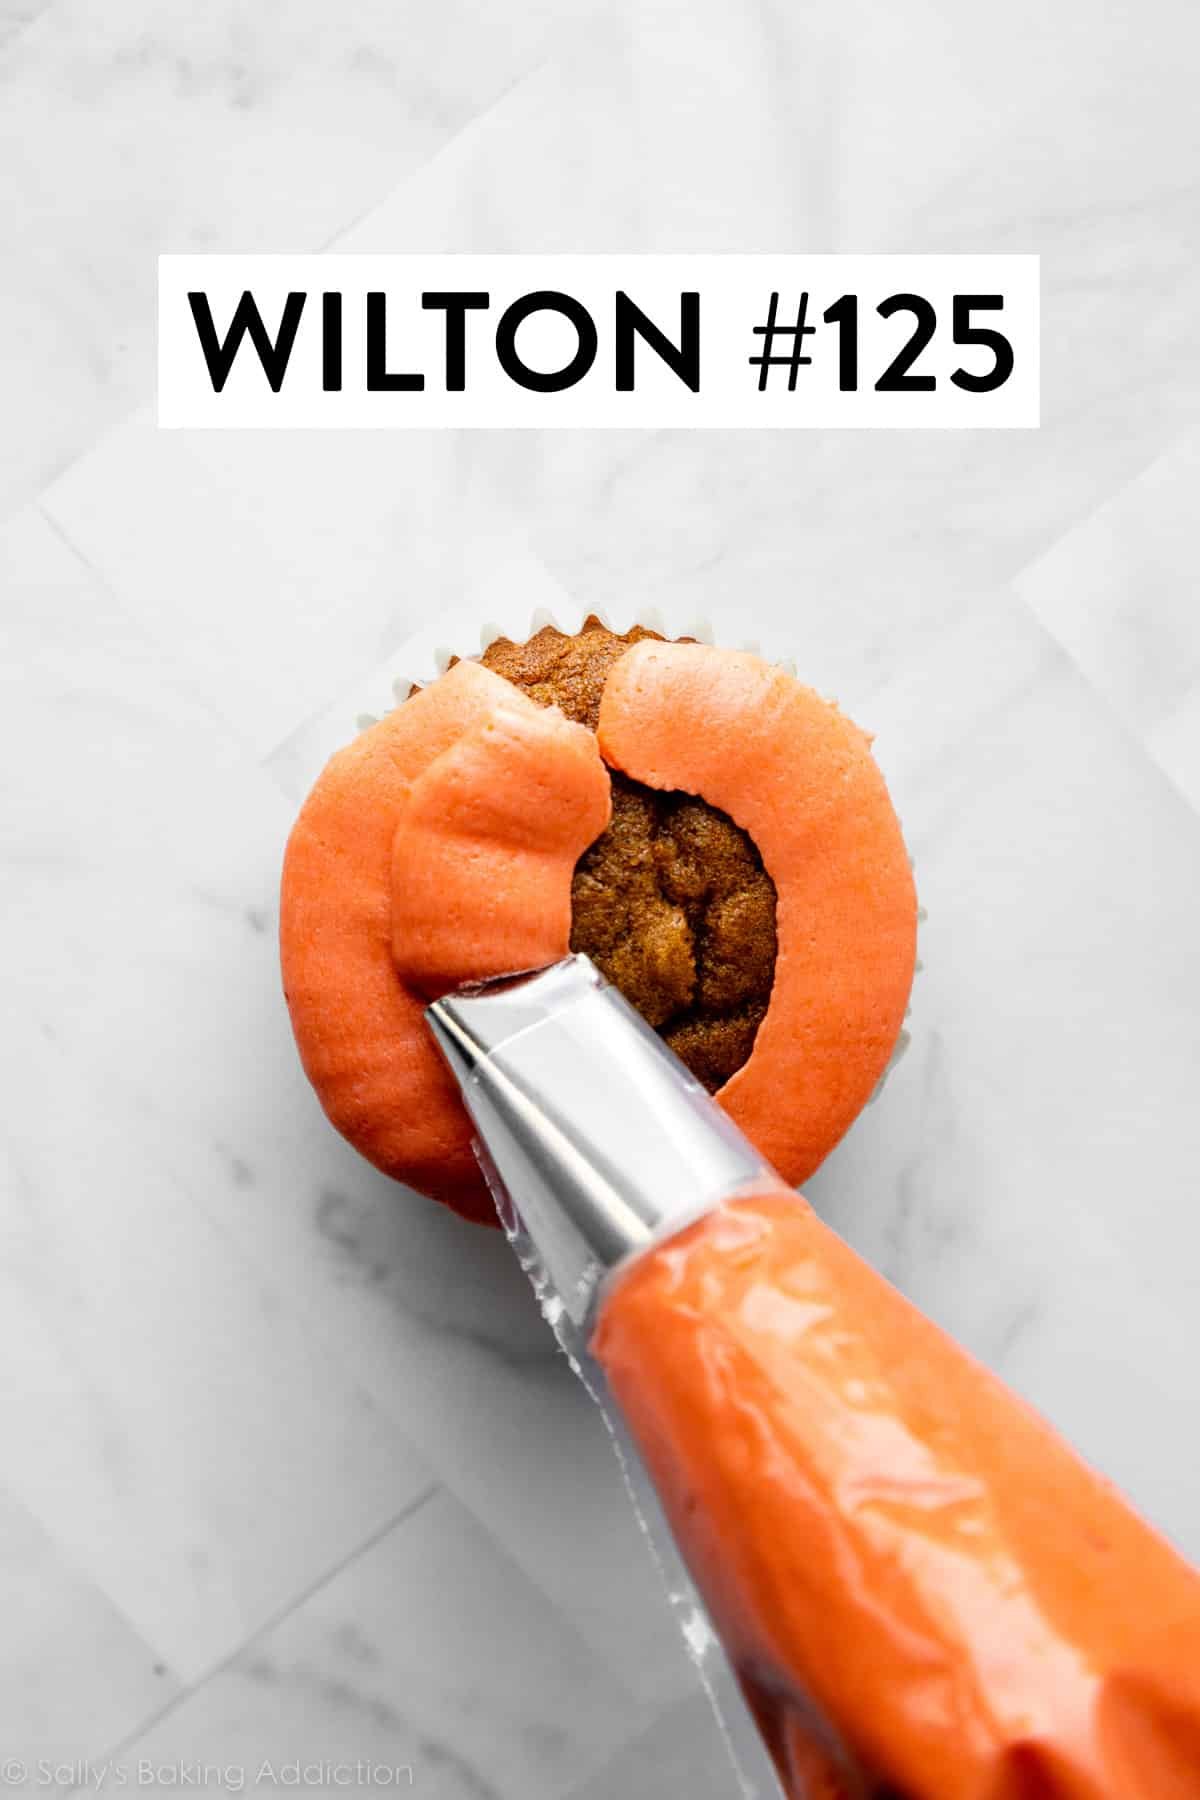
Use the petal tip to pipe the orange frosting on first. Start with the sides and work your way in, finishing with a vertical line down the middle. Add on the green stem. Then use the black frosting fitted with a small round tip to draw on the eyes, nose, and mouth. Make it as goofy or spooky as you like!
Spider Cupcakes
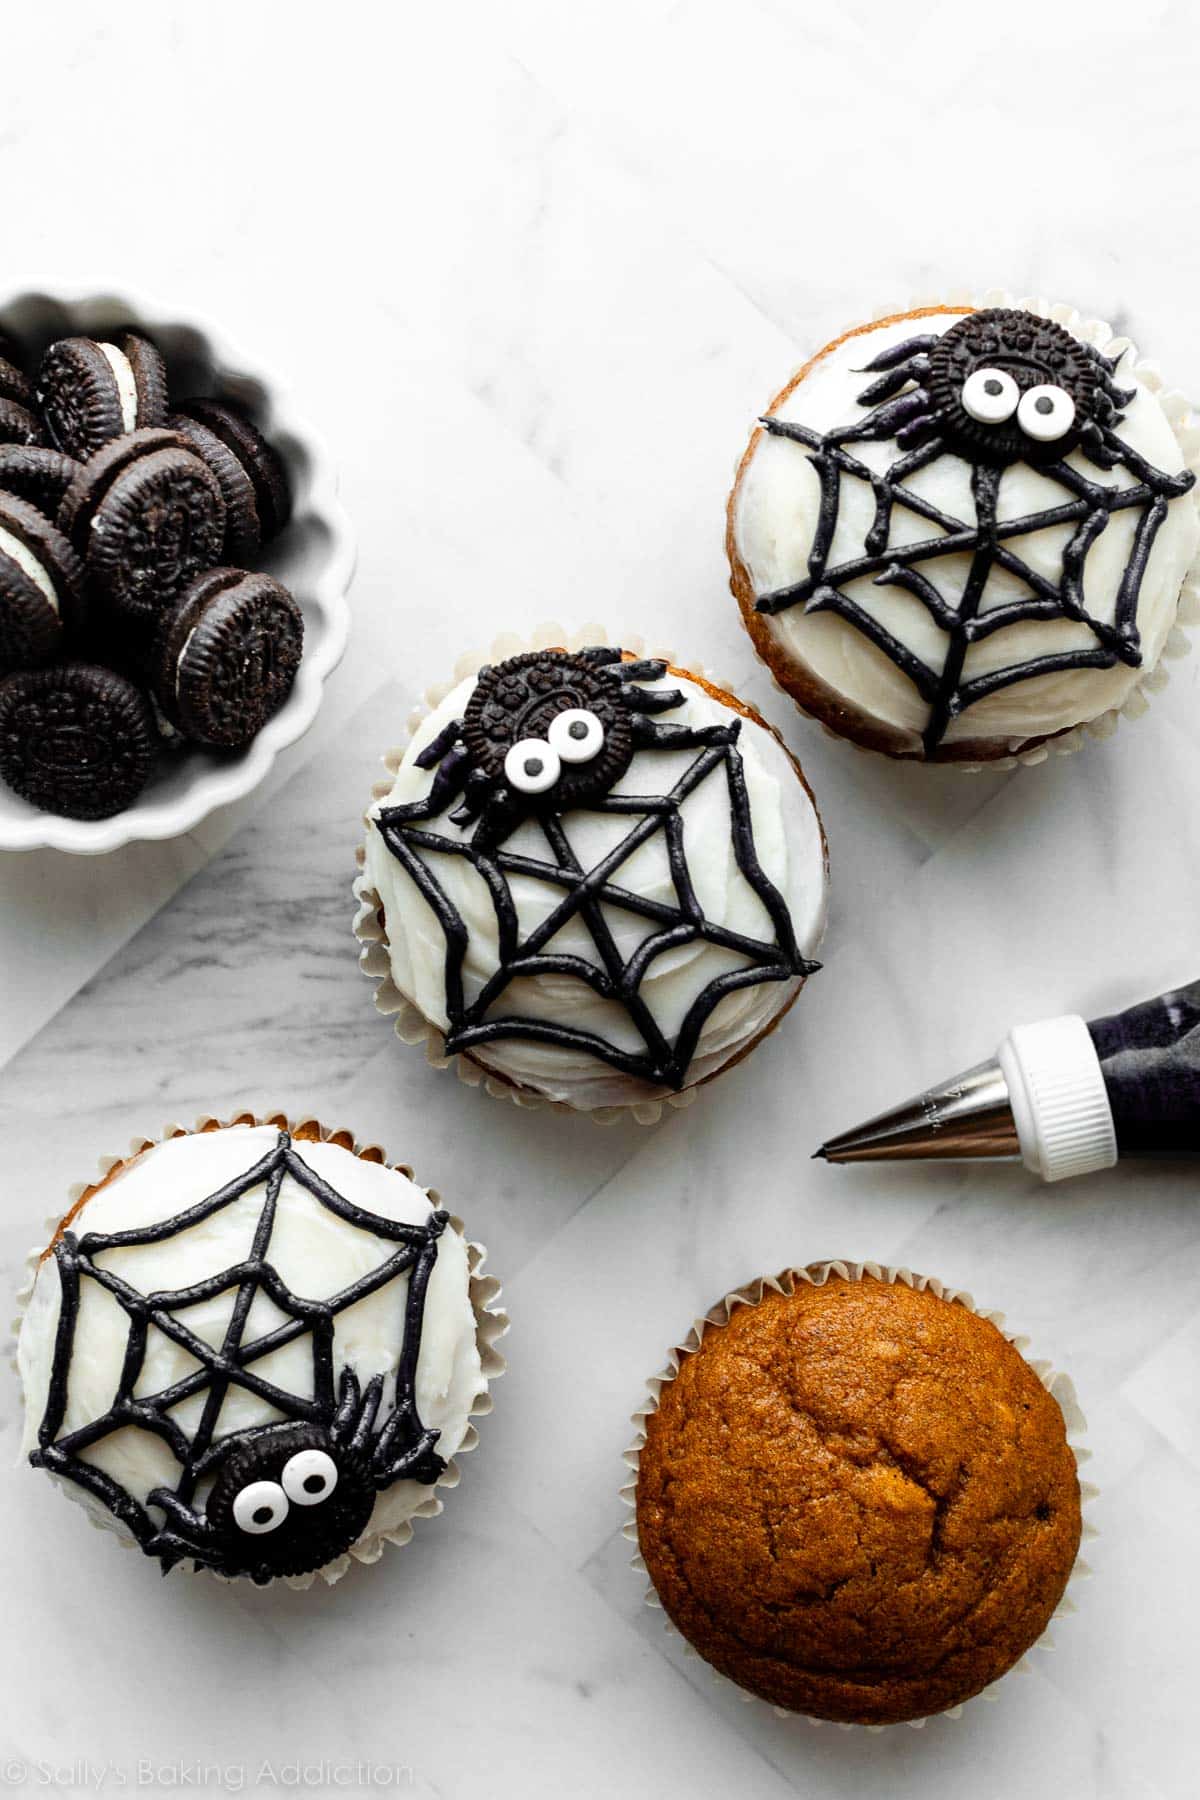
To make these spider cupcakes, you only need white and black frosting and 1 piping bag and small round piping tip. The little spiders are mini Oreo cookies!
Here’s everything you need for these spider cupcakes:
- Gel Food Coloring: Super Black
- 1 Disposable Piping Bag or Reusable Piping Bag
- Small Round Piping Tip: I use Wilton 4
- Oreo Mini Cookies: Twist open the mini Oreos to separate them. I scrape off the filling so that the spider sits a little lower on the cupcake, but you can leave the filling on if you’d like.
- Mini Candy Eyeballs: Use the tiniest ones you can find! Have you ever seen these decorated Halloween cookies before? Use the same teeny eyeballs on the decorated bat cookies. If you can’t find the mini ones, you can substitute ball-shaped sprinkles.
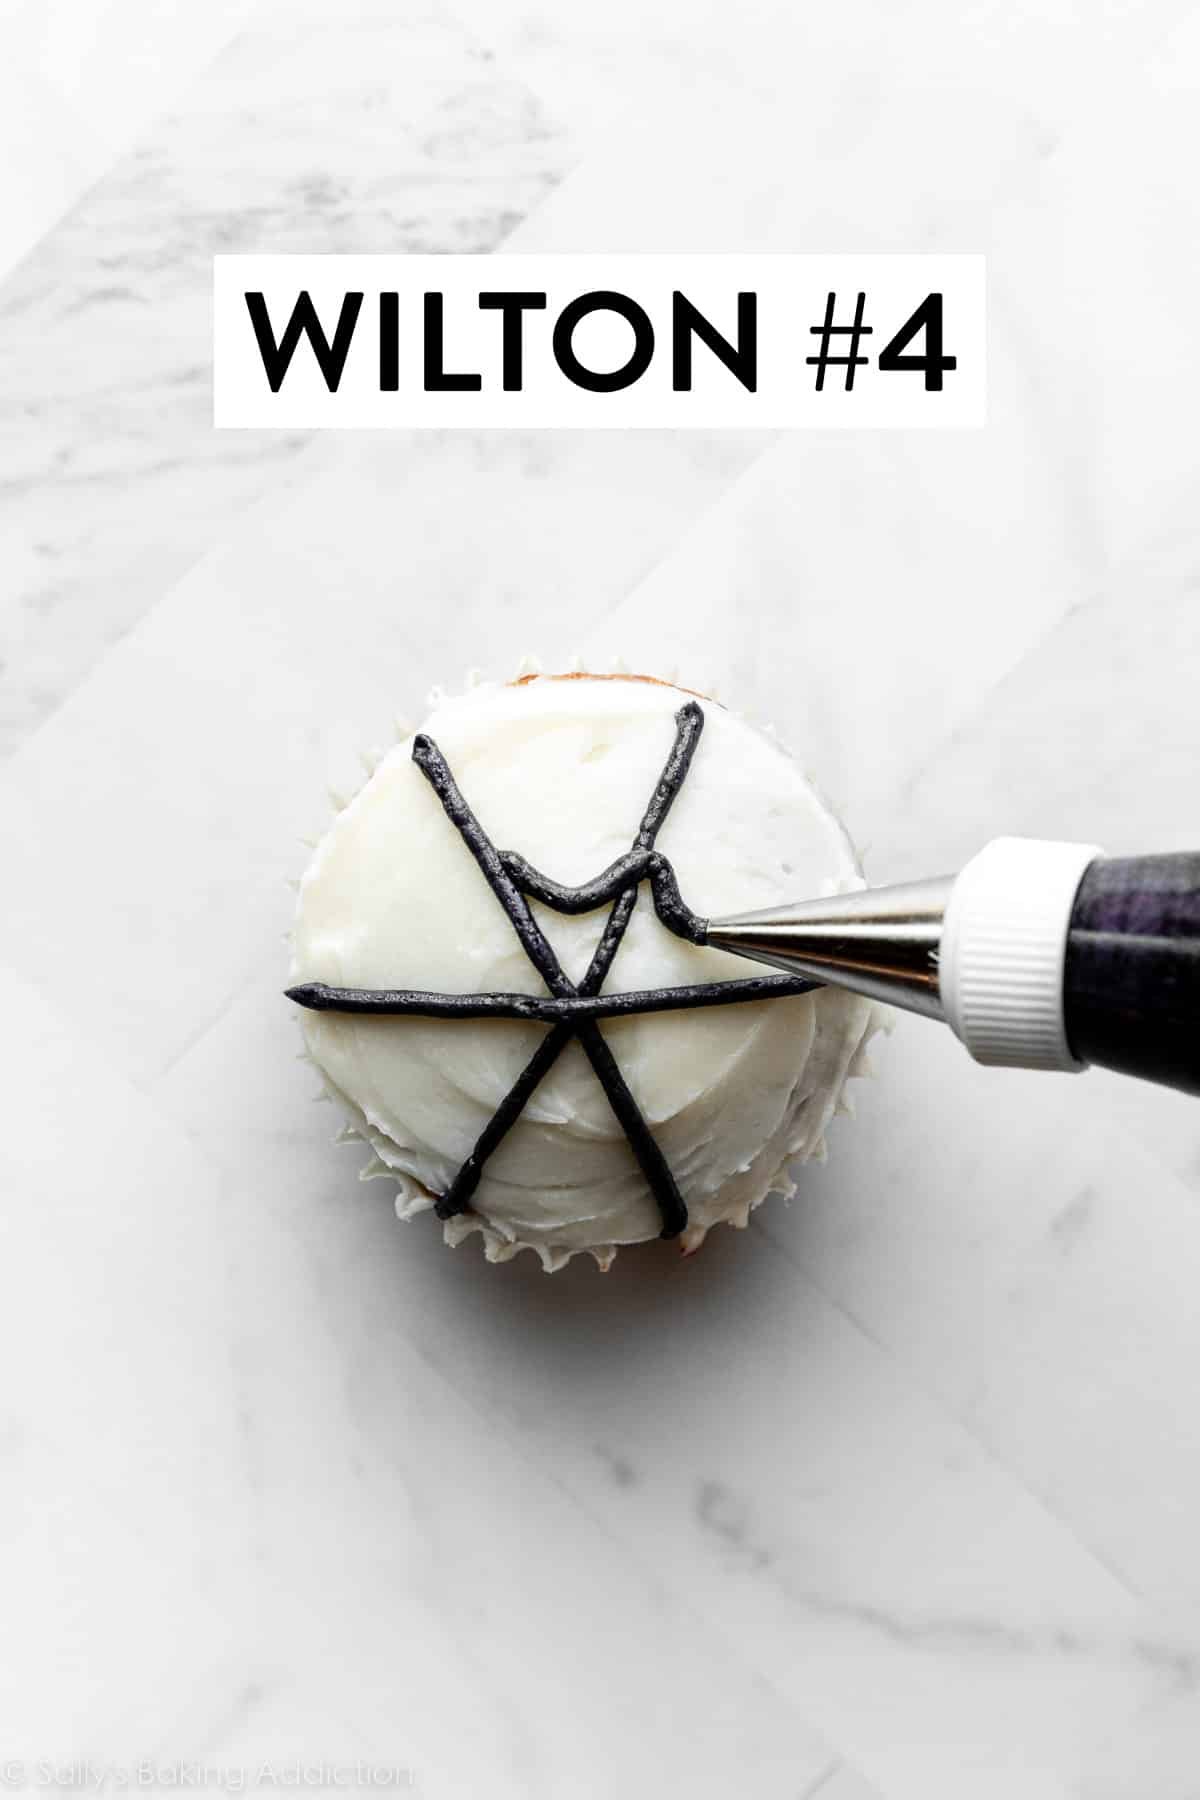
Start by spreading the white frosting onto the cupcake, smoothing it out across the top and around the edges. A small offset icing spatula works best for this, but if you don’t have one, just use a knife. Pipe the black web across the top, then add half a mini Oreo cookie wherever you’d like your spider to sit.
Finally, pipe 2 small dots of black frosting onto the Oreo and gently press the mini candy eyeballs to them to stick. Finish by piping on 8 black frosting legs.
Obviously spider webs are white, so you could swap the black and white frostings here:
Another option for spider cupcakes: Make these cream-filled chocolate cupcakes topped with chocolate ganache. Then use the white whipped buttercream filling to pipe a web on top of the ganache. You’ll need to tint a small amount of the remaining whipped buttercream black to pipe the spiders’ legs.
Frosting Color Success Tips
- Use gel food coloring, not liquid food coloring. Liquid coloring isn’t as concentrated, so you usually need more—and more liquid could alter the consistency of your frosting.
- As frosting sits, it darkens. As icing sits in a piping bag before using AND as it sets on the cupcake, its color darkens. This is the case with most colors, particularly red and black. When I make black icing, it’s usually blue-ish gray in the bowl and piping bag, and then as it dries, it darkens into a fully black shade. Don’t go overboard on adding in food coloring because the color will deepen as the frosting dries.
- Tone down color brightness: To keep colors from looking too neon, add a teeny, tiny drop (I use the tip of a toothpick for this) of black food coloring into your bowl of frosting and mix in well. This helps tone down the brightness of the color, giving you a more muted hue.
- If you don’t want to use food coloring, you can decorate the pumpkin and monster cupcakes with untinted frosting and then cover the surface in colored sprinkles.
Not too difficult, right?
Description
Learn how to decorate Halloween cupcakes with these fun (not-too-scary) monster, jack-o’-lantern, and spider designs. Start by making your favorite recipe for cupcakes and a batch of vanilla buttercream frosting, then watch the video tutorial for a visual decorating demo.
Vanilla Buttercream
Monster Cupcakes
Jack-o’-Lantern Cupcakes
Spider Cupcakes
- Make the vanilla buttercream: See recipe Note before starting, because if you only plan to use 1 or 2 of these designs, you can scale down the buttercream recipe. With a handheld or stand mixer fitted with a paddle attachment, beat the butter on medium speed until creamy, about 2 minutes. Add 5 and 1/2 cups (660g) confectioners’ sugar, the heavy cream, and vanilla extract. Beat on low speed for 30 seconds, then increase to medium-high speed and beat for 2 full minutes. Taste. Add a pinch of salt if frosting is too sweet. I always add 1/8 teaspoon. If you notice a lot of air bubbles in your buttercream, stir by hand with a rubber spatula or wooden spoon to “mash” the frosting up against the side of the bowl, which helps pops the bubbles. Do this until most of the air bubbles pop, about 1-2 minutes. This trick requires a lot of arm muscle!
- Adjust if needed: You can control the consistency of the frosting at this point—add up to 1/2 cup (60g) more confectioners’ sugar if frosting is too thin or more heavy cream if frosting is too thick (add only 1 Tablespoon (15ml) at a time, beat together, then taste and add more if desired).
- Tint the frosting: Divide the frosting into bowls for however many colors you’re making. If you’re making all 4 designs, divide the frosting into 5 bowls—you’ll need less black frosting than other colors. Tint each bowl with a few drops of gel food coloring, stirring well, until you reach your desired shade of color. Keep 1 bowl white for the spider cupcakes. Note that I used 2 colors of gel food coloring (Fuchsia + Violet) to make a pinkish purple for the purple monster cupcakes. If you’d like to tone down the brightness of any color, use a toothpick to add a tiny dot of black gel food coloring to the bowl, then stir well. Remember that the color will continue to darken as the frosting sits.
- Continue with the instructions below for each design.
- Green Monster Cupcakes: Fit a piping bag with a small open star piping tip (I use Wilton #21), and a coupler, if using. Fill the piping bag with green frosting. Starting from the outside and working your way in to the center, pipe a spiral onto the cupcake. Place a large candy eyeball in the center, tapping it down gently so it sticks to the frosting.
- Purple Monster Cupcakes: Fit a piping bag with a small open star piping tip (I use Wilton #21), and a coupler, if using. Fill the piping bag with purple frosting. Using steady, medium pressure, begin piping stars all over the surface of the cupcake until it’s covered. Gently press small candy eyeballs into the frosting, and finish with sprinkles, if desired.
- Jack-o’-Lantern Cupcakes: Fit a piping bag with a large petal tip (I use Wilton #125), and then fill with orange frosting. Fit a piping bag with a small open star tip (I use Wilton #21), and then fill with green frosting. Finally, fit a piping bag with a small round tip (I use Wilton #4), and then fill with black frosting. Start by piping on the orange frosting. Starting on one side, pipe a rounded line from top to bottom, following the curve of the cupcake. Repeat on the other side, then work your way in towards the center, alternating sides, finishing with a vertical line down the center. Use the green frosting to pipe on the pumpkin stem. Use the black frosting to pipe on the eyes, nose, and mouth. Make it as goofy or spooky as you like!
- Spider Cupcakes: You only need white and black frosting for this. Fit a piping bag with a small round tip (I use Wilton #4).Fill the piping bag with black frosting. With a small offset icing spatula or a knife, spread the white frosting onto the cupcake, smoothing around the outside and across the top. To make the web, use the black frosting to pipe 3 criss-crossing straight lines across the top, so you have 6 triangle-shaped sections. Connect them with slightly curved lines, 2 between each section, to make a web. To make the spider, place half of a mini Oreo cookie onto the web, gently pressing it into the frosting so it sticks. Pipe 2 tiny dots of black frosting for the eyes, then stick 2 tiny candy eyeballs to the black frosting dots. Finish by piping 4 black lines on either side of the Oreo, to make 8 little spider legs.
- Store at room temperature, uncovered, for up to a few hours before serving. See make ahead instructions below for more details. Cover and store leftover cupcakes in the refrigerator for up to 5 days. I recommend a cupcake carrier for storing and transporting decorated cupcakes.
Notes
- Make Ahead Instructions: These cupcakes are best served the day they’re made, because the “pupils” of the candy eyes get a bit runny the longer they sit. If you need to decorate them the night before serving, keep them uncovered. Cupcakes can be made ahead 1 day in advance, covered, and stored at room temperature—but I recommend decorating them the day you plan to serve them.
- Confectioners’ Sugar: If your confectioners’ sugar is particularly lumpy, I recommend sifting it 1–2x before measuring and using.
- Heavy Cream: I love using heavy cream for the creamiest consistency. You can use half-and-half or whole milk instead if needed. The lower the fat, the less creamy your buttercream will be. Whichever you use, make sure it’s at room temperature. Otherwise your frosting could separate or appear grainy.
- Vanilla Buttercream: The amount of frosting in this recipe yields about 4+ cups. If you’re only using 1 or 2 of the designs, the amount of frosting in this vanilla buttercream recipe would be plenty. If you plan to use all 4 designs, then use the amount above. If you need some extra tips or troubleshooting advice for the frosting, see the vanilla buttercream post.
Keywords: Halloween decorated cupcakes
Subscribe
Baking Made Easy
Are you new to this website? This email series is a great place to start. I’ll walk you through a few of my most popular recipes and show you exactly why they work.